Carlossalinas
New member
- Joined
- Jun 24, 2022
- Messages
- 3
[REPAIRED]
Hello all,
I hope I managed to repair my broken OBC. Many thanks to you guys on this forum. The symptoms were very similar to ChristopheFR's case, so I borrow his post, do some editing to save time and continue my story.
My name is Karel, and I am the proud owner of a C-zero in Czech Republic since 2015,
My Z totals 105,000 km, it is 2012, imported from Germany, used every day.
One morning in June, I realize that my “Z” is not ready . I think charger died due to the heat this summer, over 32 °C in the garden while charging. I was able to change on the Chademo socket nearby. No error on dashboard.
The apparent diagnosis: when I plug my charging cable, the green charging light on the cable box comes on for several seconds, I hear a few clicks to the cable and to the car, the car's blower starts a few seconds, then everything stops, no blower, no green light on the cable, and no fault on the cable or on the dashboard.
With the ignition key open, when I take the voltage across the auxiliary battery, I get 12.4 volts
With the ignition key closed, I get 14.5 volts.
At December 2020 my original accessory battery died, so I changed it.
-----------------------------------------------------------------------------------------------------
...while doing autopsy I found out one 4R7 resistor on the lower PCB in dog-house was broken and 2,2uF capacitor beside was partialy melted. So after connecting the charger the circuit was not charged through 2x4R7 resistors and charger ended the session without any visible error indication (i have no OBD error-diagnostics).
I did not want to waste time getting the PCB out and desolder the waffle plate, so i connected 4x 4R7 3W resistors in series between the "measure points", where you should normally measure 9,4 Ohm (pin N of waffle plate on white bar and cable named N00 connecting upper and lower PCB).
It started charging, but stopped after 1 hour. 1 blue 1nF/2000V capacitor got blown and 20A DC fuse in the MCU box got blown too.
So I disconnected my 4x 4R7 3W resistors set, took lower PCB out, desoldered waffel plate and replaced all components in dog-house but the coil: 2x 4R7 5W resistors, 2u2 310V capacitor, 2x 1nF 2kV capacitors, relay. Then I replaced 20A fuse in MCU box with 2 wires and a photovoltaic circuit breaker with fuse 15A/1000VDC.
It did not start charging, 2x 4R7 resistors in doghouse went blown. Then I almost ordered used unit for 1050 Euro from B-Parts.com, but I decided to give it one more try the next day.
Next day I connected again my 4x 4R7 3W resistors set and it started charging immediately !! But after 5 minutes charging stopped from powermeter's point of view. From user's point of view everithing was ok, charge cable indicating charging in progress, charging indication in car was on.
To be short, there was unexpected charging pause but then everything continued to happy end and fully charged pack.
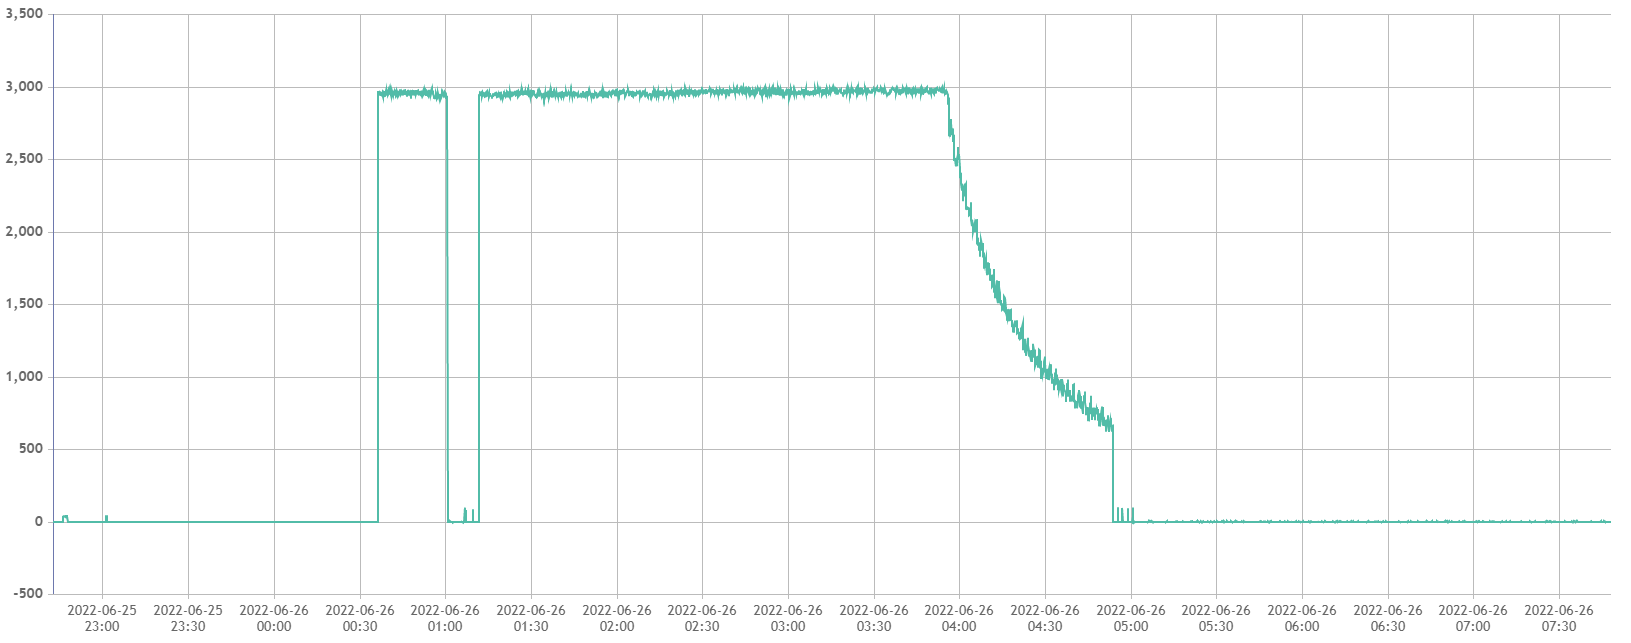
Next day I added 5nF/5kV capacitor to those 2nF/2kV (C121, C122) in doghouse (not sure why...for more stability ??) and did 1 more power cycle: discharged battery by heater on, AC on, seat heating on and blower to max. At SOC 7% I plugged the original 14A charger and recorded the power session. There is 11minute charging pause at T0+25min. Do you think it is normal?

My conclusion up to now: only passive components went wrong due to overheat in combination with ageing
charger p.n.: 9499A437 v110 2011.04.02
Thanks again and good luck
Karel
Hello all,
I hope I managed to repair my broken OBC. Many thanks to you guys on this forum. The symptoms were very similar to ChristopheFR's case, so I borrow his post, do some editing to save time and continue my story.
My name is Karel, and I am the proud owner of a C-zero in Czech Republic since 2015,
My Z totals 105,000 km, it is 2012, imported from Germany, used every day.
One morning in June, I realize that my “Z” is not ready . I think charger died due to the heat this summer, over 32 °C in the garden while charging. I was able to change on the Chademo socket nearby. No error on dashboard.
The apparent diagnosis: when I plug my charging cable, the green charging light on the cable box comes on for several seconds, I hear a few clicks to the cable and to the car, the car's blower starts a few seconds, then everything stops, no blower, no green light on the cable, and no fault on the cable or on the dashboard.
With the ignition key open, when I take the voltage across the auxiliary battery, I get 12.4 volts
With the ignition key closed, I get 14.5 volts.
At December 2020 my original accessory battery died, so I changed it.
-----------------------------------------------------------------------------------------------------
...while doing autopsy I found out one 4R7 resistor on the lower PCB in dog-house was broken and 2,2uF capacitor beside was partialy melted. So after connecting the charger the circuit was not charged through 2x4R7 resistors and charger ended the session without any visible error indication (i have no OBD error-diagnostics).
I did not want to waste time getting the PCB out and desolder the waffle plate, so i connected 4x 4R7 3W resistors in series between the "measure points", where you should normally measure 9,4 Ohm (pin N of waffle plate on white bar and cable named N00 connecting upper and lower PCB).
It started charging, but stopped after 1 hour. 1 blue 1nF/2000V capacitor got blown and 20A DC fuse in the MCU box got blown too.
So I disconnected my 4x 4R7 3W resistors set, took lower PCB out, desoldered waffel plate and replaced all components in dog-house but the coil: 2x 4R7 5W resistors, 2u2 310V capacitor, 2x 1nF 2kV capacitors, relay. Then I replaced 20A fuse in MCU box with 2 wires and a photovoltaic circuit breaker with fuse 15A/1000VDC.
It did not start charging, 2x 4R7 resistors in doghouse went blown. Then I almost ordered used unit for 1050 Euro from B-Parts.com, but I decided to give it one more try the next day.
Next day I connected again my 4x 4R7 3W resistors set and it started charging immediately !! But after 5 minutes charging stopped from powermeter's point of view. From user's point of view everithing was ok, charge cable indicating charging in progress, charging indication in car was on.
To be short, there was unexpected charging pause but then everything continued to happy end and fully charged pack.
Next day I added 5nF/5kV capacitor to those 2nF/2kV (C121, C122) in doghouse (not sure why...for more stability ??) and did 1 more power cycle: discharged battery by heater on, AC on, seat heating on and blower to max. At SOC 7% I plugged the original 14A charger and recorded the power session. There is 11minute charging pause at T0+25min. Do you think it is normal?

My conclusion up to now: only passive components went wrong due to overheat in combination with ageing
charger p.n.: 9499A437 v110 2011.04.02
Thanks again and good luck
Karel


