I tested the relay this evening using an external supply, and it pulled in as expected with 5v across the coil. Contacts have no significant resistance when relay is on (meter showed 0.01 ohms) and are disconnected when the coil is unpowered. I'll replace it anyway, but on the surface the relay appears ok.
You are using an out of date browser. It may not display this or other websites correctly.
You should upgrade or use an alternative browser.
You should upgrade or use an alternative browser.
The Troubleshooting and Repair for On-board Charger (OBC) Thread
- Thread starter kiev
- Start date

Help Support Mitsubishi i-MiEV Forum:
This site may earn a commission from merchant affiliate
links, including eBay, Amazon, and others.
Another busy weekend of MIEV repair here, after far too long a wait for parts. The tombstone form factor of the resistor is quite unusual, and I was unable to find a 33 ohm one anywhere, so I decided to go higher rather than lower and substituted a 47 ohm resistor. It, and a replacement relay arrived late last week, so this weekend I got into the repair itself.
I got myself a vacuum desoldering station, as I wanted to get the pair of boards completely apart and also was a little frightened of damaging the board with excessive heating. This proved to work fairly well - much easier than solder wick, or the clapped out station I had access to at work.
Removal of the relay and resistor was officially Hard Work. They were effectively stuck down underneath by the potting compound, as well as being soldered in on heavy tracks, and it took lots of applications of the desolderer to get the pins mostly clear. I used a fine scalpel to cut under the relay once I'd desoldered the pins, and that then let me lift it. Once removed, and after a bit of board and pad clean-up, fitting the new components and reassembling the module was fairly straightforward.
Plugged it back into the car, put things mostly back together, triple checked my wiring, crossed fingers and toes, and then applied mains.
The joy of hearing the charging process start was rapidly dissipated when I saw smoke rising from the charger - I cut the power hurriedly.
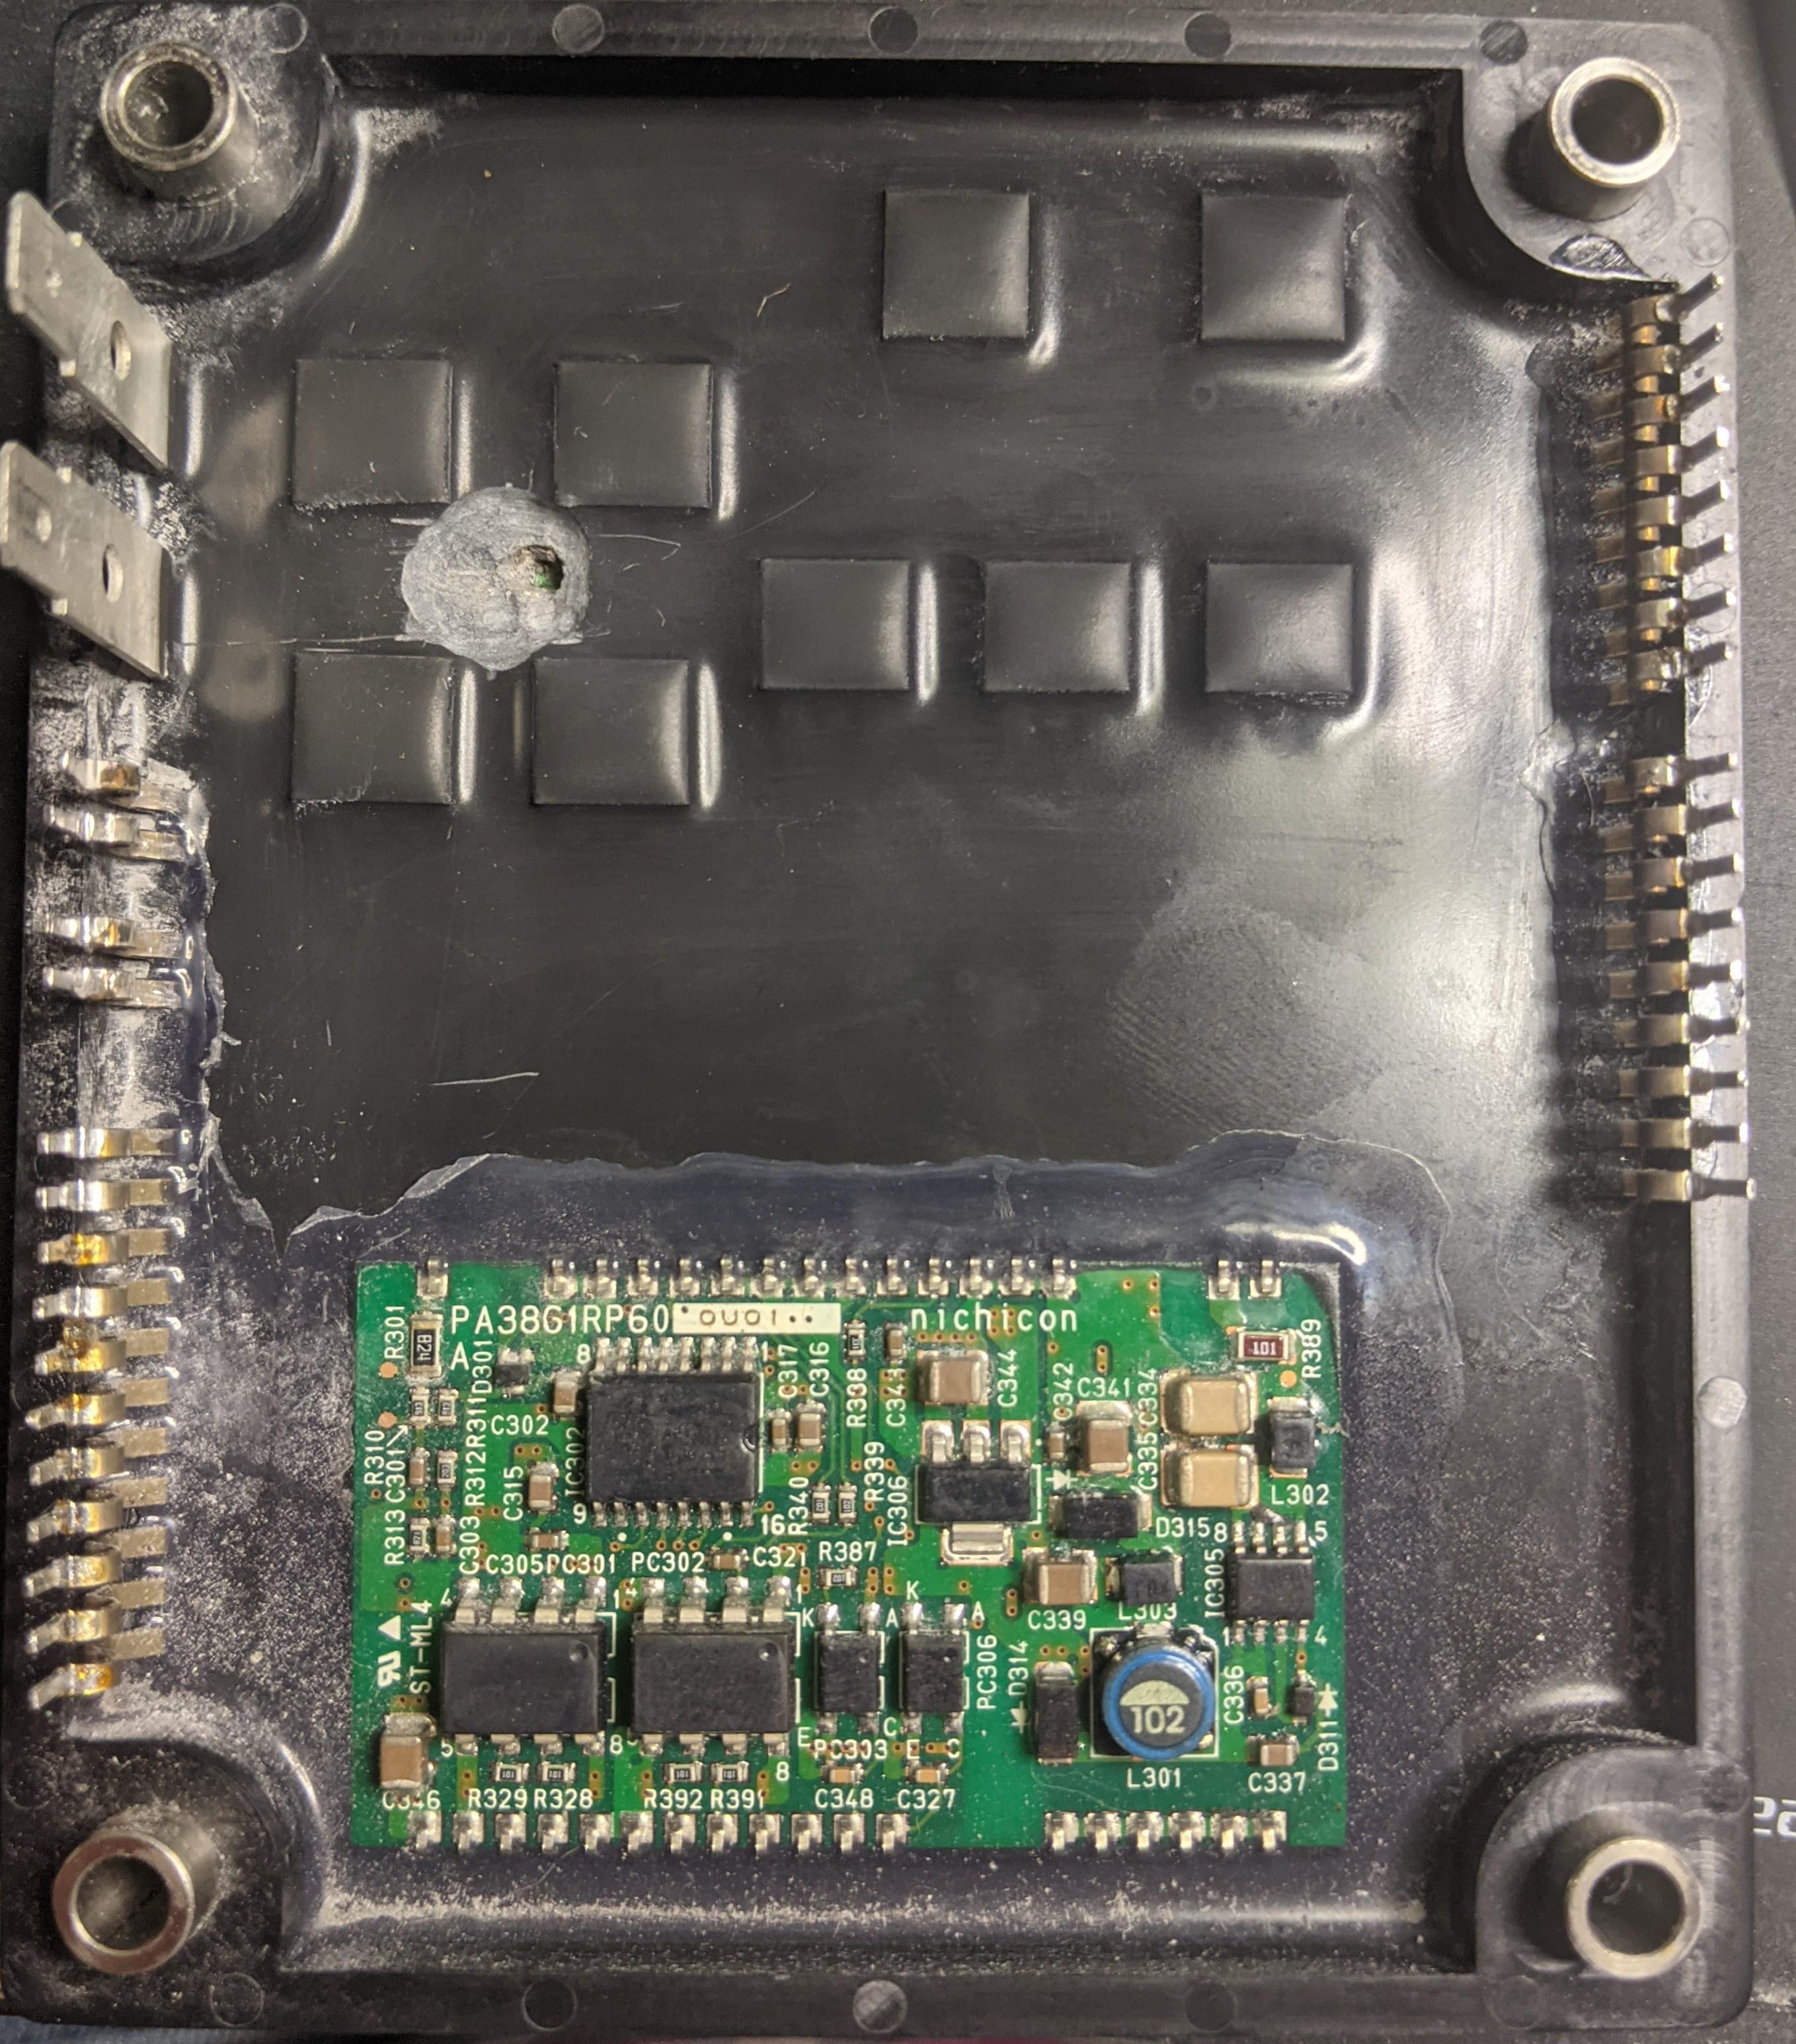
I then disassembled it all again. The resistor is once again open circuit, so lots of current must be being drawn right from power on. There is no sign of any other damage on the top board, but there's a smoking crack in the potted module underneath. The sad/annoying part of this story is that when I looked back on the photo I took of the module and mezzanine board from when I had it apart the first time the crack was already there - I'd overlooked it because I was too focussed on the resistor failure on the top board. Below is the original photo - the problem crack is in the middle of the four epoxy squares at the top left. The blackening is a little more obvious now.
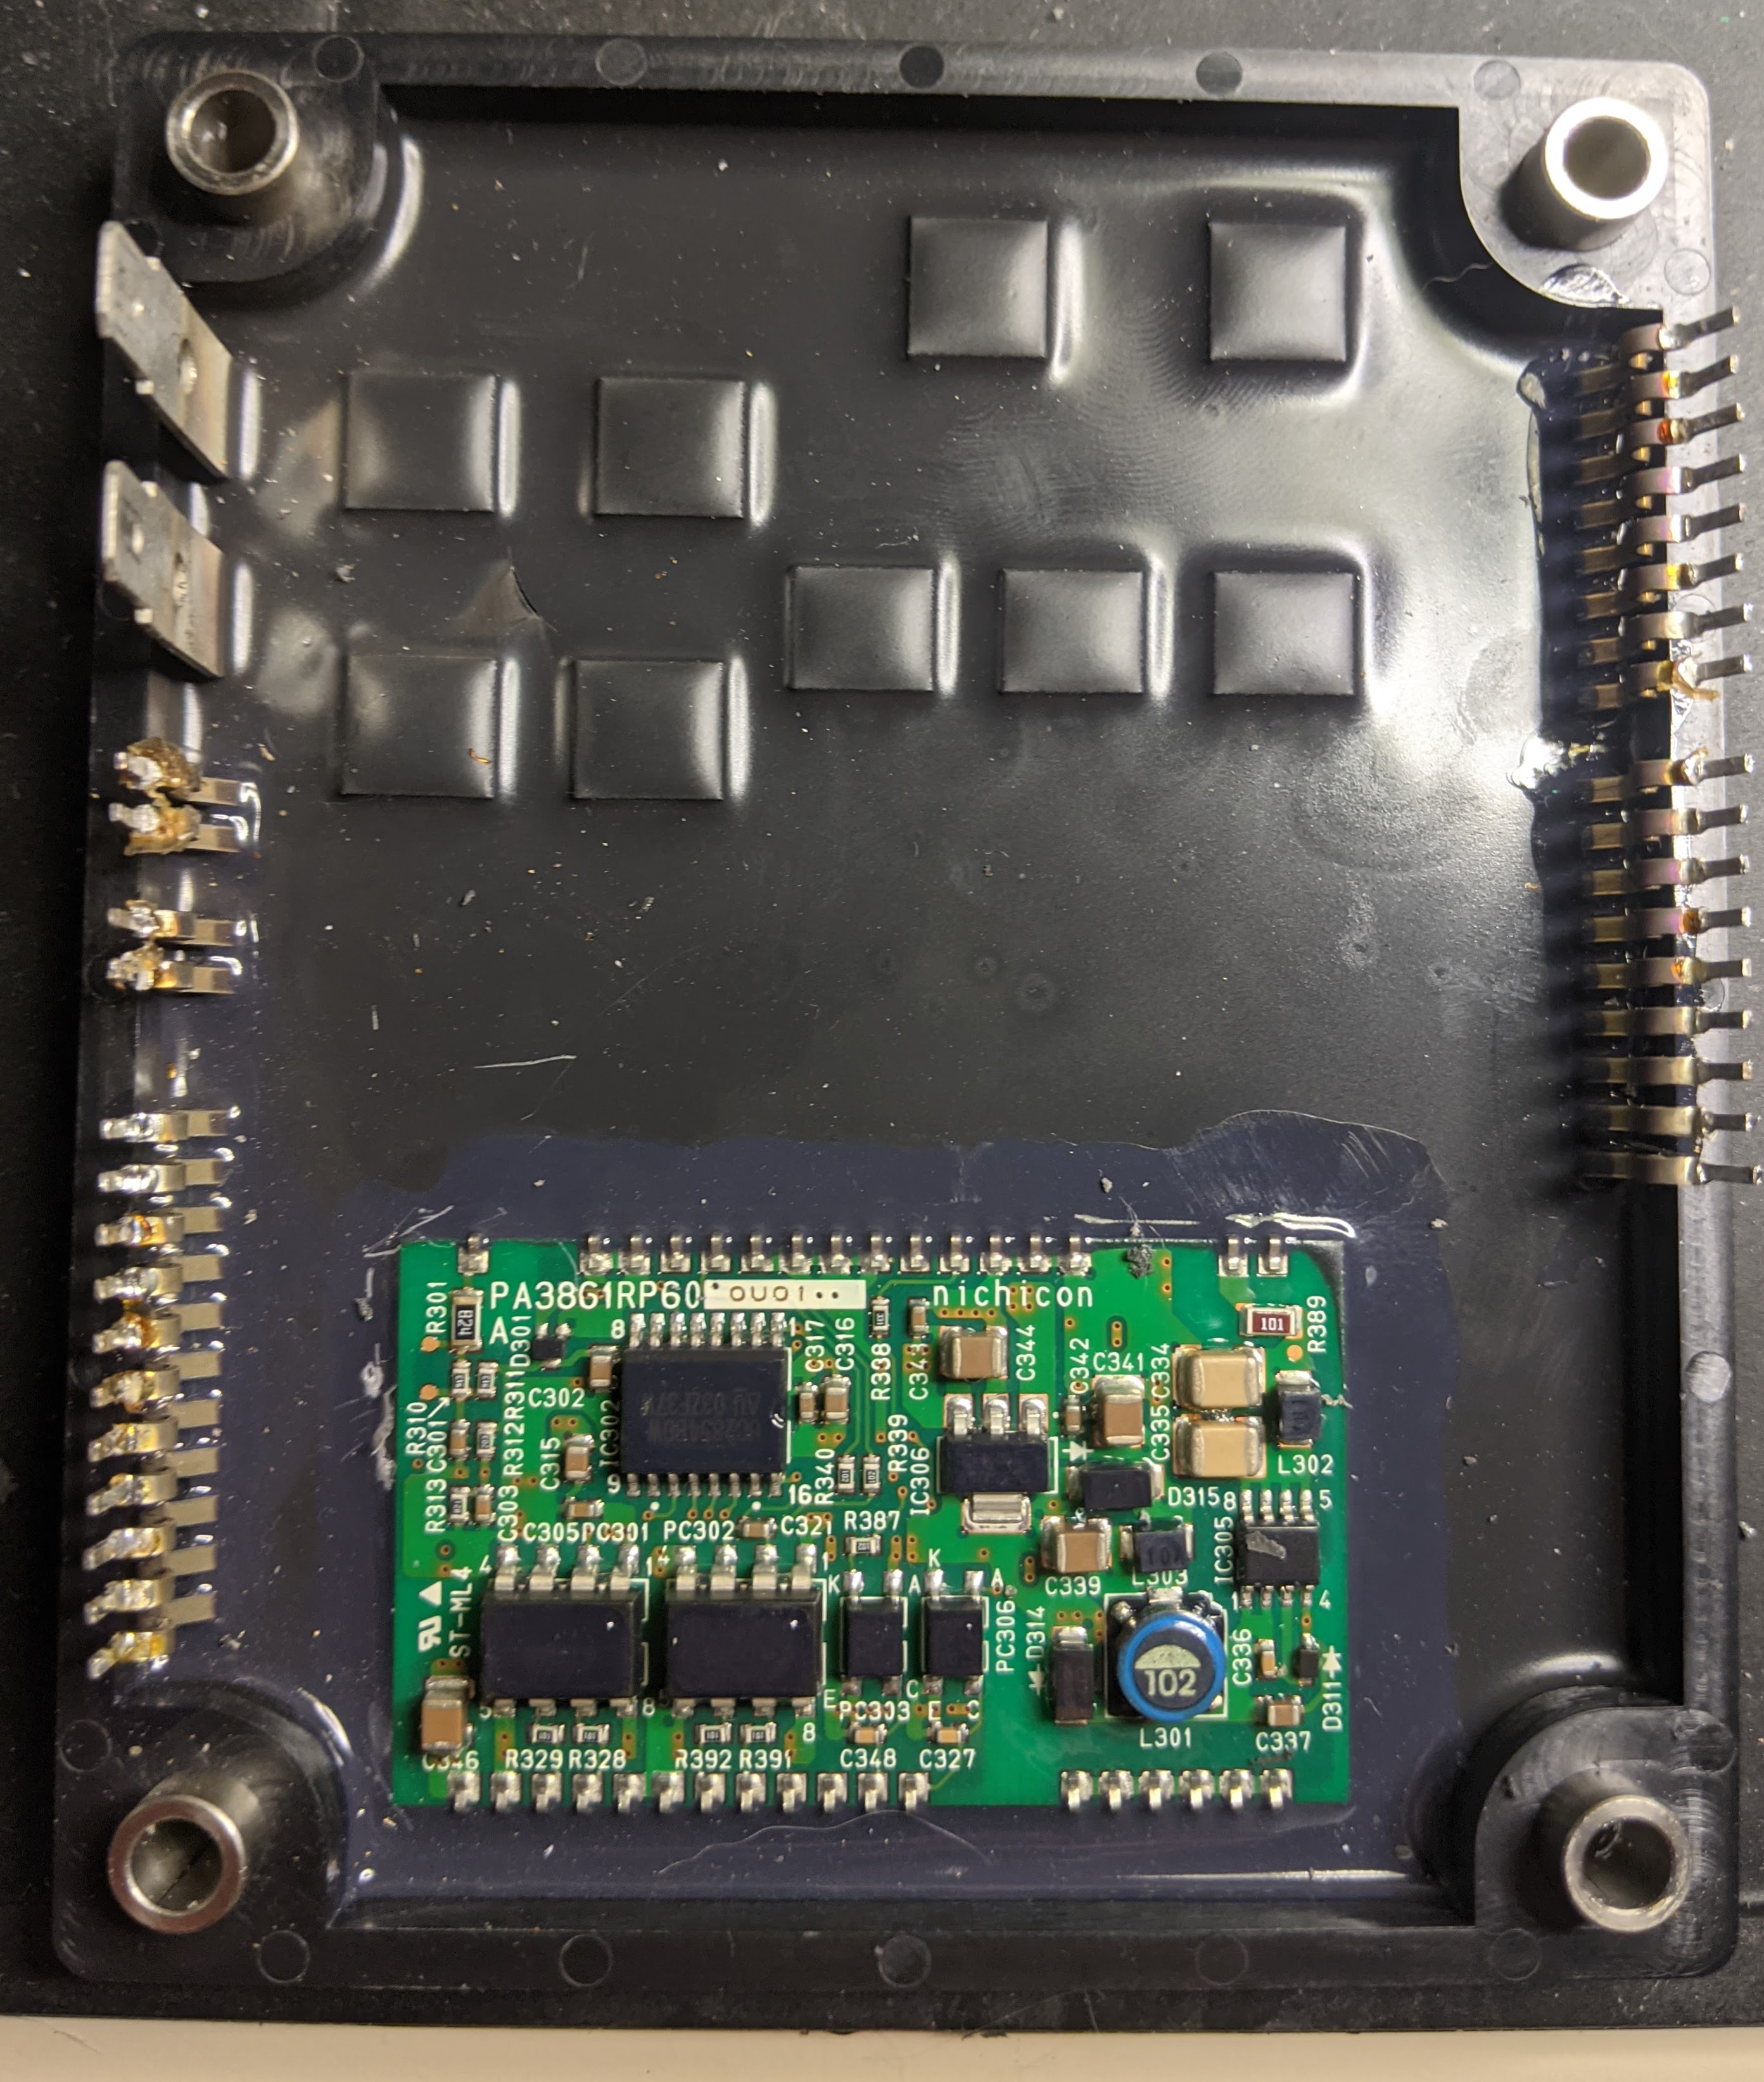
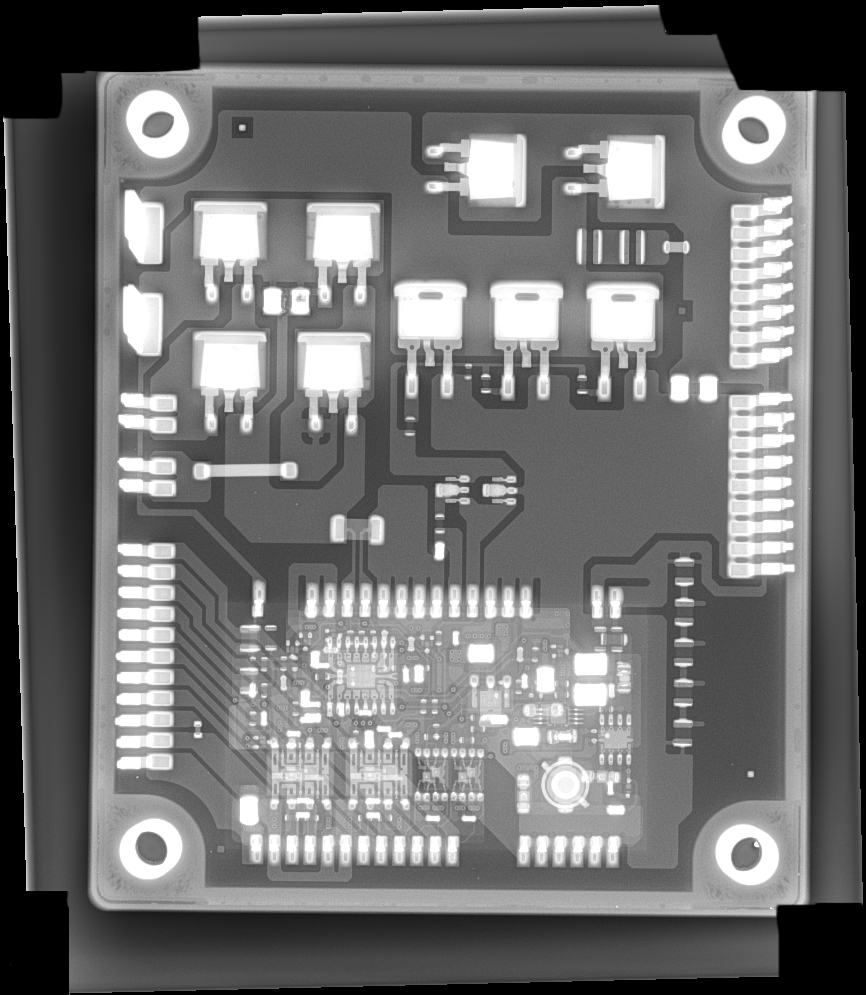
So now it all gets a little more complicated - it looks like I'll be doing some epoxy mining. I'm wondering if it is worth trying to get an X-ray of the module first to try and get an idea of what's happening there.
I got myself a vacuum desoldering station, as I wanted to get the pair of boards completely apart and also was a little frightened of damaging the board with excessive heating. This proved to work fairly well - much easier than solder wick, or the clapped out station I had access to at work.
Removal of the relay and resistor was officially Hard Work. They were effectively stuck down underneath by the potting compound, as well as being soldered in on heavy tracks, and it took lots of applications of the desolderer to get the pins mostly clear. I used a fine scalpel to cut under the relay once I'd desoldered the pins, and that then let me lift it. Once removed, and after a bit of board and pad clean-up, fitting the new components and reassembling the module was fairly straightforward.
Plugged it back into the car, put things mostly back together, triple checked my wiring, crossed fingers and toes, and then applied mains.
The joy of hearing the charging process start was rapidly dissipated when I saw smoke rising from the charger - I cut the power hurriedly.
I then disassembled it all again. The resistor is once again open circuit, so lots of current must be being drawn right from power on. There is no sign of any other damage on the top board, but there's a smoking crack in the potted module underneath. The sad/annoying part of this story is that when I looked back on the photo I took of the module and mezzanine board from when I had it apart the first time the crack was already there - I'd overlooked it because I was too focussed on the resistor failure on the top board. Below is the original photo - the problem crack is in the middle of the four epoxy squares at the top left. The blackening is a little more obvious now.

So now it all gets a little more complicated - it looks like I'll be doing some epoxy mining. I'm wondering if it is worth trying to get an X-ray of the module first to try and get an idea of what's happening there.
On the positive side, at least I now know why there was a smell of electronic death when I originally opened up the charrger. The resistors seem to fail without emitting smoke, so in hindsight it was obvious there was still a mystery to be solved. I just forgot about it in the excitement of finding one problem and fixing it.
Sorry to hear of the set back.
Looks like the AC rectifier diode section, likely a shorted diode is what caused the resistor to blow in the first place.
The soft black coating around the relay is easy to remove with a wooden tool, handmade scrapper from a bamboo chopstick. The black epoxy coating on the waffle plates is very hard to remove--i haven't figured out how to do it, but hopefully there is a way to get thru and replace the diodes.
coulomb
Well-known member
Or perhaps replace the diodes with a suitably rated and somehow heatsunk bridge rectifier. Assuming also of course that the shorted diode doesn't prevent the rest of it from working.kiev said:... but hopefully there is a way to get thru and replace the diodes.
Looks like it might be a capacitor? One of the components in the middle of the bridge looks a little hollow, and that's where the crack and smoke are located.


$26.99
KISHACZ 4 PCS Car Door Lock Cover for Mitsubishi i-MiEV 2009-2020, Car Door Latch Lock Protective Cover, Door Latch Lock Cover, Door Latch Guard Car Decorative Accessories,B Black
Yuanpingshilixiuhanshangmaoyouxiangongsi

$29.99
Car Tissue Holder for Mitsubishi i-MiEV 2009-2020, Car Napkin Cover for Car PU Leather Car Visor/Backseat Organizer Hanging Paper Towel Clip Car Accessories,Orange-1
hongchuangbaihuoshangdiangerenduzi

$150.00
$299.99
EP Home Smart Electric Vehicle Charger, 40 Amp Level 2 EV Charger, NEMA14-50 Wall Indoor/Outdoor Electric Car Charging Station, 240V, 25 Ft Cable
Energy Pro Cable

$15.99
Built Industrial Adjustable 3 Jaw Oil Filter Wrench with Adapter and Plier Tool Set for Auto Care
Infinite-Commerce

$28.99
FIPOISA Car Rear Bumper Protector for Mitsubishi I-Miev, Carbon Fiber Trunk Door Sill Protection Strip Sticker, Trunk Door Entry Guards Plate Decorative Accessories
yuanpingshizhanghongyushangmaoyouxiangongsi
Awesome--that is a great image. Here's a markup of what it looks to me, you might be able to drill down to that capacitor to get to the bottom board for repairs.
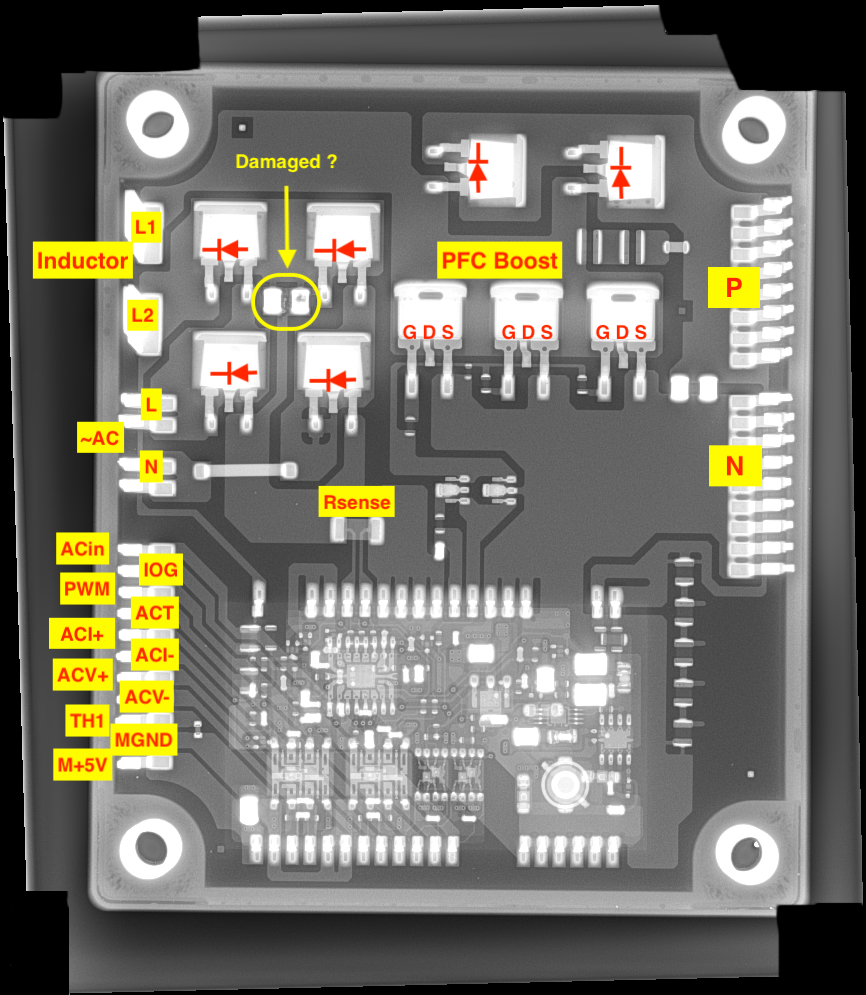

Kenny, thanks very much for the markup of the x-ray image. I had it under way myself but you've done a much nicer job. Based on your schematic from the later units on page 1 it looks to me like the possibly smoked capacitor performs the same function as the 1uF (105K) device that is external to the waffle board on the later units. I'd guess that mine has a couple of 470nF high voltage surface mount caps in parallel.
I was away for the weekend (was a Monday holiday here in Perth), but I expect to be starting my epoxy mining over the next couple of evenings - initially down into the capacitor area between the bridge diodes and then widening it out as needed. I'll be working slowly and carefully with plenty of ventilation - as there are not many spares around for this module, and none at all for me.
I was away for the weekend (was a Monday holiday here in Perth), but I expect to be starting my epoxy mining over the next couple of evenings - initially down into the capacitor area between the bridge diodes and then widening it out as needed. I'll be working slowly and carefully with plenty of ventilation - as there are not many spares around for this module, and none at all for me.
The diodes and fets look okay, so maybe just removing the shorted component would allow the system to start again. Of course it's not so easy putting it all back together just for a quick check, but it might be worth it.
May be a crazy idea: Just put the bare minimum solder on the waffle joints in case you have to remove it again, but if it works then you can add a bit of solder. i wouldn't even bolt it all back in, just set in place for a test. If it starts charging, then you can quickly stop the test with the release trigger and do a thorough reassembly.
May be a crazy idea: Just put the bare minimum solder on the waffle joints in case you have to remove it again, but if it works then you can add a bit of solder. i wouldn't even bolt it all back in, just set in place for a test. If it starts charging, then you can quickly stop the test with the release trigger and do a thorough reassembly.
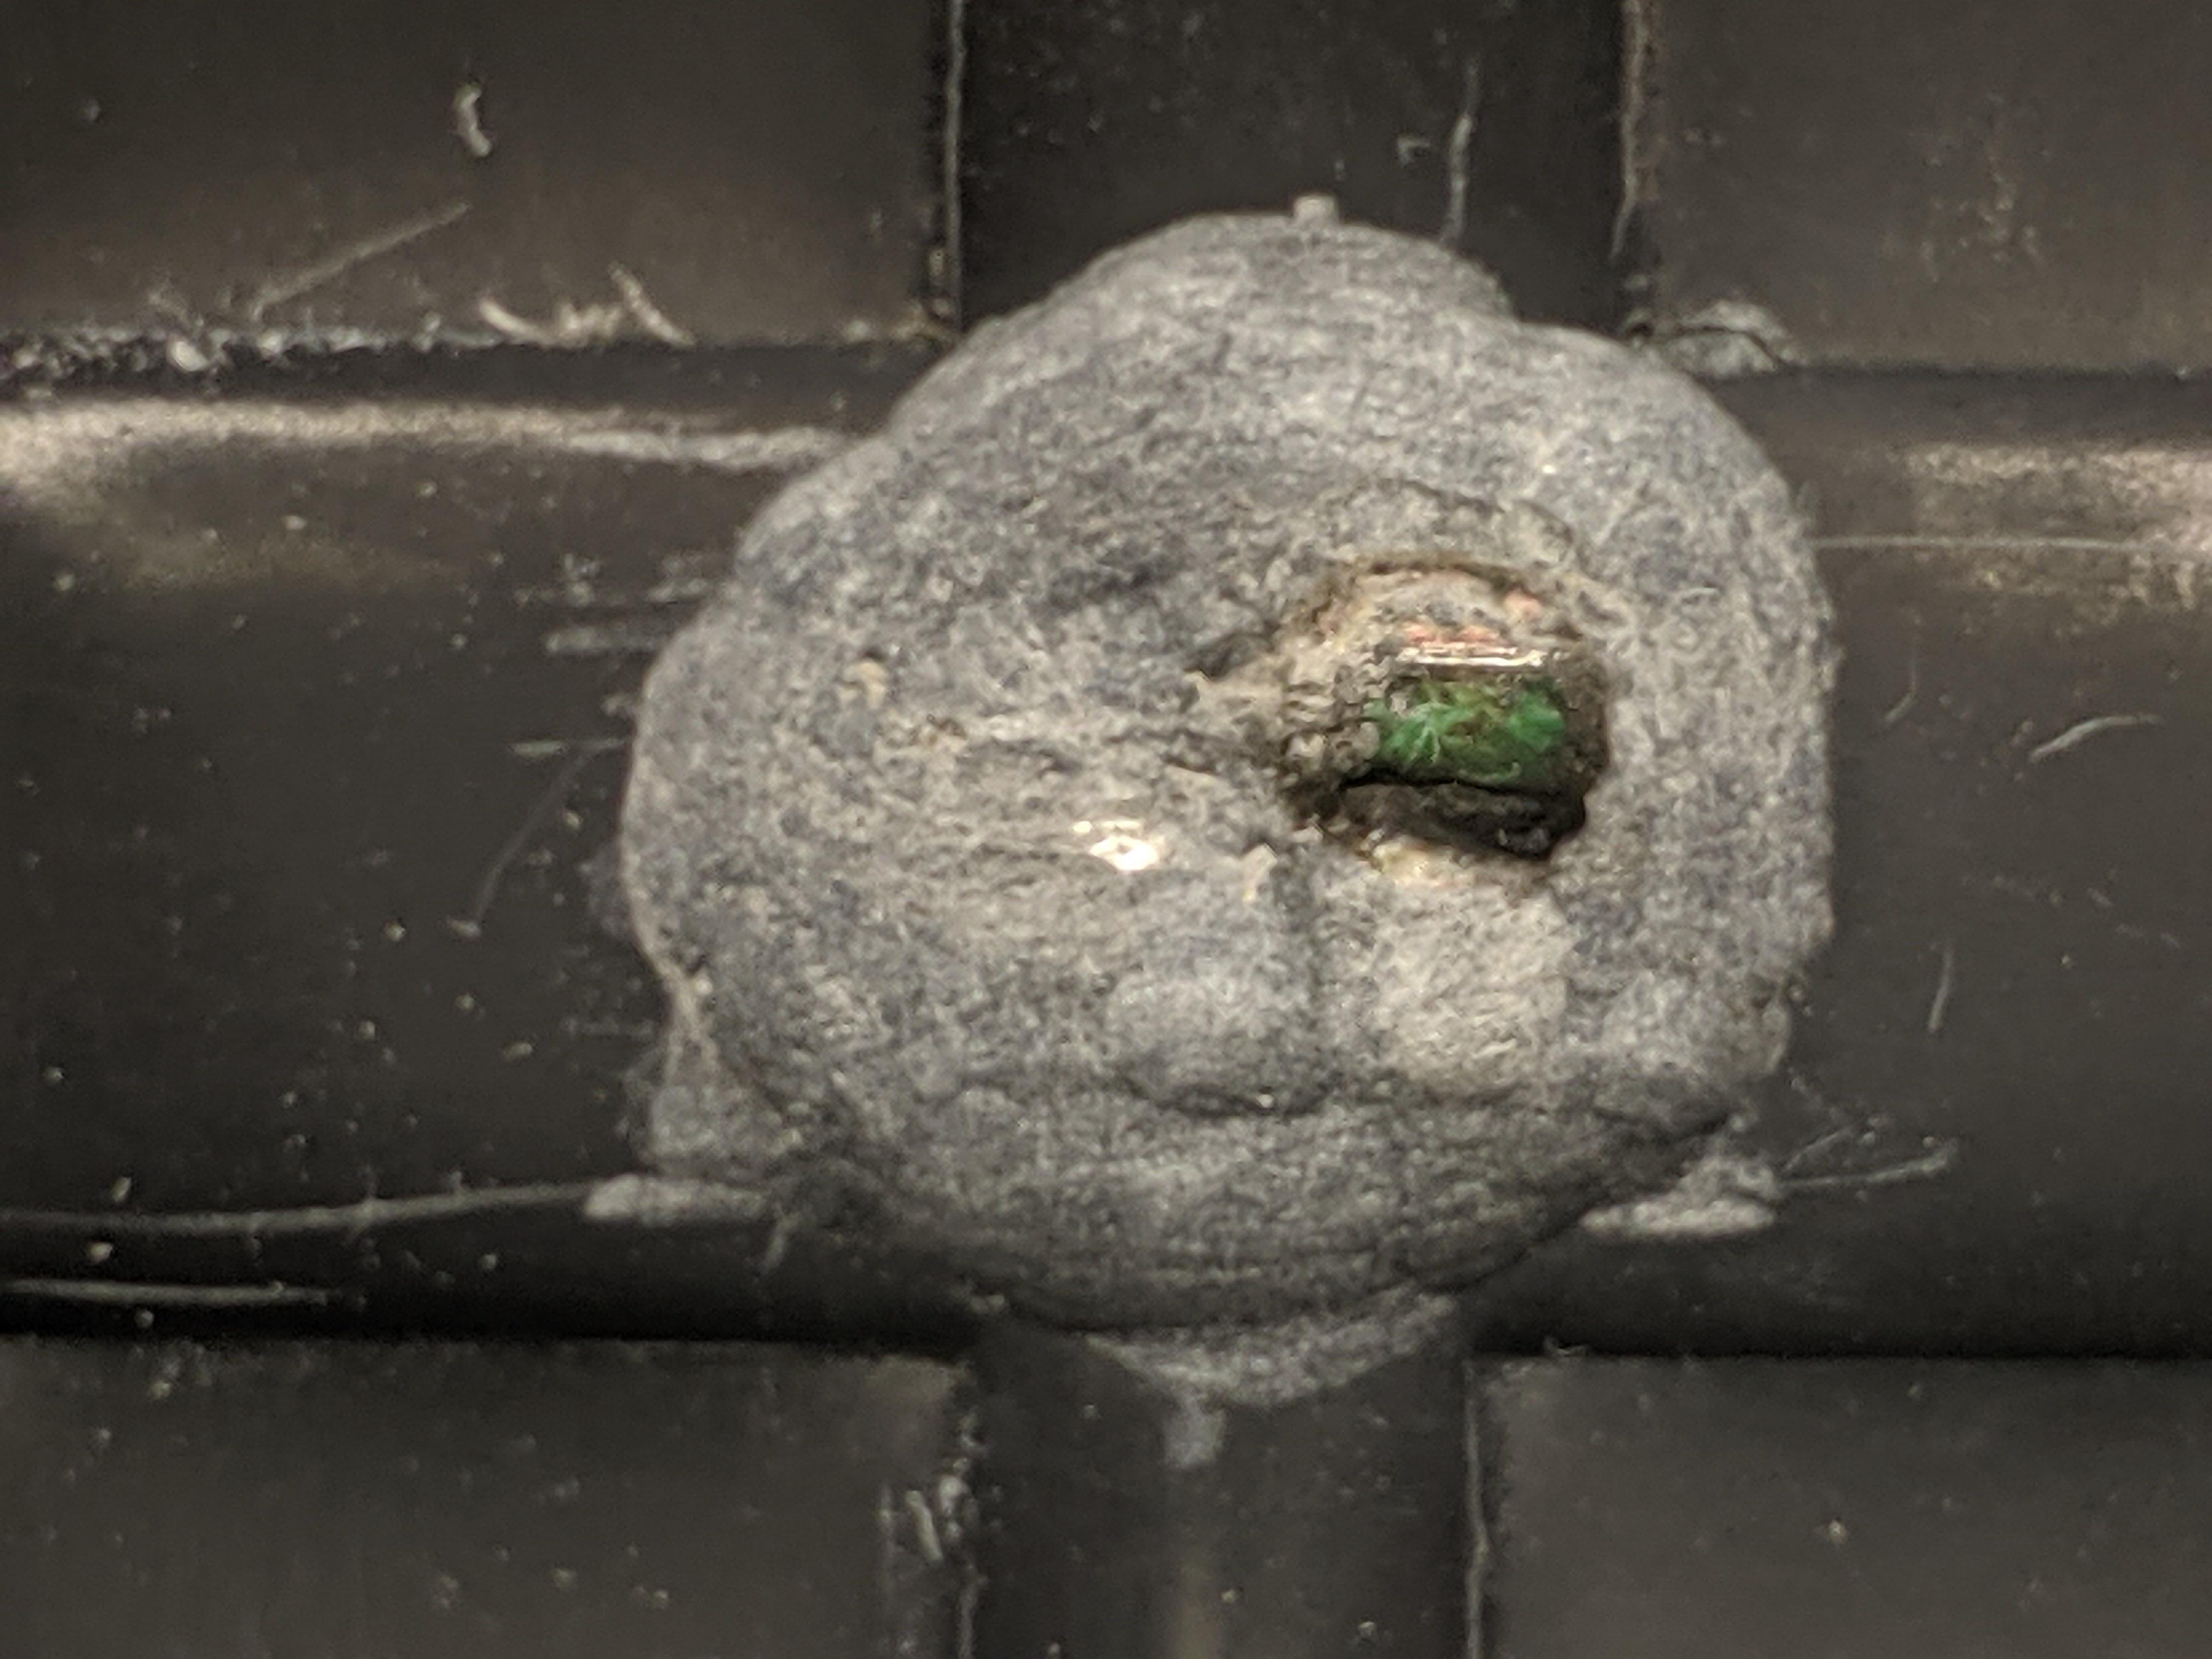
First evening of mining complete. I've struck board, and dug out fair amount of carbonised epoxy and/or capacitor in the process.
Heres a close up of the pit.
I've been using a Dremel with some very fine grinding bits, a soldering fan to draw anything airborne away, a desk magnifier to help the view, a few pointy probes to tidy things up, and I'm periodically damping the working area with isopropyl alcohol and wiping it clean.
Need to widen the hole out tomorrow so I can see the two capacitors fully, and gauge the extent of any damage.

Heres a close up of the pit.

I've been using a Dremel with some very fine grinding bits, a soldering fan to draw anything airborne away, a desk magnifier to help the view, a few pointy probes to tidy things up, and I'm periodically damping the working area with isopropyl alcohol and wiping it clean.
Need to widen the hole out tomorrow so I can see the two capacitors fully, and gauge the extent of any damage.
i've used a hot soldering iron (dry tip with no solder) with a fat flat blade tip to heat up small areas of the epoxy. This seems to break it down somewhat to form a powdery layer that can be chipped and scrapped with the blade tip or other metal tools. This will mess up the tip for soldering unless you have a sal block to re-tin the tip, or just use a replacement tip.
Also a really sharp flat blade such as Xacto, etc can pry against the thin layer on top of the diodes to crack and flip that thin small layer on top to reveal the part numbers. The thin epoxy will crack with some verical pressure of the blade, then it can be pried off from the side.
You have some nice green color of the circuit board showing so you are doing great and its working. This is all new--never been seen board before.
Another evening of mining. I used the Dremel, as well as working the epoxy with a old flat bit in the soldering iron (this was a good suggestion, thanks Kenny). I'm now thinking I may have done enough. I've removed all of the carbon and enough epoxy that I can see clearly where the failed capacitor used to be, and clear PCB below I can also see the top of the neighbouring capacitor.
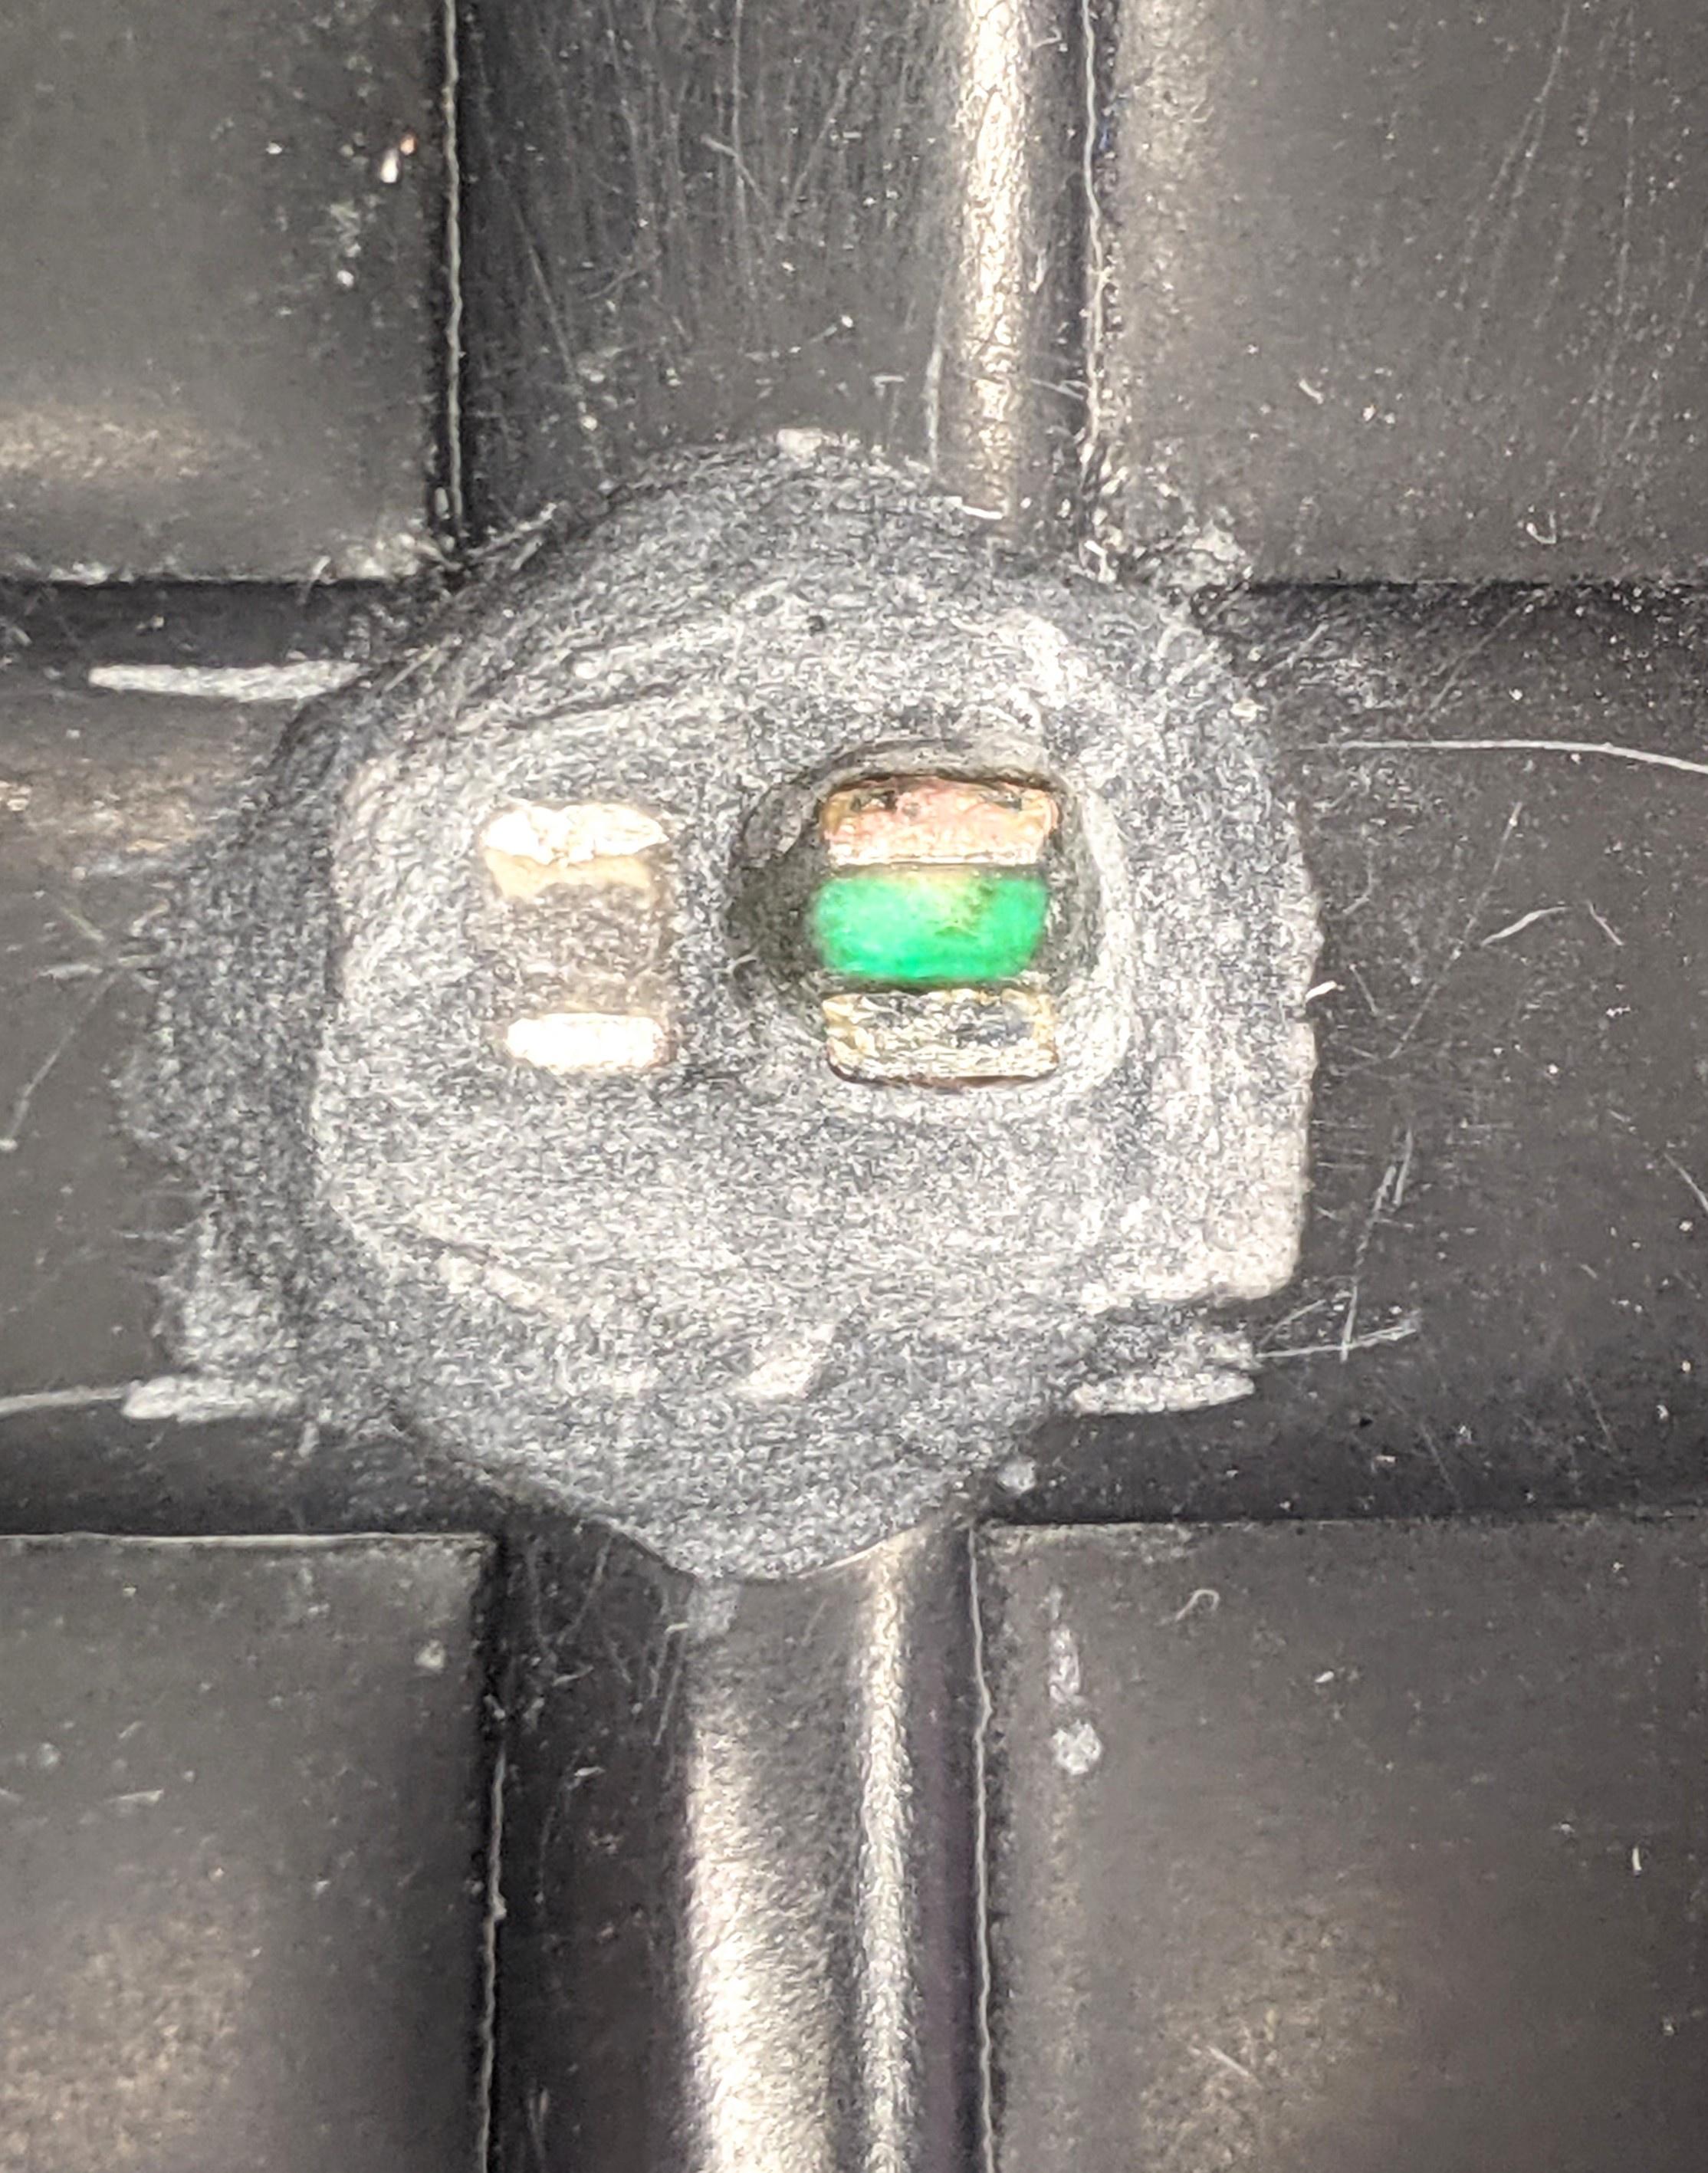
With access to the capacitor contacts I have confirmed that the short is gone, and that all of the diodes in the bridge are functional. I'm thinking that I can do an initial test as is this weekend, and solder another cap in parallel before back filling with epoxy if all is well.

With access to the capacitor contacts I have confirmed that the short is gone, and that all of the diodes in the bridge are functional. I'm thinking that I can do an initial test as is this weekend, and solder another cap in parallel before back filling with epoxy if all is well.
Is the other cap good? Can you get a reading of its value?
What is the approximate size of the device, length width height.
Great news about the diodes.
What is the approximate size of the device, length width height.
Great news about the diodes.
Good questions, should have thought of them myself. The remaining capacitor measures approx 3mm long by 2mm wide - from the x-ray its cremated neighbour was identical. Capacitance reads as 47-48nF.
So, I soldered it all back together again, leaving the pit in the waffle board as pictured above. I did proper joints rather than test tacking as the desoldering gun works very well with leaded solder and its slightly lower melting point. I put the boards back in, bolted the power board down with fresh heatsink paste, double and triple checked all the connections and the aux battery voltage (has been a while) crossed fingers, toes and every other imaginable appendage, and switched on.
...
...
It worked. No smoke, just all the normal charging noises. It pulled 12A @ 240V and did just what it was meant to. After three hours my imiev is now at 100% battery again.
Next move is to pull it out again, tidy up the waffle board and fill the pit, solder it together again, quickly test and then repot the main board. Haven't quite decided whether to try installing another cap to replace the cremated one or just to leave well enough alone.
One very happy (and more than a little relieved) iMiev hacker here.
...
...
It worked. No smoke, just all the normal charging noises. It pulled 12A @ 240V and did just what it was meant to. After three hours my imiev is now at 100% battery again.
Next move is to pull it out again, tidy up the waffle board and fill the pit, solder it together again, quickly test and then repot the main board. Haven't quite decided whether to try installing another cap to replace the cremated one or just to leave well enough alone.
One very happy (and more than a little relieved) iMiev hacker here.
philsuth, congratulations! Delighted your perseverance and skill paid off!
Sandrosan
Well-known member
Hi Philsuth,
BRAVOOO! Your great passion and perseverance are amazing!
I am so happy for you
BRAVOOO! Your great passion and perseverance are amazing!
I am so happy for you
coulomb
Well-known member
I certainly would replace the capacitor. It may be assisting with suppressing of ringing, so leaving it out may stress the PFC MOSFETs, possibly leading to early failure.philsuth said:Haven't quite decided whether to try installing another cap to replace the cremated one or just to leave well enough alone.
coulomb said:I certainly would replace the capacitor. It may be assisting with suppressing of ringing, so leaving it out may stress the PFC MOSFETs, possibly leading to early failure.philsuth said:Haven't quite decided whether to try installing another cap to replace the cremated one or just to leave well enough alone.
Good point, and it raises several questions. Do you think it reasonable to assume that both capacitors (in parallel) were the same value? I presume the total capacitance required would depend on characteristics of the FETs and possibly the bridge diodes, all of which are buried deep in the epoxy. In the later units there was a single 1uF outside the epoxy, but this was coupled with a smaller inductor then the heavy duty 600uH monster mine is fitted with.
Also, why would you use two capacitors in parallel? Lower ESR?
From my reading this evening the failed capacitor is there primarily to bypass high frequencies from the boost converter, and so reduce EMI. The design guides I read also suggest a low ESR cap, and this may be why a pair of them were used. I'm now thinking I'll replace the failed capacitor with another 47nF 500V chip capacitor - this will delay completion of my repairs a few days while I get the part, but I've come so far I'd rather do the job properly.
Similar threads
- Replies
- 5
- Views
- 617
- Replies
- 21
- Views
- 2K
- Replies
- 0
- Views
- 723
- Replies
- 6
- Views
- 8K
- Replies
- 5
- Views
- 2K


