The Troubleshooting and Repair for On-board Charger (OBC) Thread

Mitsubishi i-MiEV Forum

Help Support Mitsubishi i-MiEV Forum:

This site may earn a commission from merchant affiliate links, including eBay, Amazon, and others.
Coulomb: I like your saying " Endeavor to persevere " reminds me of the Clint Eastwood movie where the old Indian had the piece of red rock candy that was not for eating, it was just for looking at. With all this amount of hours between you and Kenny and myself, don't want to get too anxious , and fire it up and blow up something else, especially since a lot of stuff has to be dug out of epoxy resin. I'll wait and see if Kenny has any additional feedback before I fire it up again.
It is interesting that this IC and Resistor are in the output stage, which is were the two caps that were blown in the doghouse may be related.
I'm wondering if the two faults are really related or coincidental.
The reason I used a thru hole part instead of replacing the resistor with another SMD, was due to time. Out here in the West, They quote 5 days delivery for RS and Element14 deliveries from the Eastern States, but usually take a whole week, and then it takes another day or 2 on top of that to get it from Perth to my place out here past the black stump out in the bush. 1206 and 0805 parts are readily available from Altronics here, but the smaller 0603 parts take a bit longer to get in. The thru hole part I used is a higher wattage anyway, so with the leads, it won't be getting warm and de-soldering it self if that was the original problem. 39k is a pretty high value so I can't really see this part getting hot though, but then again we are talking about 360+ voltages around the output stage in some cases, so 360v across a 39k resistor would end up being above 3w if something shorted. Maybe this resistor de-soldered itself and kept the smoke from getting released from somewhere else.

You mentioned to check for burnt pre-charge resistors. Are you talking about the two 4.7R resistors that get shorted out when the relay closes?
The values on those seem ok via measuring through the EMI Filter, and they did not appear to be burnt.

Kenny also mentioned way earlier that he spotted a current sens resistor that looked a bit discoloured in one of my pictures.
Kenny can you remember where this is and point it out to me again so I can measure it and confirm that is also ok?
 
Good Catch Skylogger Larry!

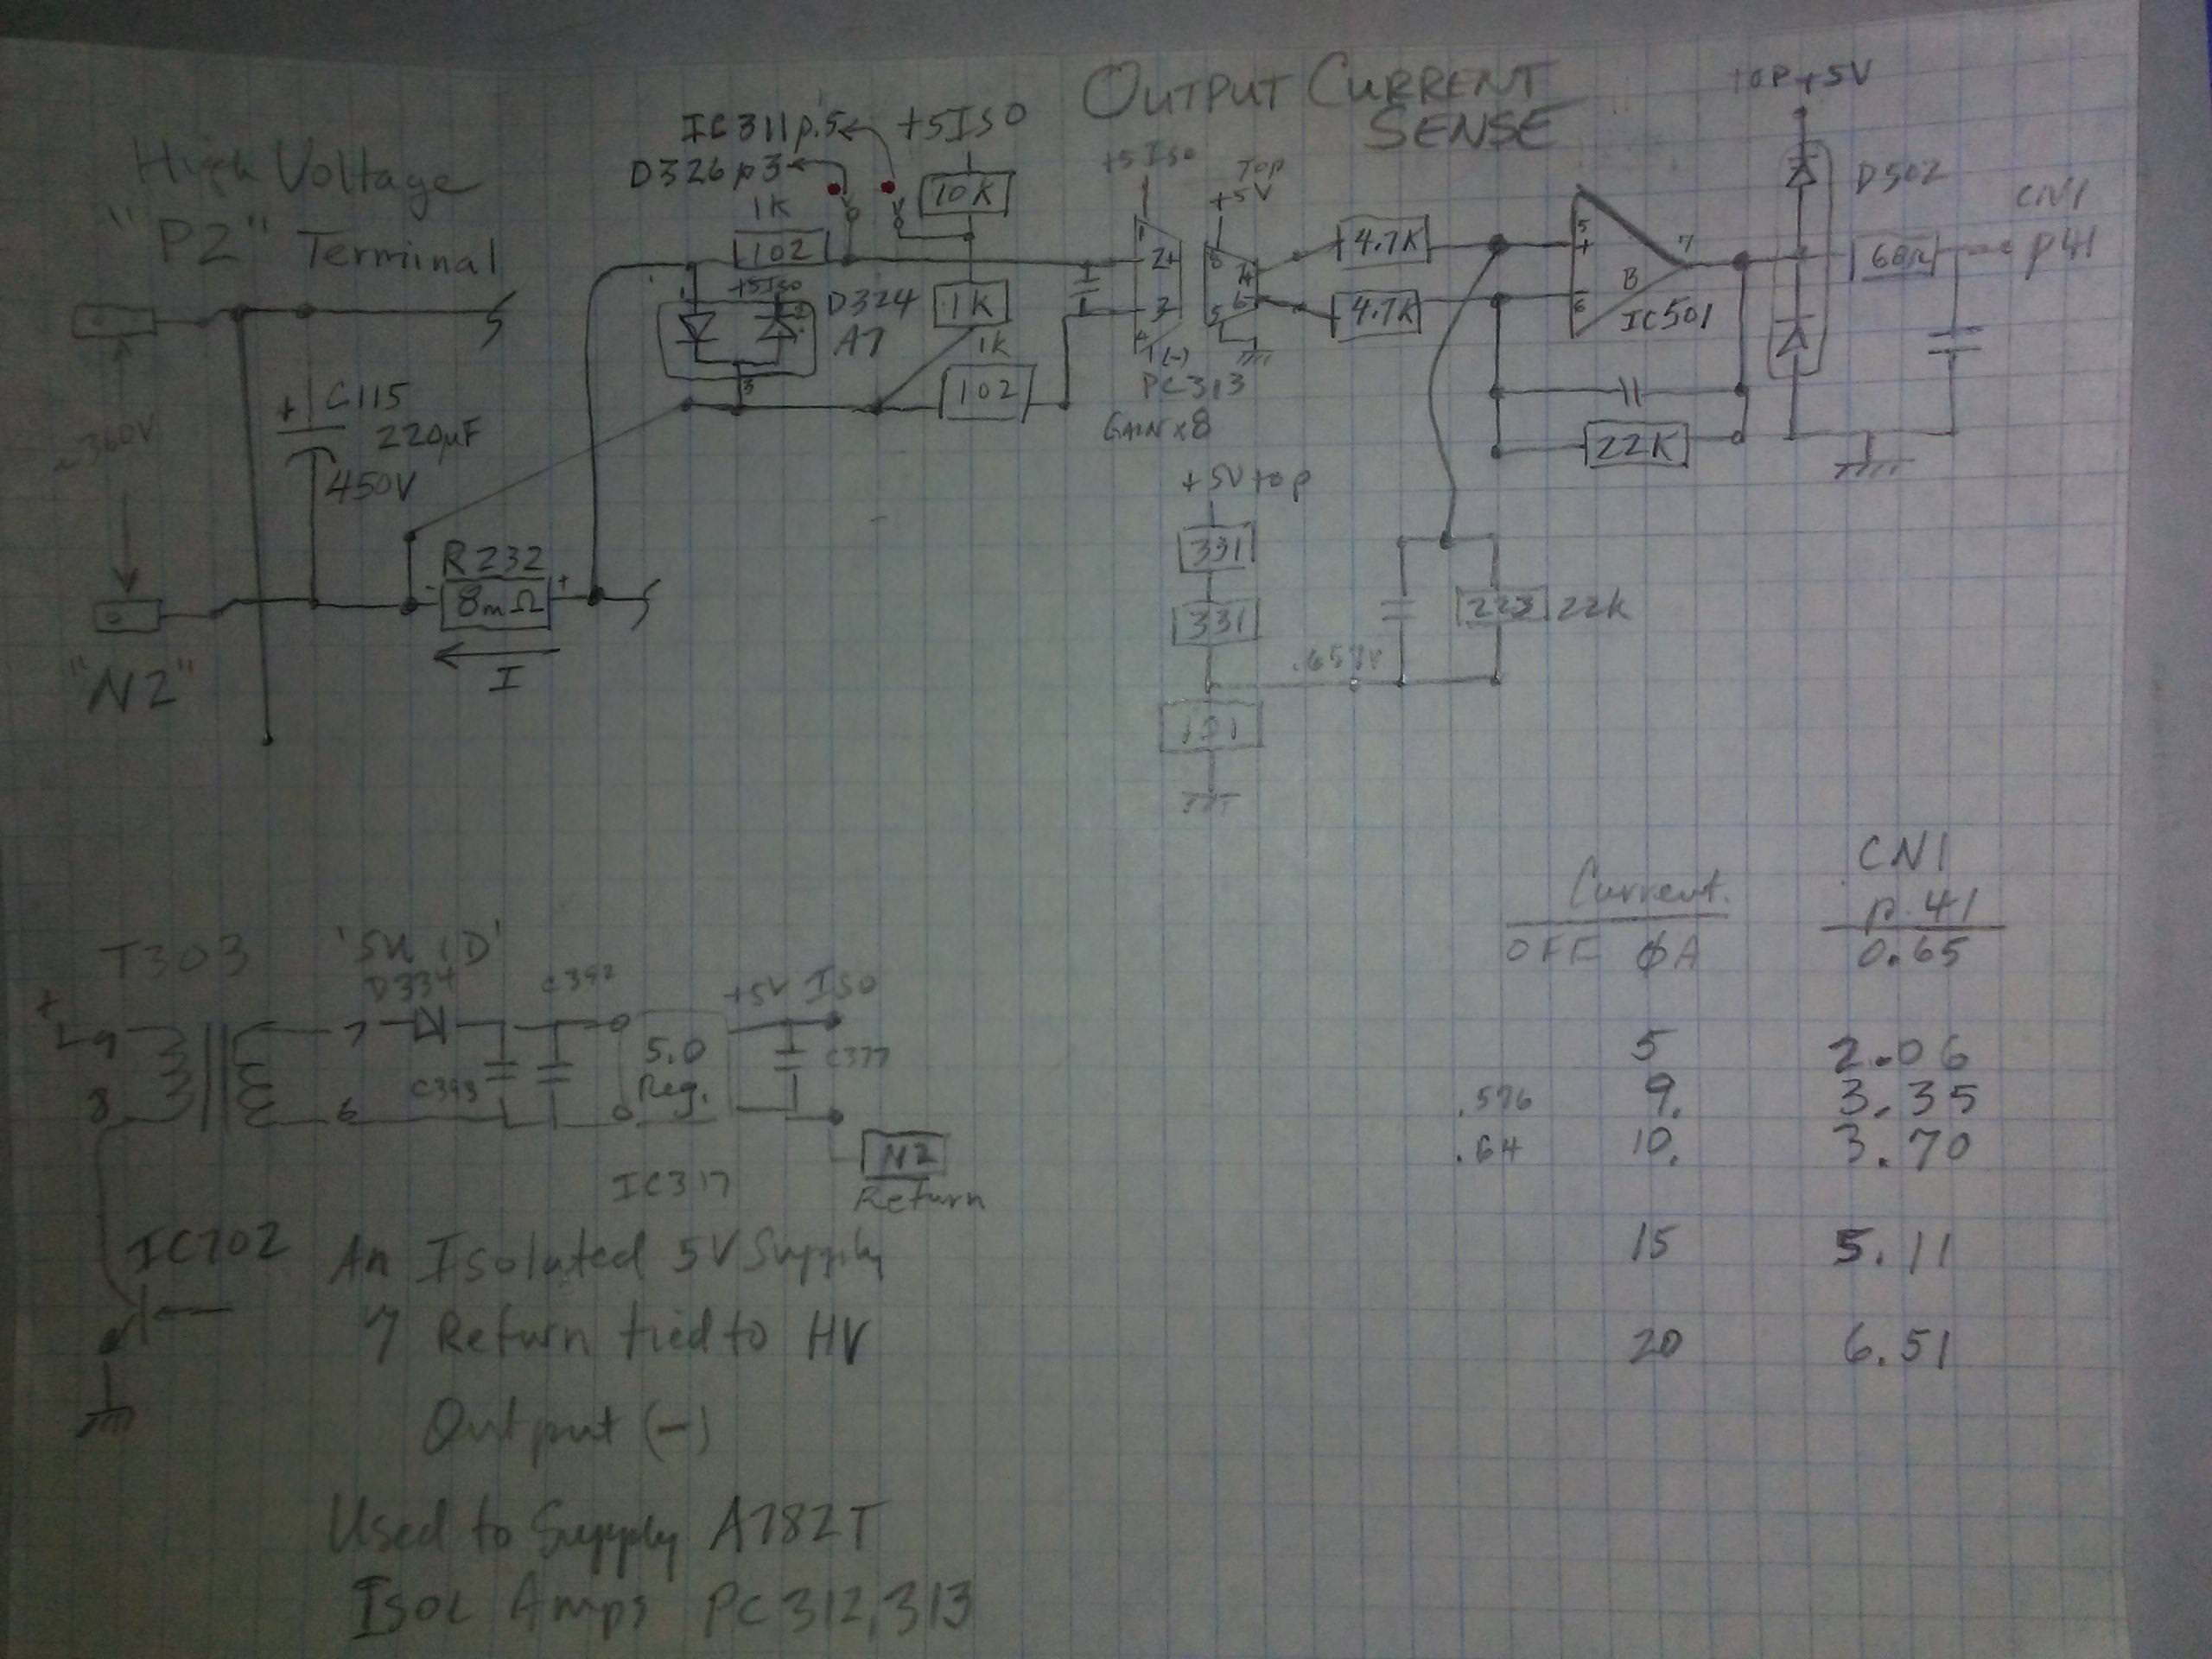
That is a very important circuit, and that resistor is too. i think i made a post several pages ago about those two big chips that are jumping across the isolation slot cut in the circuit board, PC312 and 313, which are Broadcom A782T isolation amplifiers [with fixed gain of ~8x] used to measure the OBC output voltage and current. These feed into the small IC501 2746Z op amp which sends the signal back up the CN1 cable to the top board.

The output current is read across R232 which is near the base of the output filter cap, C115. The board looked scorched to me in one of your photos, the resistor is probably okay.

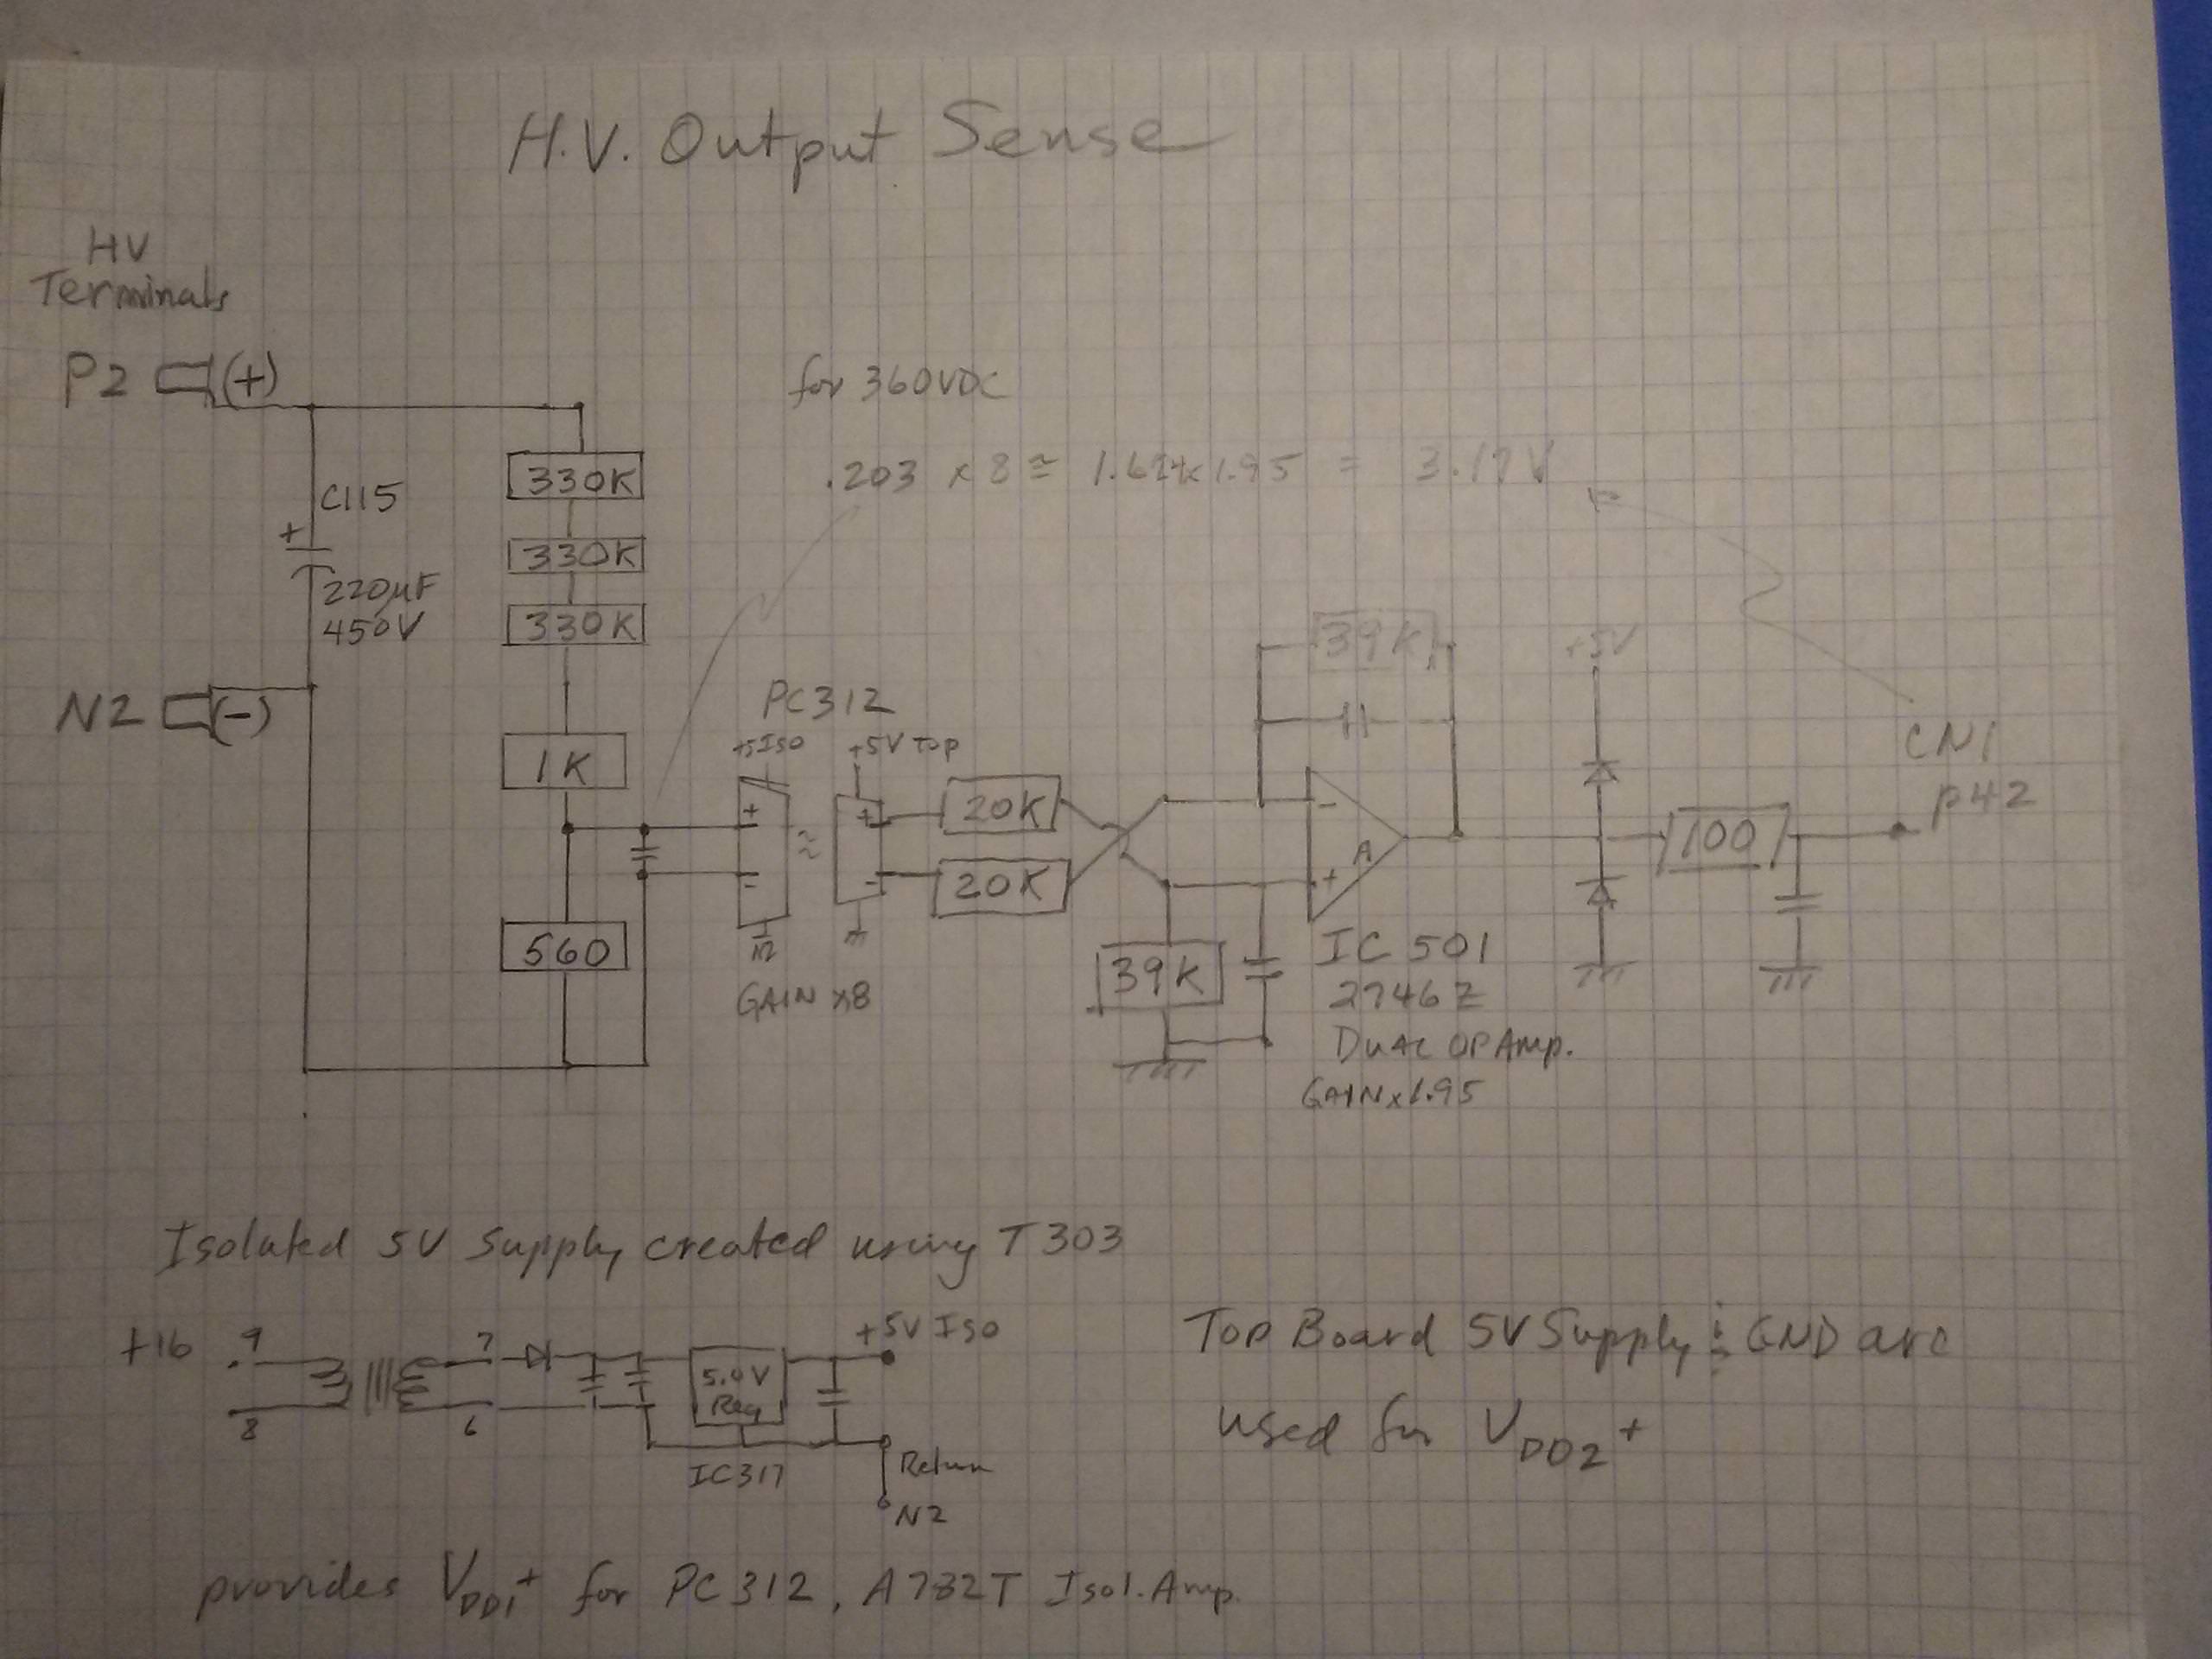
The OBC High Voltage output is divided down on the bottom side of the bottom board thru a series of 330k resistors, R431,432,433, this is then fed thru another voltage divider on the topside of 1k and 560R into the PC312 differential isolation amplifier. The differential amp will reject common mode noise on the buss line and provide a clean signal representing the voltage of the output, or across the current sense resistor in the case of PC313. The differential output of the isolation amp is fed into a non-inverting differential input-to-single output stage with a 39/20 = 1.95 gain from the IC501 op amp.

Using 360VDC as the charger HV output, the input to pin 2 of the isolation amp will be about 200 mV, and with a gain of 8 the output will be 1.6V. This is then fed into the 2746Z op amp and results in ~ 3.12V signal that is sent over the CN1 pin 42, likely as input to the microcontroller, but i haven't traced that far yet.

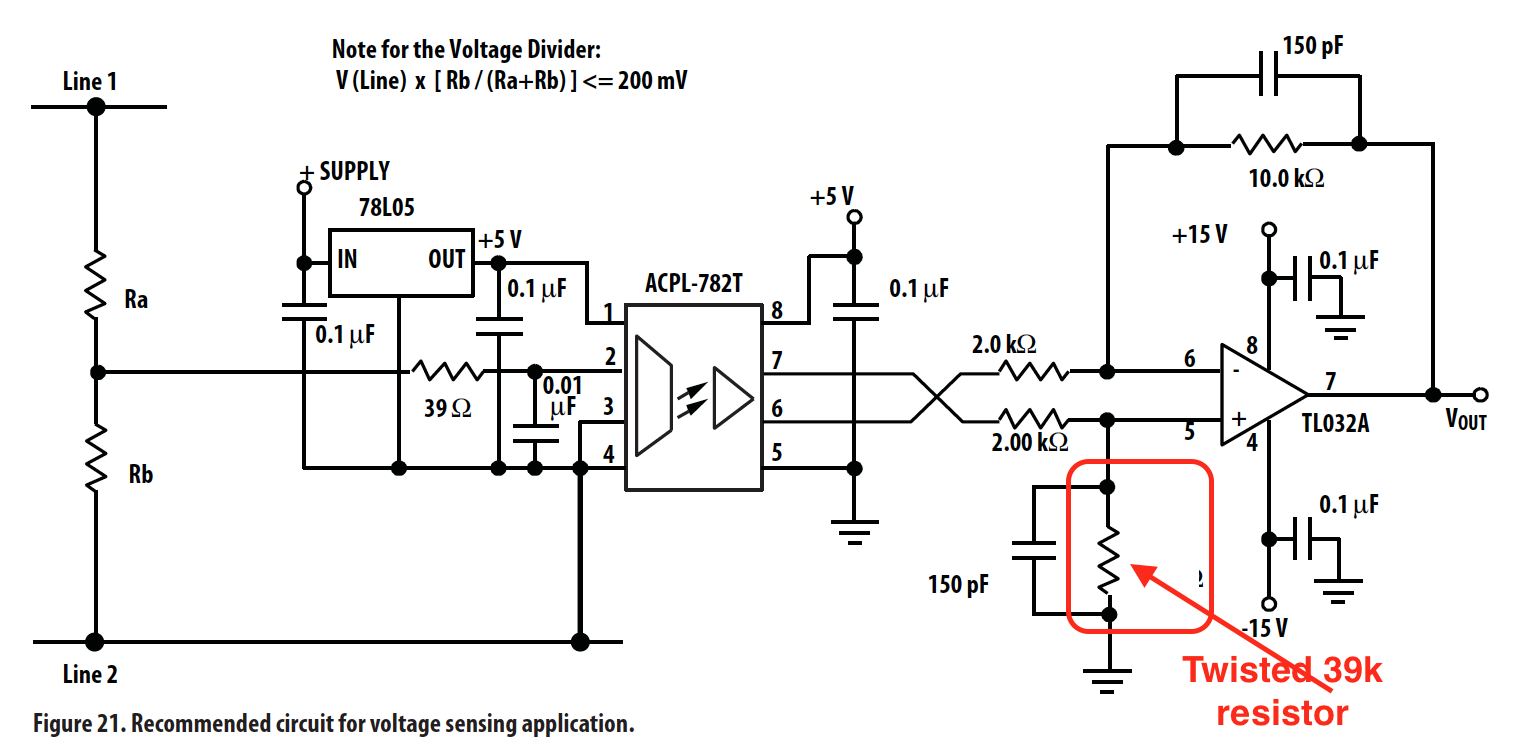
With the twisted sister resistor going open circuit, then the op amp becomes a non-inverting follower with a gain of 1+(39/20) = 2.95, and now the output goes to ~4.72V, nearly to the 5V rail. The diode circuit on the ouput would clip that back down a bit, but the microcontroller would be seeing an abnormally high voltage reading. We don't know what it would do in response, but most likely shut down the FETs in an attempt to lower the HV. It may be a sudden shutdown could cause the snubber capacitors in the potted doghouse to see a massive overvoltage and this may have caused them to blow.

[edit 8/1/2020: Transformer designation should be T302, located on bottom board]


3RI2erE.jpg


1grkzSP.png


Here is the current sensing circuit also, which uses the other isolation amplifier that bridges across the gap in the pc board. When the OBC is on but no current flowing, then the CN1 pin 41 voltage will be about 0.65V. When the current is 9 Amps, then the top board will see 3.3V. At higher currents the voltage goes up until it will be clipped, but the microcontroller will likely take action above 9A to limit it, since that is pushing the limits of what can be done with a 3.3kW charger (360V x 9A).

uHuZT3c.jpg
 
Hi KIEV:

"The output current is read across R232 which is near the base of the output cap, C115. It looked scorched to me in one of your photos."
The writing on the part looks like BL 00 What value do you think this resistor should be?
 
skylogger said:
Out here in the West, They quote 5 days delivery for RS and Element14 deliveries from the Eastern States, but usually take a whole week, and then it takes another day or 2 on top of that to get it from Perth to my place out here past the black stump out in the bush.
:)
I had to order some other parts from RS Online today (for another charger, as it happens), so I added two packs of 50 0603 39k resistors. If you like, PM me your street address and I'll post one packet to you. I forgot to add GST to the 15c, so it's really 16.5c. Plus a dollar to post, if as I suspect they fit into an ordinary envelope.

You might decide one day that an SMD part actually looks better. And you can practice SMD soldering, and not worry if you lose one. Or ten. :cool:
 
That is 8milli Ohms, 0.008 Ohms. It is probably a metal resistor and not damaged at all, but the circuit board in its vicinity looks to have gotten hot and discolored.
 
kiev said:
That is 8milli Ohms, 0.008 Ohms.
That's another use for current limited power supplies. I set mine to about 5 V and 3.0 A; mine is digital and surprisingly accurate. I put it across the shunt, such that all the current from the power supply flows through the shunt. Then I use my multimeter on the millivolt scale to measure across the thin wires that run away from the shunt. That's a "Kelvin" or "four terminal" connection, and measures the resistance that the charger will actually see. In this case, you'd hope to read around 24.0 mV (V = I×R = 3.0 × 8.0, with both voltage and resistance in milli-units, but the current in whole amps).

Just sayin'. ;)
 
skylogger said:
The writing on the part looks like BL 00 What value do you think this resistor should be?
One of Kenny's diagrams shows "8L00".

Kenny: can you explain how you get 8 mΩ from 8L00? The codes I know would show R008 or 008 or ̅0̅0̅8̅ .
 
The R232 metal current sense resistor size is about 2512. i think it is made by Vishay, where "L" indicates mOhm, and is rated about 3W, e.g. WSLP

ref: http://www.vishay.com/docs/30327/marking.pdf
 
So I decided to bit the bullet, and re-install the charger back into the car and test it out.
Once I got through fitting it, I turned the key and car went to "READY" with no errors on Dash.
I checked the 12v battery and could see it was sitting at 14.4v so it looked like it was charging ok,
particularly since it was sitting for a week without a charge.
I connected up the MUT III and scanned for errors. It not only listed the OBC Timeout Error and DC-DC Error
from the previous time I turned on the car without the charger installed, but it also listed LIN errors for all
of the CMUs which was a bit weird. I re-ran the DTC Scan with erasing all the errors first, and all errors were
cleared. Then for the moment of truth, I turned off the car, plugged in the charge cable, and the charge Light
lit up on the dash, cooling fan came on. and I could also hear the coolant pump circulating coolant. It was 5
bars down when I started, and after 20 minutes I could see that the fuel gauge had moved up one bar.
So all is looking great so far.

I've got a friend that wants me to run the MUTT III procedure that re-calibrates the battery capacity. Now that I've got the
wrecked I-MIEV fully working again, I can use it to run through this process on it before we do it on his car.
Once I've completed that, The charger and test bed car will be free for more experimentation, maybe if KIEV or Coulomb
need me to check voltages and other readings on the charger I can open it back up and try a few things now that we have
a fully working charger as a reference.
 
Way to go Larry, great job on getting it fixed--and thanks for the offer for additional diagnostic testing.

And now we have some clues of where to look when the snubber caps are blown, such as in Jay's charger.

i think the burnt by-pass resistors such as in 1pk's case will be a different culprit.
 
I've run the repaired charger now for a few days, and it seems to be stable, so smoke has come out so far ;-)
Now that I have a working charger and a test bed, There are a few things I am interested in testing.

1) I've heard several people say that the charger will run even with a DC Voltage applied to the AC input. I think Coulomb
has mentioned that other chargers can be tested using a 52VDC as a input. I was wondering if anyone can confirm they have
tried running a I-MIEV Charger using DC input. Any ideas what the voltage range would be?
If A spare I-MIEV Battery pack fully charged sitting at 361VDC was connected to the AC input of this charger, would this DC Voltage
work, and would it not be to high to cause any damage?
I have a 48vdc (54v nom) supply on my solar house. It would be interesting to find out if this is too low to try charging directly from.

2) I am thinking of temporarily cutting one of the CANBUS lines to the charger to see if it would start charging without receiving any
communications from the EV-ECU, BMU or CMUs. This would be good to know if a charger is being tested on the bench without CANBUS
Communications.

3) I want to check the signal on the CHGP line that runs from the charger to the EV-ECU. Currently I don't know if this is just an on / off signal
or if it is a continual pulsed signal to prevent a timeout. When I get a chance I'll connect a scope to this and I'll let you know what I see.
 
skylogger said:
I've run the repaired charger now for a few days, and it seems to be stable
Excellent!
, so smoke has come out so far ;-)
You do realise that little words like "no" are sometimes quite important ;)

1) I've heard several people say that the charger will run even with a DC Voltage applied to the AC input. I think Coulomb
has mentioned that other chargers can be tested using a 52VDC as a input. I was wondering if anyone can confirm they have
tried running a I-MIEV Charger using DC input. Any ideas what the voltage range would be?
Since the power supply doesn't run from the mains (it's different to the Elcon/TC chargers in that respect), you can probably go down to 24 V or even 12 V and still have useful, measurable things happen throughout the powertrain. But it's important to use a current limited power supply; if a MOSFET is shorted, then a 12 V car battery can blow up the leads and PCB tracks as effectively as the mains. You really want the situation where the worst that can happen is that an LED on the power supply lights up saying it's now current limited, and the volts go to zero with no drama.

If A spare I-MIEV Battery pack fully charged sitting at 361VDC was connected to the AC input of this charger, would this DC Voltage
work, and would it not be to high to cause any damage?
361 VDC corresponds to the peak of about 255 VAC, so it should not hurt the charger. The inrush current should be limited by the 4.7 Ω resistors, but only to about 361/9.4 = 38 A, which is still an unpleasant splat. I see no advantage in doing this.

I have a 48vdc (54v nom) supply on my solar house. It would be interesting to find out if this is too low to try charging directly from.
At least the energy in the capacitors is about 1/64th of what it would be with 400 V, but the energy in the batteries is massively more than that. So again, you really need the current limiting, as well as the voltage, to limit the energy available for damage. At least a 30 V (or less) current limited supply (limited to half an amp initially, so a transmitter power supply doesn't qualify) is fairly easy to obtain, perhaps even second hand. I'm at a colleague's place typing this, and he has two :) (One was a freeby that only works 90% of the time, but it's still useful).

2) I am thinking of temporarily cutting one of the CANBUS lines to the charger to see if it would start charging without receiving any
communications from the EV-ECU, BMU or CMUs. This would be good to know if a charger is being tested on the bench without CANBUS
Communications.
That should be an easy test, but I think it's 99% certain that nothing will happen without CAN signals. Using some sort of CAN monitor to capture the appropriate CAN message would be great though.

3) I want to check the signal on the CHGP line that runs from the charger to the EV-ECU. Currently I don't know if this is just an on / off signal
or if it is a continual pulsed signal to prevent a timeout. When I get a chance I'll connect a scope to this and I'll let you know what I see.
Yes, that would also be great to know, thanks.
 
Hi Electronpusher:

<edit> just read your other thread

Are you able to determine if the 20 amp fuse is blown that is under the small cover on top of the motor controller box to the left of where the charger is? The fuse contains sand, so you can't just look at it, you have to use an ohm meter to check it.
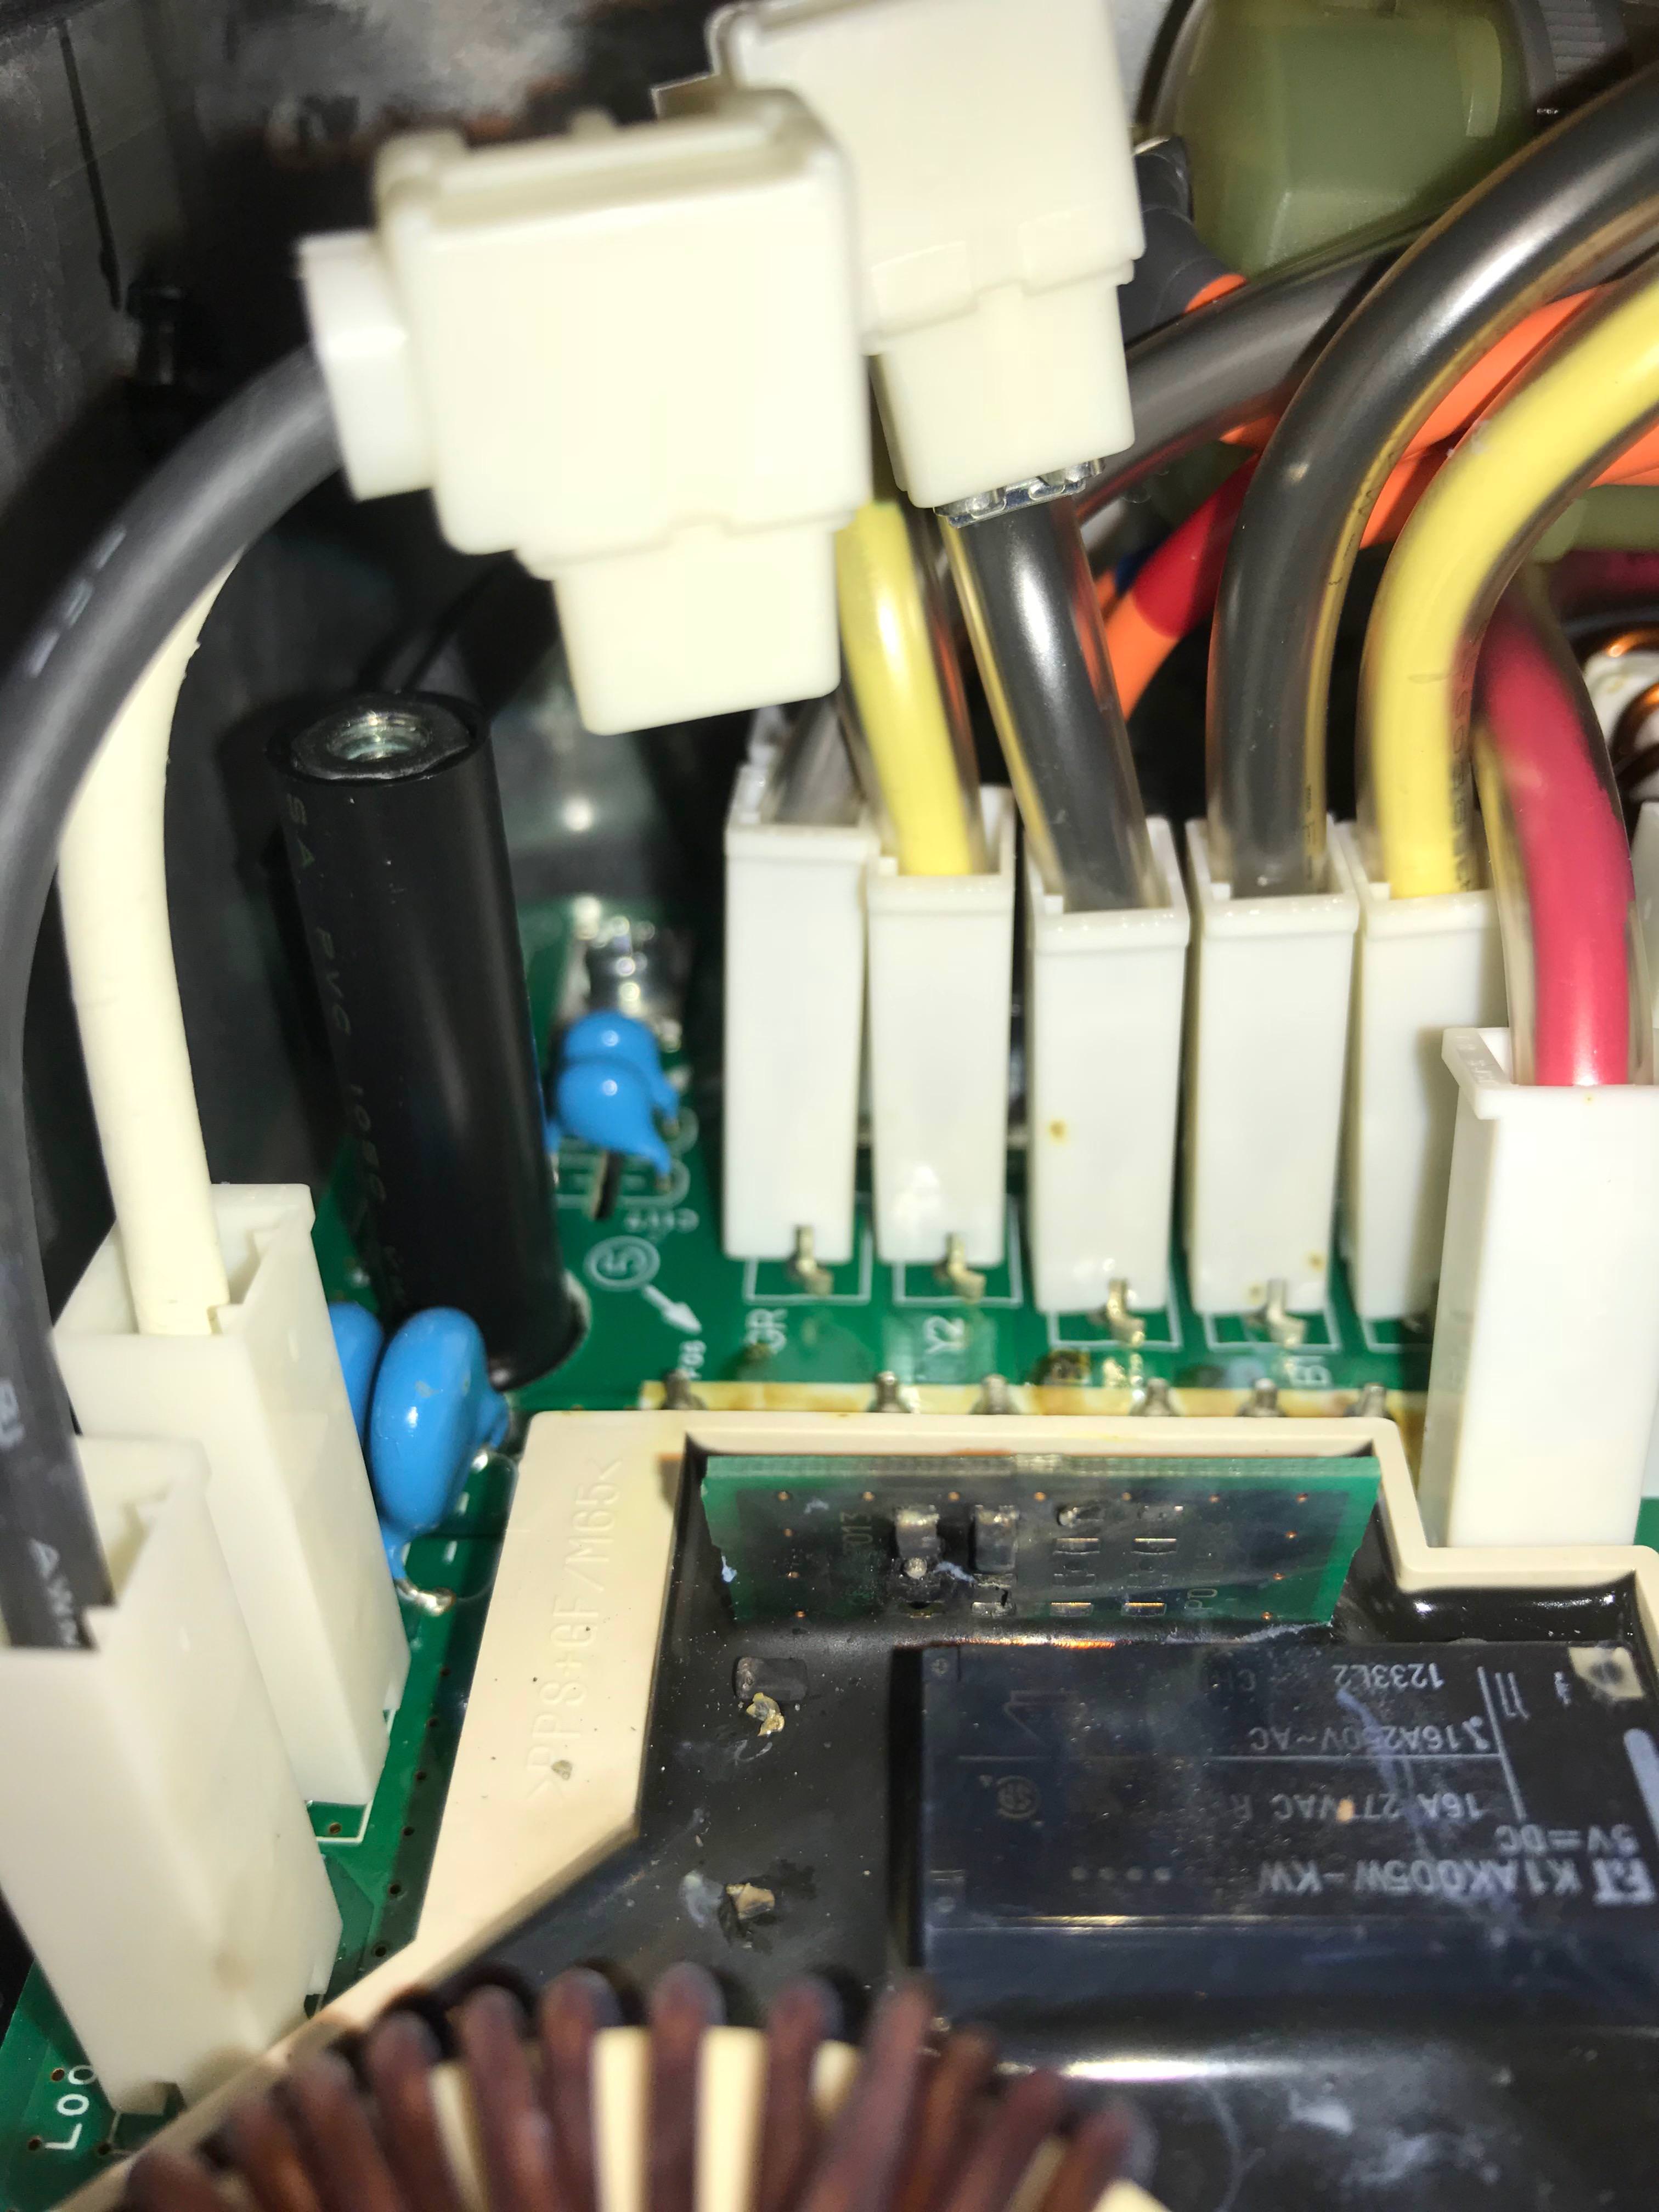
If that fuse has blown, you may have good luck and it has saved the critical parts in the charger, which was the case in the charger that I was working on. You mentioned that you have the same blown up caps in the doghouse. This means you have already lifted up the top PCB to have a look. Can you take a photo of the lower PCB next to where the flex cable connects the top pcb to the bottom pcb?
It would be interested to see if we can visually spot any damaged components in that area.
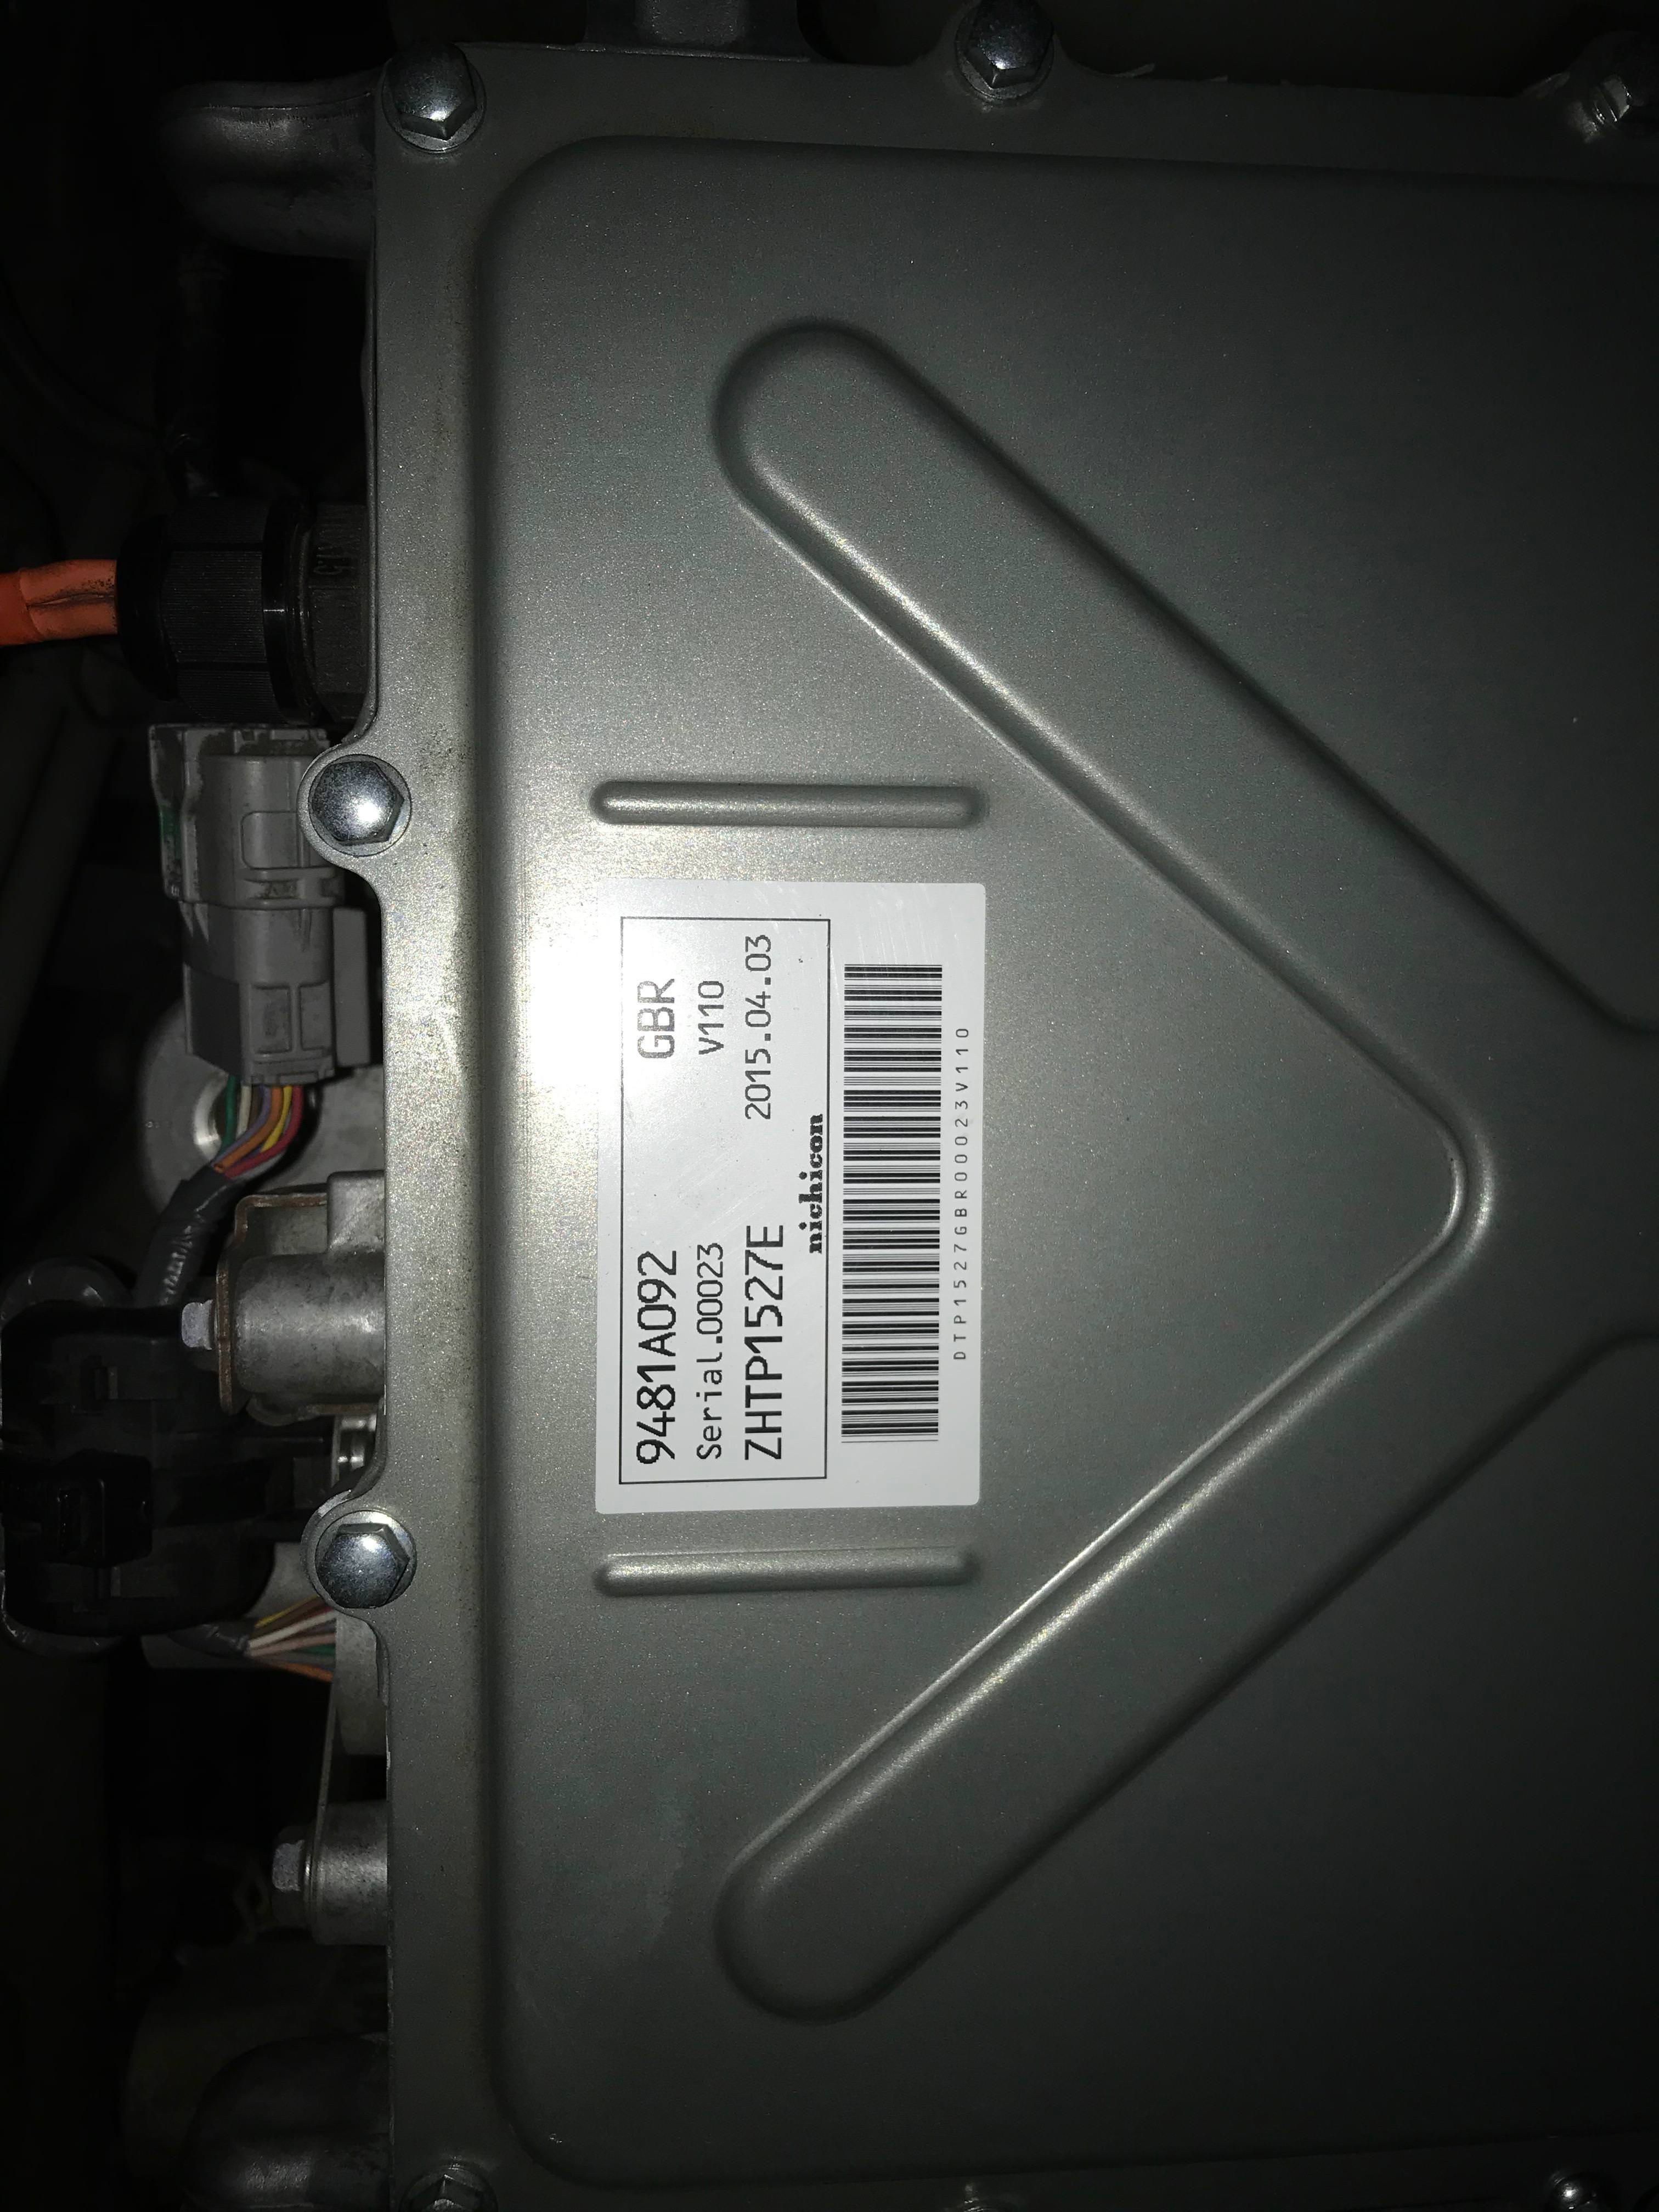
Can you let us know the Mitsubishi part number on the label on top of the charger? I am interested to see if it is same version/revision
has the one I was working on. The one I was able to repair seems to be same as what KIEV has, but I also have one with a different part number that also came out of a 2010 I-MIEV that has totally different PCBs in it. Is your I-MIEV a 2010 or later model?

<edit> from the photo in the other thread, you have same version I have where the two caps in the dog house were replaced with a small vertical pcb. The way I did the repair of this, I used exacto knife to remove all the rebbery potting. I did not want to get involved with desoldering the heatsink/waffle so I did all the re-work from topside only. I desoldered the pins that connect the small vertical PCB, leaving
the pins sticking up from the bottom pcb. The Vertical PCB was used to emulate the original two through hole caps, so I purchased the original through hole caps (value listed earlier in this thread) and soldered them to the 4 pins that were sticking up from the bottom pcb that the vertical pcb was originally connected to.

I think these two caps and the fuse blew because the output voltage increased too high. If your problem is same as mine, you will still need to find the other fault that caused the output voltage to go too high. If you get a chance, please take a photo of the PCB next to where the flex cable connects the top pcb to the bottom.
 
Gday, we havnt checked the 20 amp fuse on the motor controller yet, but this weekend i will be going to my fathers shop where the car is at the moment, and ill get as many pics and as much info as i can.

Thanks again,

Rob.
 
sorry for the late reply, here are some pics,

6TGoWeO.jpg


83XRF4b.jpg


bC03WvG.jpg


hope these help.
also of note, our car is a 2010 model, yet the converter appears to be a 2015, so i am assuming that it is not the original converter. either way, it appears the failure mode is the same as others.

these are older photos of when we first pulled the converter apart some months ago. ill get some others as requested as soon as i can. this weekend hopefully. unfortunately the car is not stored at my house at the moment.

thanks again for all your efforts in the reverse engineering and working through a repair.

rob.
 
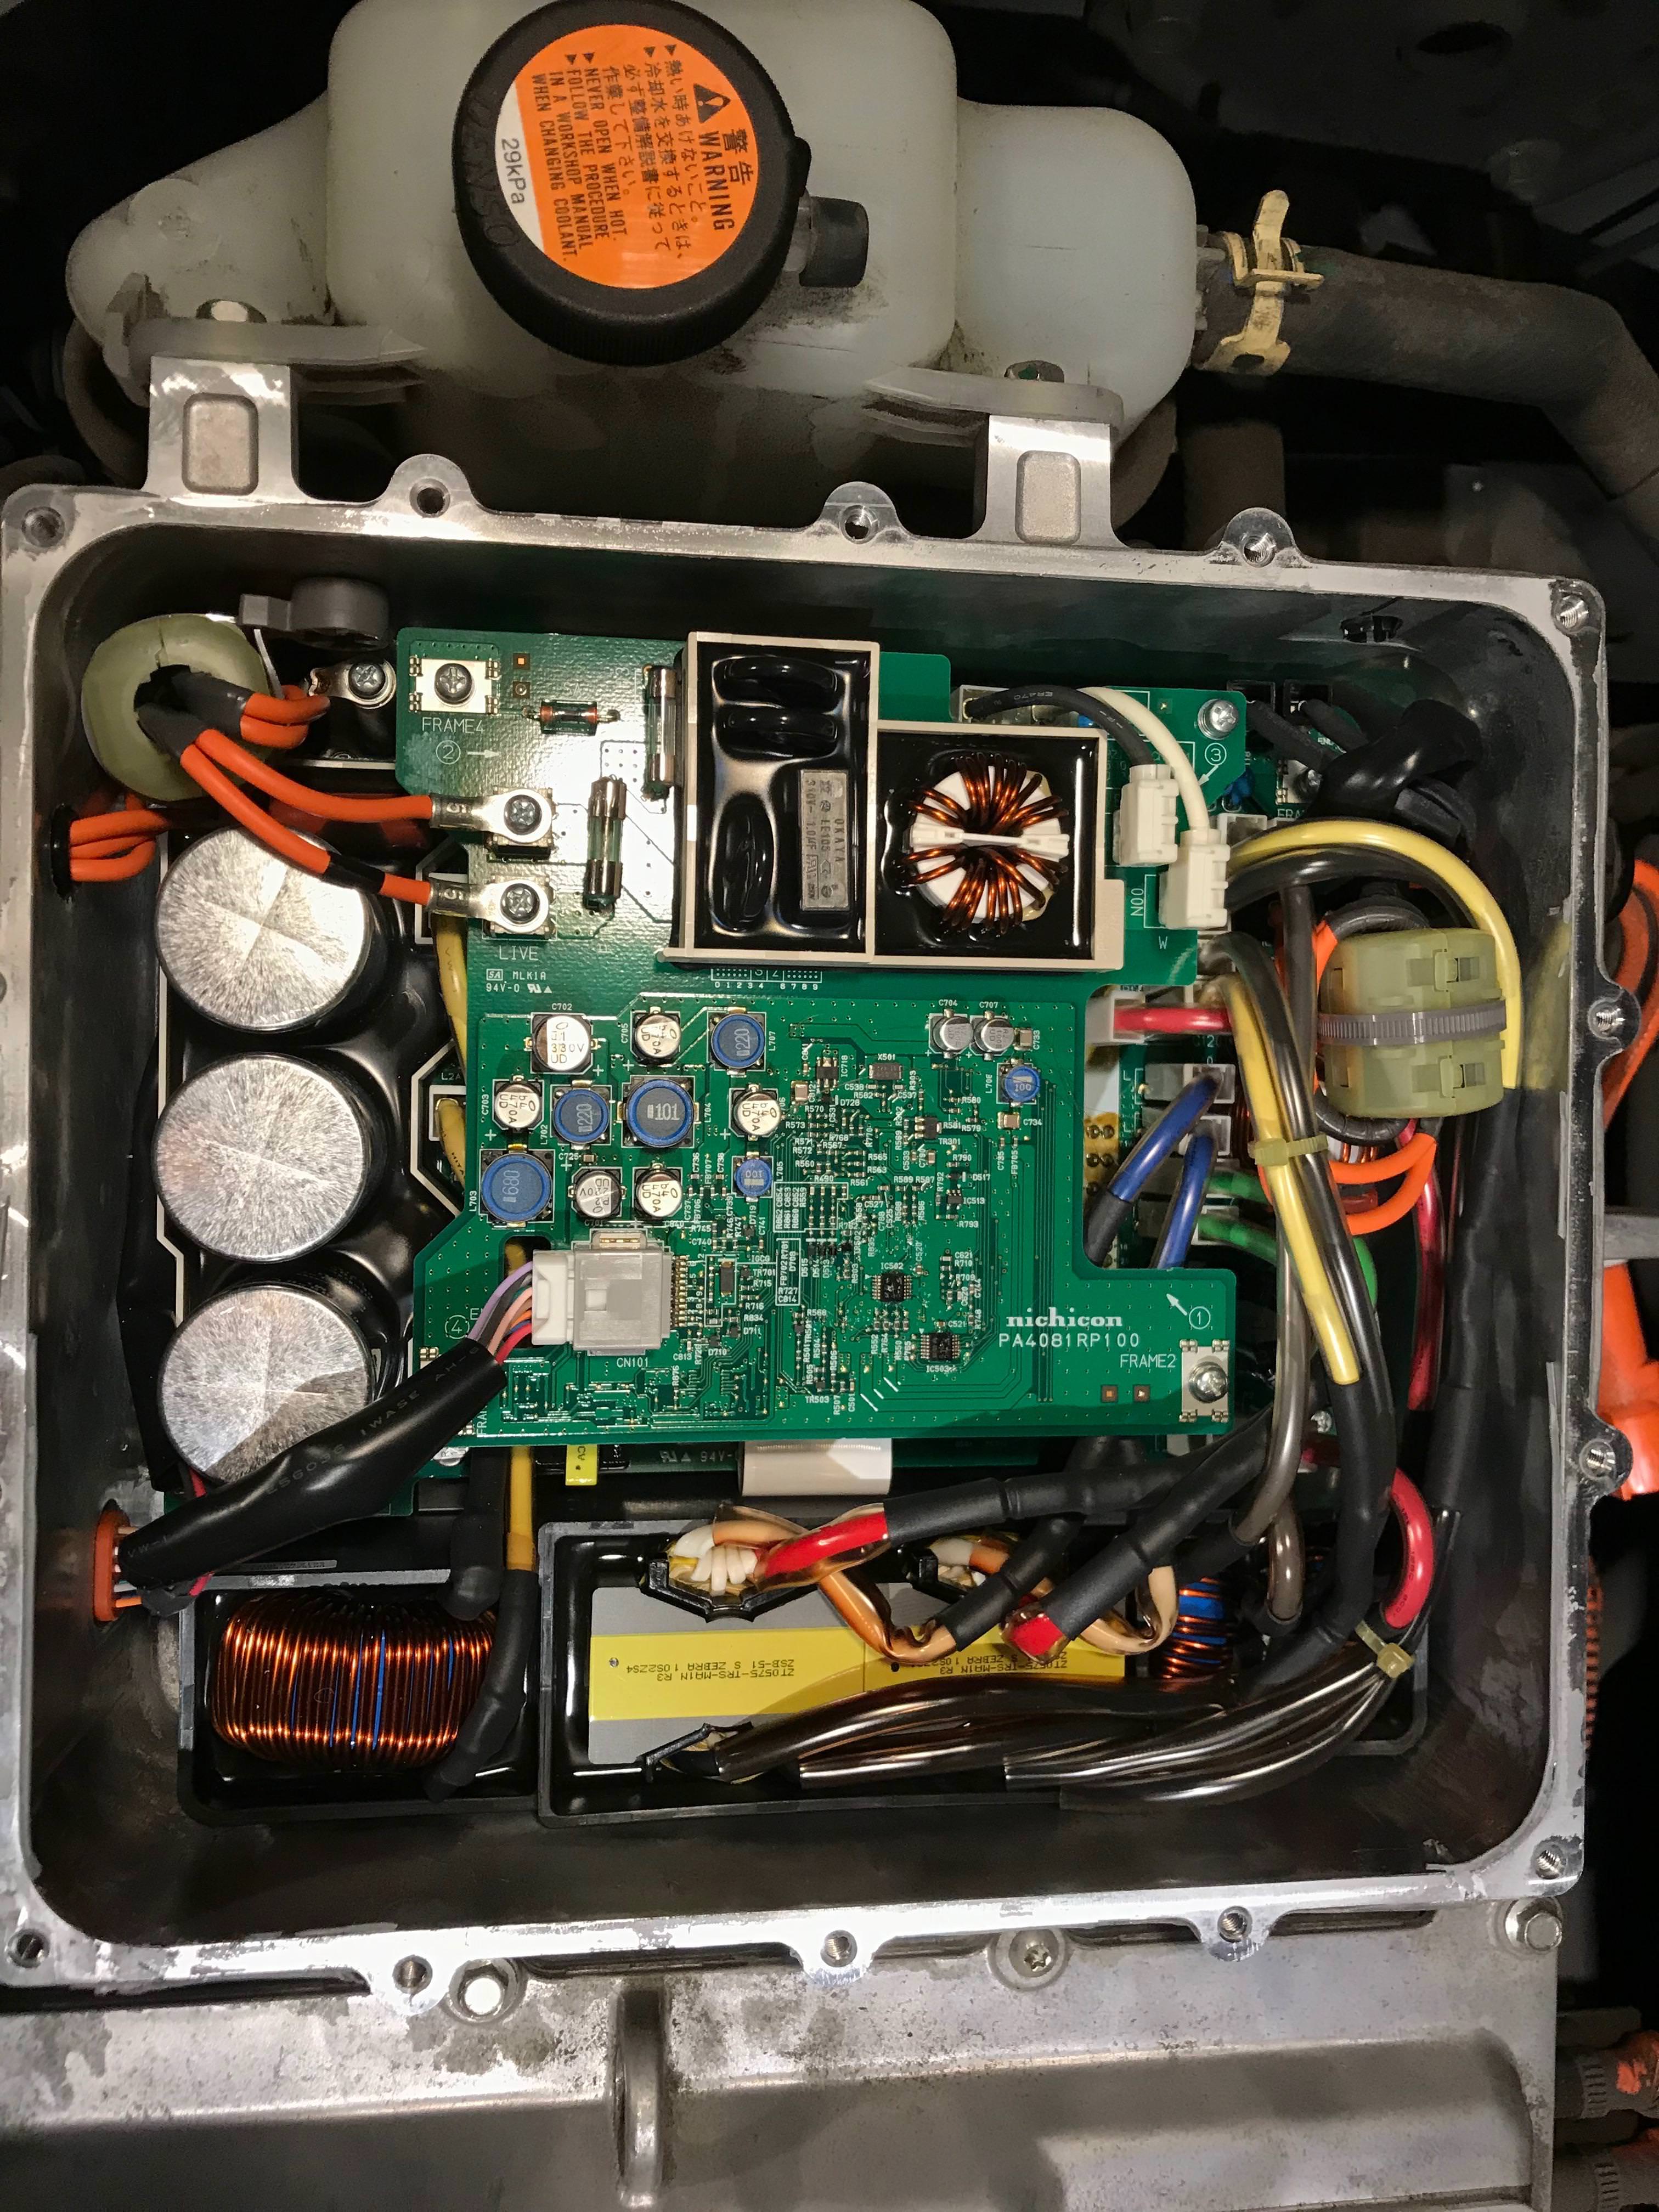
It does look like a fresh new charger since you can actually see the colors of the fat wires within the clear tubing--they are not showing signs of heat discoloration yet. But the tubing covering the tops of the large caps is already starting to recede. They added a second fuse to the AC input line and put an EMI ferrite on the AC line. Removed the external EMI filter box that was bolted to the lid, since it doesn't make sense or help to have the surge suppressor after that filter.

So this is another case where the snubber caps have blown. Something has caused an over-voltage at the output of the boost stage and before the final output filter. Inspect the bottom board with a magnifying glass looking for missing or cracked solder joints on all the tiny resistors and caps.
 
electronpusher said:
sorry for the late reply, here are some pics, ...
Interesting. I note some differences, for example two fuses versus one on the top board (middle photo).

And: the two fuses appear to be in series.

Huh?? How does that work?
 
The new lower fuse is in line between the Live (Line) input terminal and the Black wire (L00) feeding AC to the bottom board. There was no fuse on the Line side before except in the external EMI filter bolted to the lid. So all Live/Line traces downstream of the AC input terminals are protected by this new fuse.

The top fuse (F103 previously and likely now) is only in line with the lower ZNR varistor that connects between Line and Neutral, so the circuit is: Line-fuse-ZNR-Neutral. So this is now protected by the new fuse also.

It appears that they made some changes to eliminate the external EMI filter box and retain some of its functions.
 
Electropusher: The charger label on your charger has the same Mitsubishi part number 9481A092 as the charger that I just repaired.
Both are in 2010 I-MIEVs here in Australia that were built in Japan.
You also have the vertical PCB with blown caps in the dog house, VS the older style that had the through hole caps that the vertical PCB emulates. The fault on the one I repaired ended up being a poor solder connection of a 39K 0603 resistor close to where the flex cable connects the top PCB to the bottom PCB of the charger boards. I noticed that when I tried resoldering the 39K resistor, it would not re-solder properly and I found the end caps of the 0603 resistor did not have all of the plating on them. It would be interesting if your charger and my charger happened to be made in the same batch, of the same reel of SMD resistors (with faulty end cap plating), and you also had a bad solder connection in the same area that I had. I think there are actually 2 of these 39k value resistors in this circuit. My charger probably worked for a while until vibration caused the poor cold solder joint to the resistor to open. The lack of solder plating on the ends caps of the resistor is probably why during the manufacturing process, when the PCB was going through the oven, its mounting twisted a bit because the solder past only barely connected and held one end down and it floated a bit.

I think you will find when you dig out the rubbery potting around the vertical PCB in the doghouse, the only damage is the SMD Caps on the vertical pcb. The two spots that look like something else is burnt in front and to the right of the vertical PCB is where the shrapnel from the caps of the vertical PCB Caps has landed, and melted back into the potting. If you dig there, you will find no actual components under that area on
the main PCB. KIEV found the cap values on the other thread and the Murata info is:
DEHR33F102Kppp 3150Vdc 1000pF±10% 13.0mm max. 7.5 6.0mm max. A3B B3B N3A
I used 2 of these through hole caps and soldered to the four pins that connected the vertical PCB to the main board by removing the vertical PCB and soldering the caps to the remaining pins sticking up. I replaced with Altronics equivalents.
 
If you find badly soldered 39k resistor(s), I have some here and can drop them in the post for free. Just PM me your address.

It would be so sad if a bad batch of sub-one-cent components is what is crippling these $4000 chargers.

However, the SMD HF filter capacitors just seem to be a terrible design decision. Hopefully it was only done in response to some acute through-hole parts shortage.

[ Edit: "SMD Y capacitors" -> "SMD HF filter capacitors" ]
 
Back
Top