[ The P1A15 Troubleshooting Thread ] No READY. P1A15 error. Condenser charge timeout.

Mitsubishi i-MiEV Forum

Help Support Mitsubishi i-MiEV Forum:

This site may earn a commission from merchant affiliate links, including eBay, Amazon, and others.
That is a good find and a good idea to upgrade the caps to a better technology.

The Ct cap on my hybrid board has a slightly pink tint to it, unlike all the rest which are light or dark brown.

[edit] The Ct cap measures 0603, but it looks like there are solder pads for an 0805.
 
kiev said:
The Ct cap on my hybrid board has a slightly pink tint to it, unlike all the rest which are light or dark brown.
I'd say that's a good indication that there is meant to be a different type of capacitor there.
 
The more i study, the less i know...

Kemet has a good overview of the various multilayer ceramic capacitor classes, materials, properties, etc

https://ec.kemet.com/blog/mlcc-dielectric-differences/

Based upon that i would guess that the pinkish white cap is a Class 1 NP0 type that is supposed to be highly stable.

For example i found this description of the Negative-Positive Zero (NP0)
NP0 (C0G) dielectric properties suited for precision circuits, requiring stable dielectric characteristics:
* Negligible dependence of capacitance and dissipation factor on time, voltage, and frequency
* Low-loss (High Q)
* Predictable linear temperature coefficient
* No Piezoelectric behavior

It seems most unlikely that such a part would degrade before the lesser Class 2 capacitors on the board, but i have to wonder if this is a common cause across all the P1A15 failures reported on the forum?

[edit] if you want to drink from a firehose, check out the wikipedia entry!
https://en.wikipedia.org/wiki/Capacitor_types#IEC/EN_standards

[ps edit] Presentation on MLCC ceramic capacitor failure study at Sandia Labs (pdf file)
https://web.archive.org/web/20120113034107/http://www.dtic.mil/ndia/2011fuze/SessionIIIAOMalley.pdf
 
Hi

My thoughts are perhaps something else is degrading and we are just compensating with changing the capacitors value?

The car is still going as well with it in! The live data is still the same 4-6v difference.
 
Hi Guys,
I have followed your interesting testing and trouble shutting actions, bravo!

So if I understood well you replaced CT from 1nF to 220 PF, right? Probably compensating something else that is degrading.
Maybe a poor design that after some years does not resist to the degrading of some component...
Still let me think that the degrading component could be the transformer(s) of the hybrid even if the capacitors are by far the more critical components, as we all know.

In my case, around 1 year ago, I "compensated" adjusting the input voltage divider by a resistor in parallel to one of the divider resistors before the hybrid. Till now the car is working.
I understand that it is not the best solution and a real troublesutting is always preferrable, but in case of a poor design....
 
Thank you for the update on your successful resistor mod to increase the Op Amp gain, i'm glad that it is still working for you.

Yes the Ct capacitor was changed as you described. Based upon its color i suspect that it was intended to be a highly stable device of the NP0 type. Nearly everything on the board had been replaced except this capacitor and the transformers.

We tried to test the transformer with a low level frequency generator and couldn't detect anything obviously "broken". It may be that a high frequency signal is needed to test it. The transformer primary winding on my new board from an unused MCU is tapped but not in center--there is a slight resistance difference from each end to the center, possibly to create the LV supplies with a slight difference to allow for the loads on the +LV versus the -LV. The 2 supplies measured nearly equal absolute amplitude on my board but have shown significant differences when measured on reported failed boards.

Possibly the capacitor mod has increased the PWM frequency, which had the effect of compensating for a degraded transformer, similar to how increasing the gain of the OpAmp provided a "fix"..?

One other observation was that Justin was able to use localized heating and cooling of components to cause the Output to degrade. The NP0 capacitors are supposed to be nearly immune to temperature changes whereas the typical ceramic cap is not, nor are resistors. Maybe this was just a normal response from temperature sensitive components and not related to the main culprit.
 
Thanks Kenny and Justin,
In a way (Ct) or another (voltage divider), a soultion seems to be acheived.
I am glad another of these lovely cars has been probably saved from a premature dismission. In Italy seems that the replacement of OBC costs from 1500 to 2500 Euro, so I guess many owners will not accept to pay such money, specially if the car is 10 years old with degraded battery pack too.
 
i would prefer to find the culprit than to make mods without knowing why they "work".

The next big problem will be replacing the packs, but it is a shame to have nice cars that can no longer operate for whatever the reason.
 
Hello from the Scottish Borders. I've just bought the iOn from page 10 of this thread. I've done a few EV conversions in the past and bought a Leaf in Feb. Now I'm hoping 3rd time lucky as at least 2 people have had a go with this iOn.

Symptoms of this car when I got it is that when you tried to start it, it set a P1A15 error. The 12v battery was replaced by the previous owner with new one. I'm keeping it fully charged and it tests good. I also checked to see if it would charge but that set a different fault, P0AA1 which relates to the main battery contactors. I've been reading through the forum and it is suggested that a weak 12v battery can damage the contactors, mine has a new battery, so I ordered a replacement contactor and fitted that in the battery box. Result is that the P0AA1 fault is gone but it still won't charge, now it sets P1A15 when trying to charge or start.

Next step I connected a volt meter to the main battery terminals inside the MCU, disconnected AC and heater HV connectors and connected my Autel DS808 to read condensor voltage. The result of that test is that the car is precharging, voltage goes up to pack voltage on my volt meter and then bleeds back towards 0 volts when I try and start it but the Autel stays at 0 volts. Both top and bottom covers of my MCU were off when I got the car and there are obvious signs of wires being soldered to the ISA board so that's my next step. I'll report back once I've had a look at the ISA board.
 
That 2012 iOn with a P1A15 error was also discussed on the "speakev" website in this thread:
https://www.speakev.com/threads/peugeot-ion-p1a15-error-code-capacitor-not-charging.153841/
 
Eddie49 said:
That 2012 iOn with a P1A15 error was also discussed on the "speakev" website in this thread:
https://www.speakev.com/threads/peugeot-ion-p1a15-error-code-capacitor-not-charging.153841/

Thanks for the link Eddie49. I've had the circuit board out of the MCU and inspected the ISA board. Test wires had been soldered to the 8 pin op amp and according to the thread above and speaking with the previous owner he had been able to get the car to move on a couple of occasions. That tells me that the ISA board was outputting the condenser voltage in the past, however now it just reads 0 volts even when I watch the voltage on the condenser go to full pack voltage and then drop off again. I suspect the op amp got damaged so I've ordered a few AD8677 from Mouser. Even if it is still working I wouldn't trust it.

I'll update again next week, if the op amp doesn't work I'll have to do some actual voltage measurements on the ISA board.
 
After clearing the fault code, Have you checked the live data of the battery pack voltage and condenser voltage when applying terminal 50 and attempting to get ready mode.

If it doesn’t go into ready mode then you will have to clear the fault code again before rechecking the live data. You only get a second or so to monitor the live data but if you might be able to see this on the freeze frame data for that fault code.
 
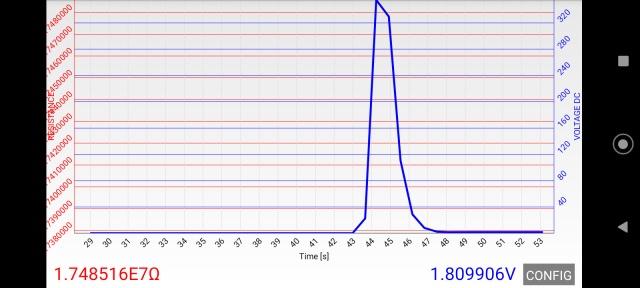
Here's a graph of the actual condenser voltage when trying to put the car into ready mode. Live data stays at 0 volts even though the condenser is precharging fine.

C6RVhPh.jpg


http://imgur.com/gallery/5aN5M3G

Edit: fixed broken picture.
 
I've fully tested the ISA215N board on my MCU and it's goosed. Using the ISA215N datasheet and google translate I determined that I am seeing around 4 volts briefly during precharge on pins 1 and 2, as expected. I'm getting 15 volts on pin 5, also as expected, but pin 3 is always showing -0.4 volts when it should be matching the voltage across pins 1 and 2 (pin 4 is MCU earth).

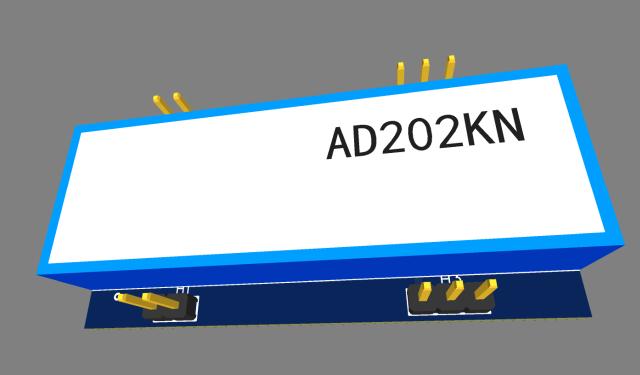
So knowing that pin 3 should output the same voltage as pin 1, but isolated from pins 1 and 2, I started looking around for isolation amplifier circuits and found that Analog Devices makes an AD202KN isolation amplifier. It requires a 15 volt supply and can be configured for unity gain (max 5 volts input) using only a jumper across 2 pins on the device. It's a bit pricey but I've ordered one from Mouser (datasheet) but there are Chinese sellers on ebay claiming to have them for about half the price. I've knocked up a simple pcb design and I am getting that made. The headers at the top of the board will actually be 90 degree and the board will stand on end with a couple of blobs of glue to CN2 and CN5 so it doesn't vibrate. The headers shown at the bottom are there just as test points if required.

wFa9nYg.jpg


Hopefully I'll have everything in about a week, I hope it works!
 
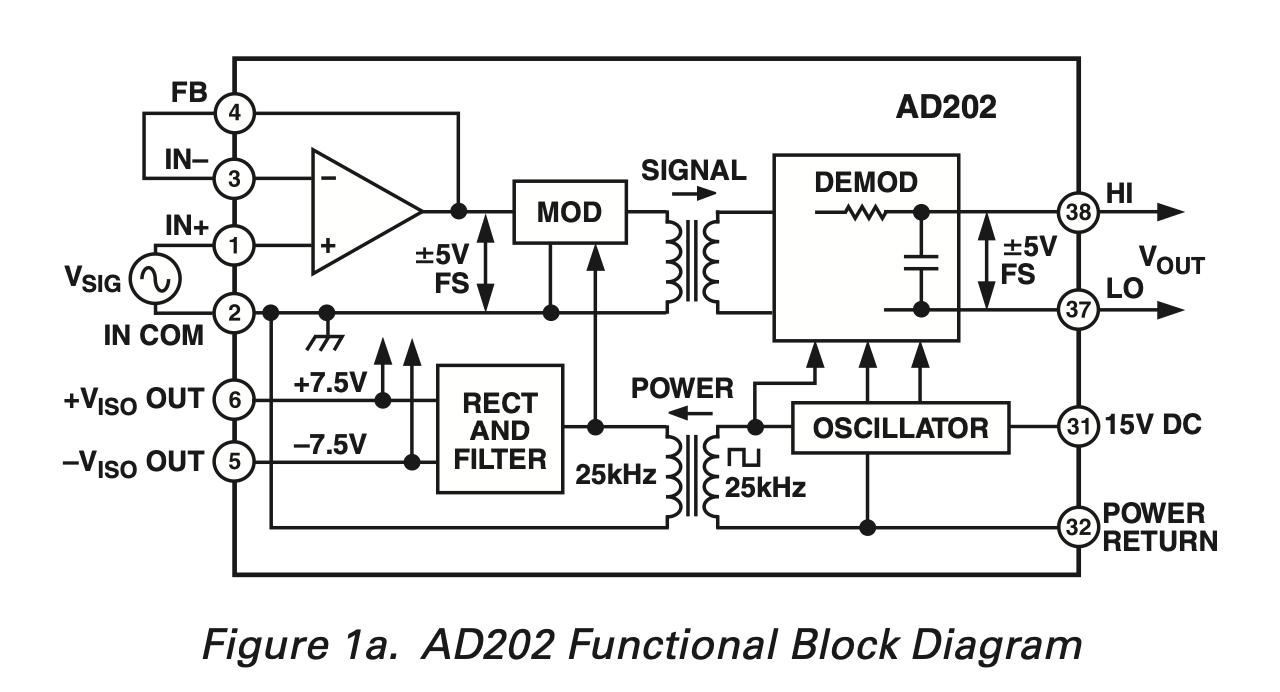
Wow that is a great find there Greg. It is nearly the exact same circuit that is on the ISA hybrid--i would never have expected to find such a perfect match. Thanks for sharing i will have to order one to investigate also.

Q0Mc7dw.png


$124 at digikey, https://www.digikey.com/en/products/detail/analog-devices-inc/AD202KN/611855
 
Hi

**************** EDIT ****************************

My AD202KN arrives today

just checking the configuration and a question about pin outs

going by the datasheet I can see the pins as follows but can I use pin 22 and 18 both as common for the 15v return?

Main board AD202Kn


pin 1 VH pin 1

pin 2 VL pin 2

pin 3 signal pin 19

pin 4 12v rtn pin 22 and 18

pin 5 vcc 12v pin 20


pin 3 and 38 on AD202 bridged
 
That looks like the way to wire it, but you also need to add a 2k resistor between VH and pin 1 of the AD202, and add a jumper wire between pin 3 and 4 of the AD202.

but one thing that concerns me is that little chassis ground symbol hanging off of pin 2 inside the diagram--i don't know what that means.

You could check to see if pin 2 has continuity to the enclosure of the AD202 device or any exposed metal of the device cover, etc.

i would definitely test it on the bench first to check the output signal polarity of pin 38 to pin 37 before connecting 32 to 37. i.e. A positive voltage on pin 1 with respect to pin 2, gives the same positive voltage reading on 38 with respect to 37, to within a few mvolts
 
Perhaps it’s shielded inside the enclosure as the enclosure looks plastic

From what I read it suggests a capacitor between 3 and 4, is that required on this as I understand that was just for smaller tolerances
 
That's good if plastic and enclosed, just don't want any connection between Pack (-) and vehicle chassis.

i read the datasheet to say that cap between 3 and 4 is not necessary for unity gain such as this. But if the op amp goes unstable and oscillates, then the cap would be used for stability compensation.
 
Back
Top