The Troubleshooting and Repair for On-board Charger (OBC) Thread

Mitsubishi i-MiEV Forum

Help Support Mitsubishi i-MiEV Forum:

This site may earn a commission from merchant affiliate links, including eBay, Amazon, and others.
Did a really lengthy post about answering some of Electronpushers questions, but took too long and the form timed out and I lost it all.
So heres an abbreviated version

"Do we need to remove the black stuff in the dog house, or can we mount the new snubber caps on the riser (I know the rise is for SMD,
not sure if it is possible to retro fit through the hole onto it or not)."
My vertical riser PCBs were both damaged too much on the two OBCs that I've looked at so far. If your one looks re-usable, that would save you some time. I still managed to rework this without removing the main PCB from the box. I used a box cutter knife (did not have an exacto scalpel) to cut strips in the black pottiing stuff. Then I dug out with a tiny small screw driver. I also have some dental tools I bought from local chemist to do some finer cleaning. In my case, I desoldered and removed the vertical PCB and used the remaining pins to solder the two replacement through hold caps back to the main PCB, so I left the vertical PCB out altogether.

"Do we need to remove the board from the waffle plate, or can we do the diagnosis and repair with it attached to the waffle plate?"
You can test most of everything without removing the main board from the waffle or removing the main board from the box.
KIEV has done a really nice job of a schematic page with the connecting pins on the white stips on the main board that connect to the waffle.
You can use that page and an ohm meter set to DIODE testing to check all the diodes, bridges, and half the IGBT to see if most of it looks good.

"Can the board with the dog house etc be removed without desoldering?"
The vertical riser PCB inside the dog house cannot be removed without desoldering 8 pins (4 on front and 4 on back)
The doghouse is not a seperate board, but just an area on the main PCB that has a plastic boarder filled with the black potting stuff.
If you do want to remove the main PCB, you have to one by one LABEL and remove all the wires with blade connectors.
Then the four screws that mount the PCB to the box in the corner are removed.
Then all 5 standoffs need to be removed. The screw in the center of the Main PCB is removed, but the standoff that it screws into ALSO has to be removed. The four outer standoffs also need to be removed, because even though it looks like they do not tie down the PCB, They bolt the heatsink of the waffle to the box, and since the waffle is still soldered to the main PCB, its still fixed to the box until all five of these are removed.
 
I meant to mention earlier re the concept of the pre-charge relay possibly being the root cause of the problems. Since the pre-charge resistors are only 9.4 Ω, the highest current the relay contacts have to briefly pass is about 240 x √2 / 9.4 ~= 36 A. This is a fair bit more than the 16 A that the contacts are rated for. This could explain the micro-pitting seen in Skylogger#2's relay contacts. Though a colleague of mine said the contacts looked fine to him, and might be suffering from too little current, not "wetting" or cleaning them enough. I can see both points of view: it gets too much current for a fraction of a second, then has no action for probably 24 hours So maybe that's too little average current, and too much peak current. Either or both of these might contribute to the relay contacts going high resistance.

When in high resistance, it might exhibit what's seen in some of the poll results, where the charrger charges at very low current for a few minutes, then shuts off, and often dies shortly after that. The very low charge current could be due to the pre-charge resistors dropping a hundred or so volts, making it impossible to maintain ~400 VDC on the PFC output capacitors. The charger would struggle to get 360 V or so (after the transformer) to push current into the battery pack.
 
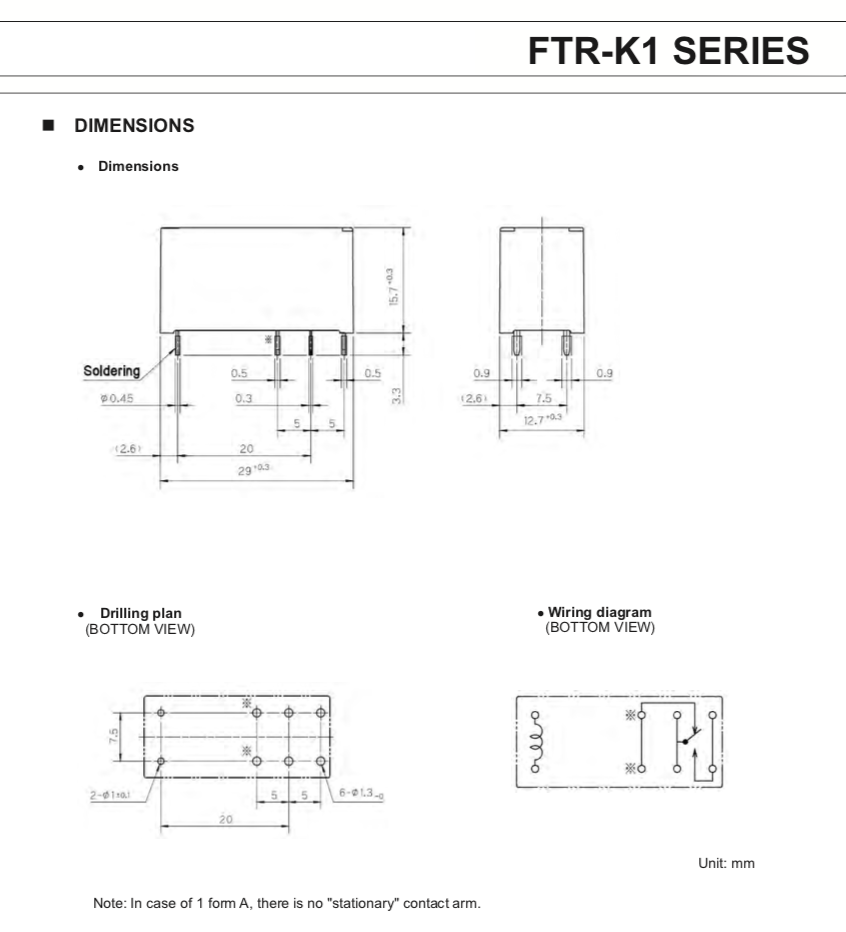
i hope i didn't cause your relay problem with an error in the schematic drawing for the AC input. i just used a generic relay in Kicad and didn't put all the pins. Here is the datasheet picture from the Fujitsu pdf, and i think the concept is the same--a single pole N.O. contact that closes when the coil is energized.

tusiAZS.png


copied from: https://www.fujitsu.com/downloads/MICRO/fcai/relays/ftr-k1kw.pdf
 
Um, but Kiev your photo of the underside of the charrger PCB shows 4 contact pins, plus 2 coil pins for 6 pins total.

I think Nichicon must use a version of this relay with the normally closed pins not present. Oh, maybe that's what the reference mark symbol ※ means; not present on some versions. [ Edit: That must be what they are saying with "form A", there is no "stationary arm", which must mean no normally closed contact. The arm is clearly present internally, at least in SkyLogger#2's case. ]

[ Edit: X with four dots -> reference mark ※ ]
 
i think you are right, mine is marked K1AK005W, so it appears to be the single contact "1 Form A" contact configuration. Their note is incorrect, it is the stationary "pins" that are not brought out, but the stationary arm clearly is present.
 
skylogger said:
Did a really lengthy post about answering some of Electronpushers questions, but took too long and the form timed out and I lost it all.
So heres an abbreviated version

Hi Skylogger,

I hate it when that happens half way through typing, very frustrating, however I very much appreciate your help and the abbreviated version anyway. We have take out the DC/DC Converter, but I have not begun disassembling it just yet, I will start that this week some time.

I think with the riser, I'll desolder the damaged caps, and take a look at how the pads held up before making a decision. If I can reuse the riser, it will make life easer.

Regarding removing the DC/DC Converter board with the dog house (not sure what we are calling that PCB board, do we have a name for it?), I know understand why last time we had trouble removing it, and that is because we still had the waffle house bolted down, and the PCB is soldered to the waffle house which I did not know at the time we last had it torn apart. I thought those white strips where the waffle house is soldered to the PCB were sockets or plugs initially, but now that makes sense, it is for heat transfer to the waffle house and hence the *hard* connection to the waffle house.

I'll need to do some reading back through Kiev's posts and study the schematic diagram he has produced.
 
Hi Electropusher:
If you look at Ohm out the riser vertical PCB, you will find as per KIEV's schematic, that the SMD Caps emulate the two original through hole caps, which connect to the main board by four holes. I thought these were in series with each other, but the track routing on the main board (and maybe on the riser vertical board also), actually make these two caps parallel each other. I think Coulomb pointed out that the vertical PCB was populated with a few SMDs, but there were unpopulated spaces for spare caps also. So if the pads are damaged where the original caps were blown, you might be able to use the spare locations. There is probably some layout consideration to prevent arcing, so Even though the caps are parallel, they are spread out a bit and not put too close to each other, so You might take that into consideration when you are mounting the through hole replacements.
 
Hello all,
My name is Christophe, and I am the proud owner of a C-zero in France since 2012
My Z totals 82,000 km, it is 2011. I use it every day.

my Czero's charger is dead. One more!

One morning in July, I realize that my “Z” is not ready . I make an appointment with Citroen for the following week and I go on vacation. On the return, serious problem : Citroen gave me a quote for the charger change: 2800 €

I think it died due to the heat this summer, over 35 °C in my garage while charging.

While waiting to change the charger or to repair it, I recharge my "Z" on the Chademo socket at Ikea.

The apparent diagnosis: when I plug my charging cable, the green charging light on the cable box comes on for several seconds, I hear a few clicks to the cable and to the car, the car's blower starts a few seconds, then everything stops, no blower, no green light on the cable, and no fault on the cable or on the dashboard.

With the ignition key closed, when I take the voltage across the auxiliary battery, I get 12.4 volts
With the ignition key open, I get 14.5 volts.

(At the December 2015 maintenance, Citroen told me that the accessory battery was low, so I changed it preventively).

Do I have to believe that the 360/12 VDC converter works?

I'm going to autopsy the charger next Saturday, and take pictures.

Anyway, the problem is that I can not do without my "Z", how to do if the repair is worse than the load on the Chademo terminal?

Can I remove the PCB from the charger for repair and continue charging with the Chademo plug?

And does the accessory battery continue to charge?

Congratulations to all for this excellent topic. Christophe
 
Hi Christophe:


The fault with your charger might be a bit different to the ones I am working on. It sounds like DC-DC is still working which means the 20 amp fuse has not been blown. It also seems to detect when AC is connected.

"The apparent diagnosis: when I plug my charging cable, the green charging light on the cable box comes on for several seconds, I hear a
few clicks to the cable and to the car, the car's blower starts a few seconds, then everything stops, no blower, no green light on the cable,
and no fault on the cable or on the dashboard."
With the ignition key closed, when I take the voltage across the auxiliary battery, I get 12.4 volts
With the ignition key open, I get 14.5 volts."

The input to your on board charrger is working as the AC is being detected, since you hear the contactors and blower come on for a bit.
It sounds like the DC-DC Converter section is also working as you see the voltage on the 12v aux go from 12.4 to 14.5, but not sure when you say "key open" and "key closed" seems to be opposite. When the car is "READY" you should see the higher voltage of 14+ volts which means the DC-DC Converter is charging the battery. When the car is OFF, The 12V Aux battery voltage should drop down to the 12v range.

"Do I have to believe that the 360/12 VDC converter works?"
Based on the above, it does look like the DC-DC 360/12 part of the box is working

"Anyway, the problem is that I can not do without my "Z", how to do if the repair is worse than the load on the Chademo terminal?
Just confirming, you earlier said you can still use the Chademo charger at IKEA with no problems? If so, that goes through a seperate relay and contactors and fuse, so that should be mostly separate to faults with the on board charger.

If you remove the Charrger/dc-dc converter out of the car, you would need to do a few things to be able to use the car while working on the charrger:
1) The liquid coolant runs in series from tank to pump to MCU (motor control unit) To Charrger, and back to pump.
with the charrger removed, you would need to put a bit of pipe between the hose that is the charrger coolant IN to the charrger coolant OUT of the charrger, so that a bypass is made and the full loop is present. If this is not done, the coolant will not flow and cool the MCU.
2) With the charrger out of the car, The 12v aux battery will not get charged and will continue to drain. you could connect an external 12v battery charrger to the battery every night, so you could do a few small drives during the day, and then put back on the external 12v charrger again every night.

3) You could still charge the car at IKEA CHADEMO to maintain power in the 360v traction battery.

"Can I remove the PCB from the charrger for repair and continue charging with the Chademo plug?"
And does the accessory battery continue to charge?

The connection of the traction battery goes through the charrger pcb, then goes down to the lower pcb that is the DC-DC Converter.
There is also some communications lines that go from top section down to bottom DC-DC section.
It might be possible to do some kind of bypass connections but its not really easy.
It's probably easier to use an external 12v charrger every night as long as your not using the car for long trips, and use the CHADEMO at IKEA to keep charge on the traction battery while you have the whole box out of the car. You would still need to bypass the coolant hoses so the MCU still has coolant circulated ok.
 
ChristopheFR said:
my Czero's charger is dead. One more!
Oh no!

... when I plug my charging cable, the green charging light on the cable box comes on for several seconds, I hear a few clicks to the cable and to the car, the car's blower starts a few seconds, then everything stops, no blower,
That to me sounds like the relay that is supposed to short the pre-charge resistors is not working, though that's just a guess based on similarity to other reports. With others, this situation quickly deteriorates to the charrger never coming on at all (because the pre-charge resistors fail open circuit). [ Edit: If I'm right, then that's a good reason to get the charrger out of the car as soon as possible, or at least not attempt to use the on-board charrger until then. ]

The only way to find out is to extract the charrger / DC-DC box from the car, as SkyLogger has said.

Sadly, it looks like you're in for a lot of inconvenience. Maybe it's only the pre-charge relay; if so, you should be able to get that shipped to you in a few days, and you might be back and running in a week, depending on your time. Your pre-charge resistors might have had a hard time of this, so it might be worth replacing them at the same time, especially if you can source them from the same supplier (e.g. Digi-Key or Mouser).
 
So my theory justifying the above is as follows. If the relay fails, then the 400 V bus charges as normal, and until the IGBTs are switching, there is essentially no load on the 400 V bus. So there is simply no way for the charrger microcontroller to know that the input relay has failed at this point. So it gets everything ready, perhaps does some handshaking with other vehicle computers, and if all goes well it starts ramping up the charge current in a few seconds. When the charge load is less than say 2 A, then the voltage drop across the two 4.7 Ω pre-charge resistors is less than 20 V, which is less than 10% of the mains. At two amps, the power dissipated by each resistor is I²R = 2×2×4.7 ~= 19 W, a severe overload, but they can probably take that sort of power for a few seconds. Note that with 10% less AC voltage available for charging, the PFC (Power Factor Correction) stage has to work 10% harder to maintain 400 V, so really it's 2.2 A at this point.

But when the charge power ramps up to say 920 W. so the current from 230 V would normally be 4 A, then the voltage drop across the pre-charge resistors is at least 40 V. That means the PFC stage has to work at least 17% harder, so it's really 4×1.17 = 4.7 A, which really means 44 V drop, so the current is really about 5 A, and each resistor is dissipating some 5×5×4.7 = 118 W. Surely at this point, they would fail open circuit. But there is a chance that they could fail high resistance, evaporating away some of the wire (assuming wire-wound types, as they appear to be), leaving some wire intact. This means that they would get even more heat with the same current, but the AC input to the PFC stage would drop even more quickly as the charge current ramps up. When the PFC stage input voltage drops below about 85 VAC, the charrger microcontroller would detect an error and stop charging. This protects the pre-charge resistors from further deterioration, so they might stabilise at a certain much higher than nominal resistance.

So my theory predicts two different outcomes, though one is more likely than the other. The more likely scenario is that the pre-charge resistors fail open circuit suddenly. When that happens, the 400 V bus collapses very quickly, which might cause stored energy in the output inductor(s) to cause the small doghouse capacitors to explode. These often fail short circuit, hence the fuse in the motor controller blows. We've seen plenty examples of this.

The other, less likely outcome is that the pre-charge resistors fail high resistance. As indicated above, this could cause the charrger microcontroller to terminate charging so quickly that the pre-charge resistors don't suffer much more degradation. This could be the situation with ChristopheFR's Zero. Alternatively, every time you fire up the charrger, it might be like playing Russian Roulette with the charrger; eventually it dies (because the pre-charge resistors fail open circuit), but it might get lucky and survive a few starts. Maybe ChristopheFR was lucky, and/or didn't try starting the charrger many times. Until the pre-charge resistors fail under load, you don't get the sudden stopping of charging, so you don't see the doghouse capacitors explode, and the DC-DC still charges the auxiliary battery.

One thing that bothers me with this theory is that any interruption of AC while charging should cause the doghouse capacitors to explode. Otherwise, when the input resistors fail open circuit, the charrger should quietly refuse to start from them on, and the DC-DC should continue to charge the auxiliary battery. I imagine that most charges would be via J1772, so if you interrupt the charge by taking out the connector, there is a digital signal to the charrger microcontroller, which allows the microcontroller to ramp down the current in a tenth of a second or so; that's all good. But surely sometimes the AC fails for other reasons: a breaker trips, the charge is via a wall plug and is turned off before the charge is complete, blackout, brown out, or a rat chews the power cord. I don't hear reports of on-board charrgers failing for these reasons.

The other thing is that there is considerable energy in the 220 μF capacitors, so that interrupting the AC input (which happens all the time 100 or 120 times per second due to the nature of alternating current), and these are presumably sized such that over the 8-10 ms between peaks of the mains, these capacitors can run the charger with only a minor dip in 400 V rail voltage. I realise that between peaks, the capacitors are still being charged via the PFC boost stage, but there is less current charging the 400 V bus capacitors between peaks. The current is sinusoidal, as well as the voltage; that's why it has good Power Factor. Kiev's theory about poor auxiliary battery voltage may explain this; if the IGBTs get too low a voltage on their gates, they could fail to turn on properly or at all. There might be some sort of desaturation protection, which causes the IGBTs to suddenly stop switching. However, in my very limited experience, desaturation protection is more of a gradual cut-back of gate pulse width than a sudden shut-off.

So I suspect that while the relay is the root cause of some failures, something else is causing the doghouse capacitors to explode. In Skyogger#1's case, we could blame the poorly manufactured 39 kΩ resistor, but this doesn't seem to be a common issue, at least so far.

Let the speculation continue :)
 
Hi Coloumb / KIEV:
I mentioned earlier that during the testing of the relay in the doghouse, that I accidentally blew up the protection diode on it's coil by putting wrong polarity during the test. I found a simular diode in a piece of scrapped equipment and replaced it with that while waiting on the relay to be supplied. Now that I think about it, I think I should look into making sure that I use a diode that will function properly.
It looks like the original diode was in a SOD-323 Package. I came across a diode in stock at Altronics called a Y0162 1N4148WS
It's not a power rectifier, just a signal diode, but it's the only one altronics sell in a SOD-323 Package.
Would this be suitable for protecting the inductive kick from the relay coil? The markings on the original diode are no longer readable.
The markings on the diode that I have currently(temporarily) put in place is "32J" but not sure what it's part number or specs are.
 
The Elcon / TC charrgers have a BAW56 dual diode (usually marking code A1t or A1W), both rated at 215 mA, in parallel. This is for a relay with a 12 V coil, so it would have lower current than the 5 V coil. So I'd guess you'd need about a 500 mA diode, which is not going to be easy. Here is one though: https://au.rs-online.com/web/p/switching-diodes/7512730/ . Well, it's 100, actually, about AU$12 including GST. 5 working days for delivery, plus west coast and black stump penalties :( .

But maybe someone can post a photo of the diode; it looks like it's D301 on top of the board, just near a 45° angle change in the dog-house border, between the dog house and the two pulse transformers. @SkyLogger, one of your photos has it, but it's too blury to read as is. Maybe you have a higher megapixel version on your computer or in your camera that can read it. The 1N4148WS is probably rated at about 300 mA (repetitive peak forward current) and might well be good enough.

There is a small chance that the diode you scrounged, marked "32J", is a 2.7 V zener diode, which definitely won't do. Others are 5.6 V zeners, which might work for a while, but I suspect that zeners are too low current for this application. Perhaps test with a 9V battery and a 220 Ω to 1 kΩ resistor in series with the diode, cathode (striped) to negative; measure the voltage across the diode.
 
D301 on my board has a roughened (etched?) appearance with no part number. Why go to the trouble to etch them?

It has a size of 0805 (LxW inch) with a square cross-section. The metal at the ends is just a thin vertical strip about .015" in width that doesn't extend to the top face. i can't tell if there are feet at the solder pad unless i remove one.

On the bottom layer there are 7 more similar-looking diodes (D317-322, 346) near the PFC chip, IC312, UC2854BDW.
 
Hi KIEV,

Can you add ChristopheFR to the list? It's the exact same symptoms as mine (#16).

I've been following your exchange of ideas very closely.
The fact that Christophe changed his Aux in 2015 makes me think that there's more to it - though the symptoms are different.
I'd say the thermal design issue can also play an important role - if everything is heated more than it should, failures can pop up from anywhere and everywhere.
 
ChristopheFR said:
...
While waiting to change the charger or to repair it, I recharge my "Z" on the Chademo socket at Ikea.

The apparent diagnosis: when I plug my charging cable, the green charging light on the cable box comes on for several seconds, I hear a few clicks to the cable and to the car, the car's blower starts a few seconds, then everything stops, no blower, no green light on the cable, and no fault on the cable or on the dashboard.

With the ignition key closed, when I take the voltage across the auxiliary battery, I get 12.4 volts
With the ignition key open, I get 14.5 volts.

Bon jour Christophe,

Your "failure" is quite different from all the rest here, and i hope that it will be an easy fix.

Your car, the EVSE cable, and the OBC all appear to be communicating normally, it is trying to start charging, but something is blocking that last step needed to turn on the transistors in the waffle plate.

The easy case is that i think you may have a blown fuse on the top board, or some sensor circuit on the bottom board is not sending the required signal to the micro controller chip on the top board. But in the worst case, it may be that components in the waffle plate have blown. Almost everything in the OBC can be purchased and replaced, except the plate.

It appears that your DC/DC converter section in the bottom of the OBC box is working ok, so the 20A fuse in the MCU is okay also.

Please pull the cover off and post up some pictures.
 
Hello tous,
Thank you for all your answers.

Kiev, do you think I have less malfunctions on my charrger because I changed my aux battery in 2015?

I will open Saturday, and I will take pictures. I will start by checking the fuses
 
Hi ChristopheFR,

It sounds different because your symptoms are different to the other charger failures, why that is we simply do not know at this point.

While I see merit in the Aux Battery theory, I am not completely convinced it is the Aux Battery just yet, since we had our Aux Battery replaced about a year prior to our DC/DC Converter failure, however, we do have a rather small battery (I think we can fit a bigger one in the battery box), and also have an after market amp, sub etc, which may have also cause the Aux Battery to go low.

When you open up your DC/DC Converter we can then see if it is the same problem or not.
 
One puzzle upon which i ponder, is how do both of these items get taken out? It appears to be a common failure mode in Australia and US, maybe not so much in France and EU.

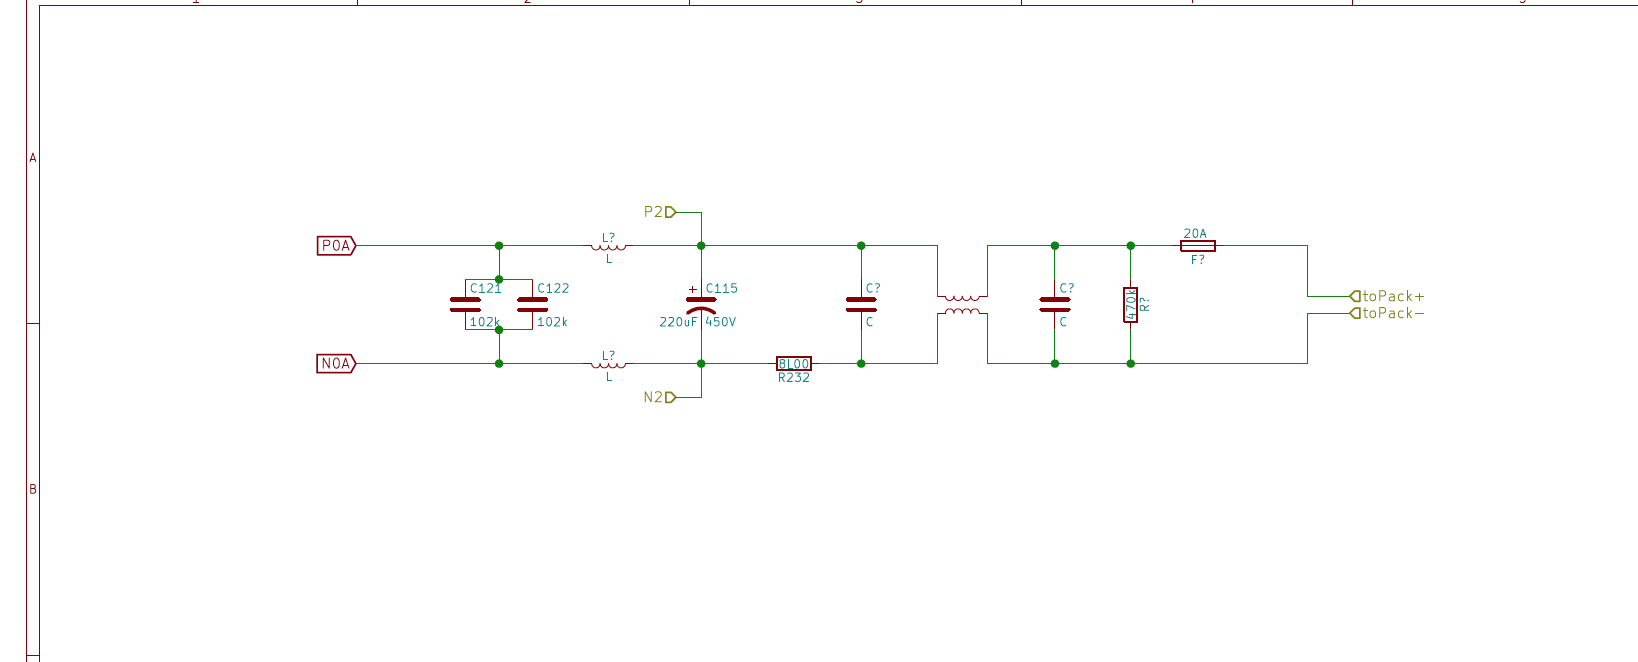
If you look at the Output Filter, these items are at either end of the filter stage, the snubber caps at the beginning and the MCU fuse just after the OBC output line on the (+) terminal to the pack, just past the 20A fuse on the OBC board.

The little 20A fuse on the (+) inside the OBC has never been reported blown, neither has the little 20A fuse on the (-) side on the DC/DC board. Maybe that is good for us since they are soldered to the boards, whereas the MCU fuse is a screw terminal device and can be easily accessed under the small cover plate on the MCU, but that would be a clever designer to be able to control the failure's location.

But the commonality of the failed parts in the vicinity of the Output Stage should somehow be a clue.

qsMS9DD.png
 
Back
Top