The Troubleshooting and Repair for On-board Charger (OBC) Thread

Mitsubishi i-MiEV Forum

Help Support Mitsubishi i-MiEV Forum:

This site may earn a commission from merchant affiliate links, including eBay, Amazon, and others.
Hey guys.
My OBC (Case #16 on this thread) had the exact same symptoms as ChristopheFR (Case #18).
I remember reading he swapped the bigger components on the top board, but it still wouldn't work.
Just a heads up, finally I got mine repaired. It's working right now.
More details coming soon.
Cheers
 
Hello footswitch,
Glad to read you again in this post.
As for my Z, I finally bought a used OBC that I repaired, same symptoms as electronpusher : I just changed a blue capacitor in the doghouse.
But I hope now to repair the old one: I just desoldered the waffle plate to test the IBGT one by one.
I also have a doubt about the UC2854 component, which drives the PFC.
And what part did you repair?
 
Same problem burnt charger. However I can't anyhow remove bottom board that has filter relay and burned capacitors. How it's done. I thought about replacing them. But they seems glued to the heat exchanger
 
danielsl said:
I can't anyhow remove bottom board that has filter relay and burned capacitors. How it's done. I thought about replacing them. But they seems glued to the heat exchanger
This is the post from the index on the first page about the bottom board, it might help some:

http://myimiev.com/forum/viewtopic.php?f=23&t=4079&start=20#p36669

Removing all 72 joints really requires a desoldering station, but you should be able to unbolt the Waffle Plate™ from the case and gain access to the two pieces (bottom board and Waffle Plate combined).
 
ChristopheFR said:
Hello footswitch,
Glad to read you again in this post.
As for my Z, I finally bought a used OBC that I repaired, same symptoms as electronpusher : I just changed a blue capacitor in the doghouse.
But I hope now to repair the old one: I just desoldered the waffle plate to test the IBGT one by one.
I also have a doubt about the UC2854 component, which drives the PFC.
And what part did you repair?

Sorry for taking this long to reply.
It was a "simple" repair, component wise, just the ceramic resistors, 5V relay, main capacitors and so on.
Also a capacitor or two underneath the top board.
No fiddling with the IGBTs or anything like that.

And in fact it worked well for a couple weeks.
Mind you, the first 4-5 charges were self-stopping before reaching full SoC, and I couldn't tell if the icon in the dashboard flashed on those occasions.
Eventually, after a couple weeks, it reverted to the same symptoms once again (plug it in, ventilation test, flashing indicator, relays clicking, no charge).

Haven't reopened it yet.
We'll look further into it, but at this point I'm skeptical that we can get it working reliably.

[EDIT] I noticed that the 12V line goes up initially (during ventilation test), so the charger actually does some voltage conversion before giving up.
 
i plugged in to lvl2 chargge this morning and it quit after about 25 minutes, and wouldn't restart. Drove around and had the aux and High Voltage warning lights and wouldn't chargge on lvl1. pulled DTCs and had OBC abnormal stop and DCDC converter fail codes. Tried to reset codes but they came right back.

Aux was new in May 2016, installed in Sept 2016, it measured 12.7 OCV and 12.28 in READY. i pulled the Aux from the car and added 1 oz of distilled water to each cell to bring the level up from the bottom of the slot up to near the top of the slot used to site the level.

Maybe it was too low and caused a hiccup, but doesn't seem likely, all the plates were plenty covered. And the OCV is reading 12.90.

Pulled MCU cover and the 20A fuse is blown. Pulled the OBC cover and top board to inspect the blue snubber caps, and they have popped too.

Hopefully just changing these will get me back on the road, but it is still a puzzle about what is causing this havoc with the OBC...

There is a tiny fuse on the top board before AC enters the bottom board, and a tiny fuse on the output of the DC after the filter on the way over to the MCU. There is also a tiny fuse inside the DCDC for HVDC going into that section. Yet none of those fuses pop, it is the external fuse inside the MCU, and it is the snubber caps on last stage of the FETS before the output filter and the tiny output fuse.

Maybe something is blowing the MCU fuse first and that causes a chain reaction to blow the snubber caps--but what can this thing be...?
 
kiev said:
Maybe something is blowing the MCU fuse first and that causes a chain reaction to blow the snubber caps--but what can this thing be...?
I've had a few false starts answering this question (yet again).

Here's all I can come up with today. Charrger is charging at near full current. MCU fuse is somehow not vibration resistant, and under warming from the charge current, it lets go. All the charge current pours into C115 (220 μF 450 V), and its voltage shoots up very fast; much faster than a battery ever would, and faster than the control circuit is designed for. It notices the over-voltage, and pulls back the current. It overshoots, as control circuits often do, meaning that it cuts the full bridge off completely. Or there is a special circuit to notice a severe overload, and it cuts off the full bridge. Zero percent PWM. But there is still current in the inductors, with the full bridge open circuit one side, and C115 at maybe 400 V on the other side. The only path for the inductors to continue to dump whatever current they have left into C115 is via C121 and C122, our blue or surface mount friends that are not designed for this amount of current. The excess current blows them to smitherines, and the resultant arc finally discharges the flux from the inductors.

Mind you, I don't know how big these inductors that I'm talking about are. There are whoppers in the PFC circuit, sure, but maybe these aren't big enough to blow your nose. If the main output-side inductance is actually the leakage inductance of the transformers, then my theory is toast.

The answer would seem to be to beef up the peak current capability of those capacitors that keep blowing (and probably their voltage rating as well). That might cause something else to blow instead, but I suspect not.

@Kiev, would you consider beefier replacements to see how they go? But I don't know how to prove that you've thereby fixed it "for good".
 
So it seems a weak 12v aux may not be a culprit then ?

Also, perhaps we should take preemptive action to deal with the marginal fuse contact integrity ?
 
coulomb said:
...
@Kiev, would you consider beefier replacements to see how they go? But I don't know how to prove that you've thereby fixed it "for good".

yes i would consider this. i had posted some photos of alternative HV ceramics that i had available, 1000pF at 3kV and at 6kV. Both are much larger physically than the little blue caps in the OBC.

Would you reckon these would represent a beefier cap since the voltage rating is higher, or were you thinking that the capacitance value also needs to be increased? Or does it need to be decreased to 500 or 250 pF, but with the higher voltage ratings? i just don't have a feel for the impedance and frequency response needed for a safe level of current flow thru the caps (without blowing them).

ps i found some higher rated fuses (30A and 40A) in the same ISO style holder and frame, with same voltage rating, ~$20 each in quantity.
 
kiev said:
Would you reckon these would represent a beefier cap since the voltage rating is higher, or were you thinking that the capacitance value also needs to be increased?
I say don't change the capacitance value unless you really know what you're doing.

My feel is that they just need to be physically bulkier to absorb the energy pulse(s) in their mass. The higher voltage rating helps too obviously.

ps i found some higher rated fuses (30A and 40A) in the same ISO style holder and frame, with same voltage rating, ~$20 each in quantity.
Please post details. I didn't think that the MCU fuse was any sort of standard, let alone ISO.
 
Hey guys,

I've been lucky enough to have my C-Zero's charger die on me :D I experience exactly the same symptoms as ChristopheFR and footswitch. I've tried opening OBC but without success. Is there any other screw that need to be unscrewed or is just the ones on top next to the edge? I might just be too gentle. I was hoping to post some images of components for discussion.

I've visited official Citroen dealer who gave me an estimate of 2500€ just for new charger. Next week I'm taking my C-Zero to an electrician. Thanks to you guys I have some hints as to what might be worth looking at.

12V battery is barely working. I have no issues with it day to day, but after few days of not driving the car, it won't start due to dead battery. After charging it, car starts. Car has ~75.000km on it and is now 8 yrs old (2011). I was using wall socket with timer (sonoff) to start and stop charging which probably helped with OBC breaking down. I stopped charging with this timer when it melted few months ago :D It was in use for two or three months - 1.5 hour each night.

It's been 3 weeks since charger stopped working. Luckily CHAdeMO is still working as well as DC/DC converter so I can use the car. I've done ~1000km with only CHAdeMO. Does cell balancing happen on DC fast charging if I let it charge to ~100%?

Regards, Mitja
 
There is a layer of sealant between the lid and the case, so you will need a razor or knife blade to slice thru it. There are no hidden screws, but there is also not a jack-screw, such as found on the MCU, to help remove the lid.

i'm going to guess that your failure is on the AC input side, such as a fuse, or the relay or the ceramic resistors. If the MCU fuse had blown then you wouldn't have any DCDC converter activity.

Good luck and let us know what you find.
 
that's true enough--i just took his word for it that the DCDC was working.

@mitjap: probably need to get a new Aux battery if it won't hold a charge.

If the DCDC is not really working, then the MCU fuse and the snubber caps are likely blown.
 
I measured voltages on 12V battery just to be sure. It's a bit over 12V when car is off, and over 14V when car is ready. So I'd say DC-DC is working fine and fuse in MCU is OK.

I understand it's best to disconnect the high-voltage traction battery under driver's seat. Is this reversible without a visit to service center? I heard some other cars (Kona EV) need visit to service center for car to start again. I'd like to pass as much information to electrician as possible so he can focus on the charger/inverter.

I also have an appointment on Monday for 12V battery replacement. This one is still first OEM battery.

Edit: I did some more searching and found on many places across the forum where people mention they have disconnected the main battery, so I presume there is no need for a visit to service center after reconnecting.
 
Please advise of the most probable reason of the following problem

Inserting the 16 A home charger to the IMiev it starts to charge for a few secons ( the yelow lamp on the wallcharger is on, and a weak ventillation of the car starts and ends immediatelly as the yellow lamp dies out).
I generally use the 16 A homecharger.
This is a 7 years old car. Is it good to open and clean the connections or you think it won't help.
What are the safety instructions before opening the charger box?

thanks any help

Ferenc Ábele
 
Howdy Ferenc, and Welcome to the forum.

First thing: What is the age and condition of the 12V Aux battery in your car? Is it old, weak or worn out, or the original (7-year old), then replace it and try again.

It doesn't hurt to inspect and clean the contacts in the car port and the EVSE handle, also the plug for the mains.

Are you able to try a different EVSE unit, level 1 or 2, to chargge the car? This would narrow the problem to either the OBC or the EVSE.

Does the car start and go to READY? What is the voltage of the 12V Aux battery while the car is at READY, measured either at the battery or the lighter socket in the dash? If it is not 14.4 VDC, then you likely have a blown 20A fuse in the MCU, and blown snubber capacitors in the OBC.
 
Hello fellow imiev ers. I’ve been hanging around the forum for about a year now gathering a wealth of opinions and info pre and post purchase of my 2012 . Bought at 65,000 kilometres and am presently at 75,000 km having already dealt with the infamous brake vacuum pump and now have the OBC issue that’s been the plague of this thread. For the record my brake light coupled with the Amber ! Within the car showed up not during a charging session but on a startup scenario in town. Drove home , 16km, and poured through this thread. Thought I’d first try simply replacing the fuse as one report on the thread had success with this
so I thought I’d take the $25 gamble. I didn’t try charging but went instead to ‘ready’ where my hopes were dashed with an audible pop from the rear of the car. So, thanks to all the help from this post , and the YouTube video, I now have the charger opened up and have extracted the obviously damaged components. They are one of the blue ( m&m size) ‘snubber’ caps, which had split open; the Okaya LE 225 capacitor which had bubbled on the 7K resistor side, and the 7K resistor itself that may have been ok but I extracted anyhow as it looked baked next to the Okaya bubble. I do wonder if putting a new fuse in and giving it another go caused further damage? Anyhow I managed to get all three items removed leaving wire legs sticking up above the board , the least of which is about 3/16”. I’ve ordered replacement parts from Digi-Key after talking to a tech person and cross referencing. Questions; will I be able to solder reliably from above to the legs sticking up? Can anyone inform me of the polarities for these three pieces as they’re affixed back on the board? Don’t believe the blue ‘snubbers matter as they’re on the dc side but the others on the ac side? Going to try posting a photo of my board however my computer skills are as suspect as my electrical skills! Thanks in advance. Looking forward to getting Evie back to the garden. Mark. https://photos.app.goo.gl/J9kPCTim6n68D7Dh8 - I think this works!
 
Thans for helping me.
I will check the 12 V battery and the 14.6 V in the ready state , but i think it must be in good condition, as it drives the other electic parts such as, e-windows ...
The EVSE is checked with other EV and it works fine.
The main (tracking) battery is not empty ( 25 km is available) , and the car can be driven without any problem. I can go for a ChaDemo charger and this helps to know that OBC is ok or not.
Today i opened the metal cover of the drive system and all the boxes looked nice, but one of them must be wrong. I know which is the OBC box but it is sealed nicely and i was not daring enough to open it. Before open it what to do for safety. ( inside of the box the 360 V is there).
The MCU ( the motor control unit ?) is just right on the top of the motor? If the car funtioning perfectly can this MCU 20 A fuse blown?
Opening any box what is the best way to make a perfect insulation after fixing the problem? ( if i do it wrong it may cause serius problems to the electronics).
It will not be easy to find a new capacitors if this will be the problem, (maybe e bay?)
Ferenc
 
Howdy Mark and Welcome,

Sorry to hear you are having problems with the OBC. It sounds like you have had a failure on both the AC input side, and on the HVDC output side, which is not typical. It may be that more details of your failure would help determine what happened--usually these two don't happen at the same time.

Chances are that the fuse failed first and partially took out the blue snubber caps, then when you tried to go READY, it just finished them off.

What's the age and condition of the 12V AUX battery? If it's old or weak, then replace it before anything else. The brake light DTC could have been due to a low Aux, or the fuse was already blown and the DCDC converter wasn't able to charge the Aux.

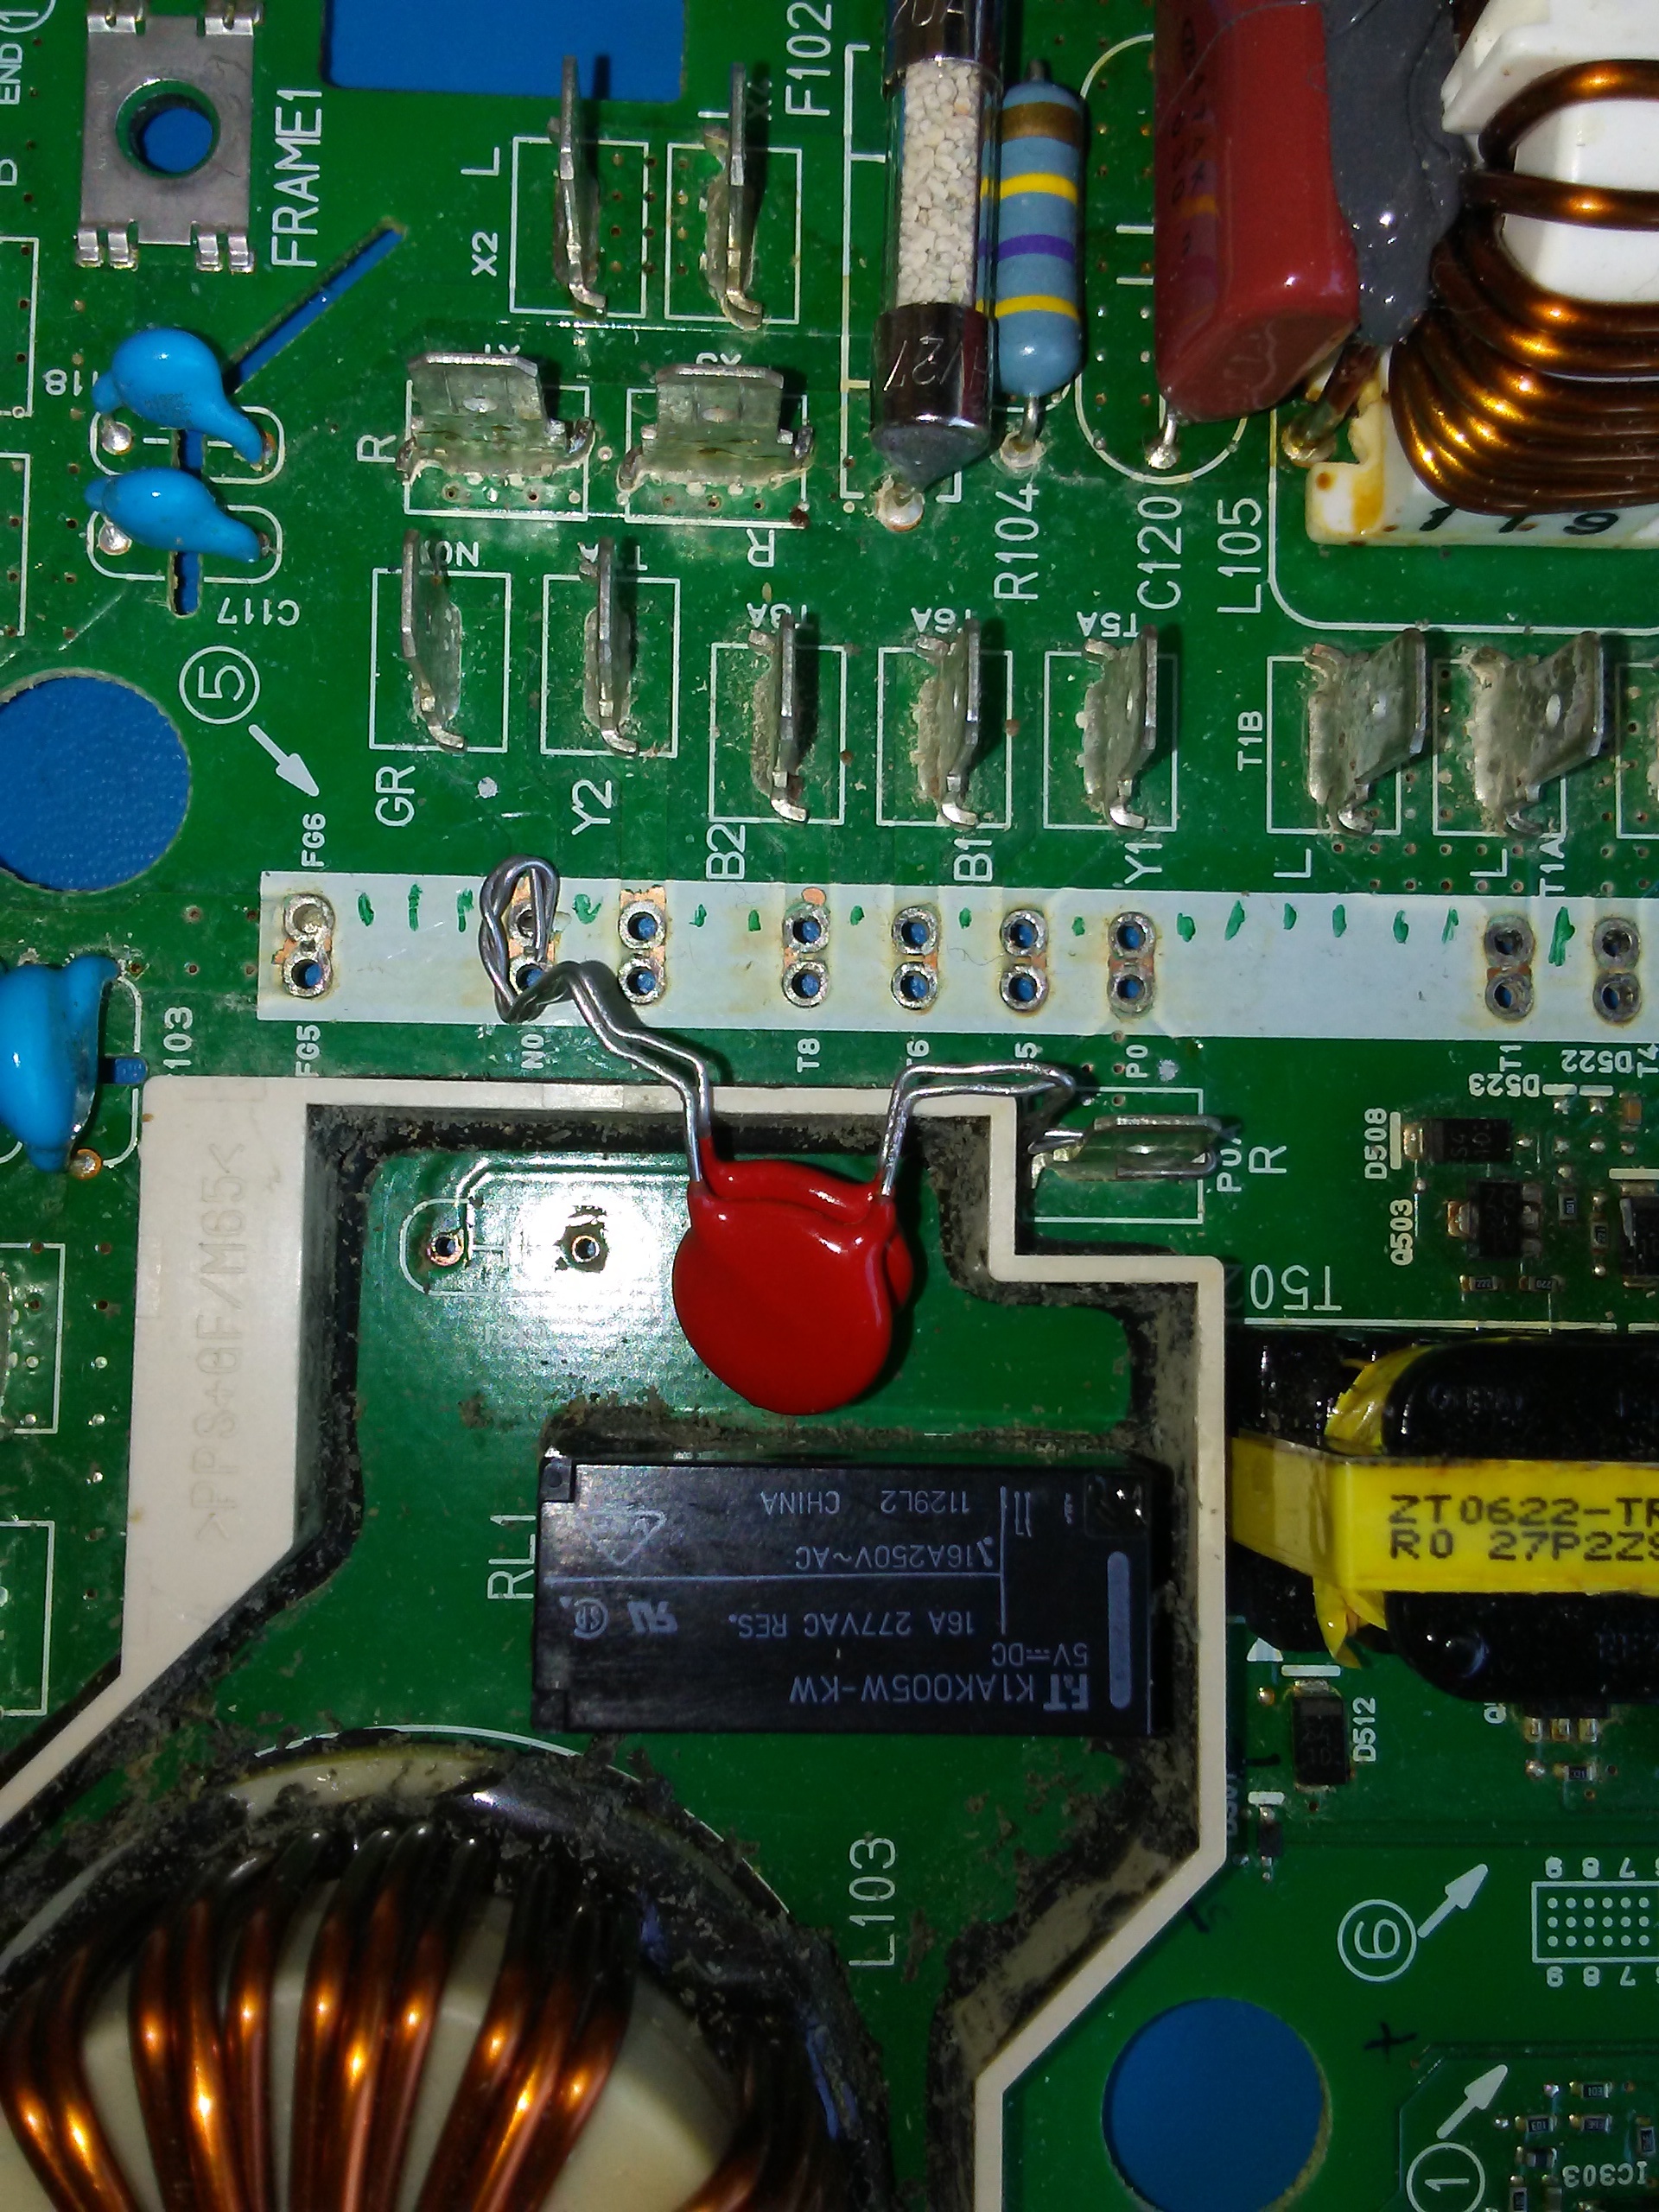
i have blown snubbers that i've been trying to figure a good way to solder. Here is a picture of how i plan to solder my red m&m's. One side to the base of the spade lug for POA, the other side to the NO terminals of the waffle plate pins.

Be careful to not crack the epoxy coating on the leads when you make bends to the wire--hold the wire with needle nose pliers near the epoxy and make the bends on the wire side, not the device side.

33HQevN.jpg
 
Back
Top