Repair shift position switch on gearbox.

Mitsubishi i-MiEV Forum

Help Support Mitsubishi i-MiEV Forum:

This site may earn a commission from merchant affiliate links, including eBay, Amazon, and others.

GregFordyce

Well-known member
Joined
Aug 15, 2021
Messages
51
Location
Scottish Borders
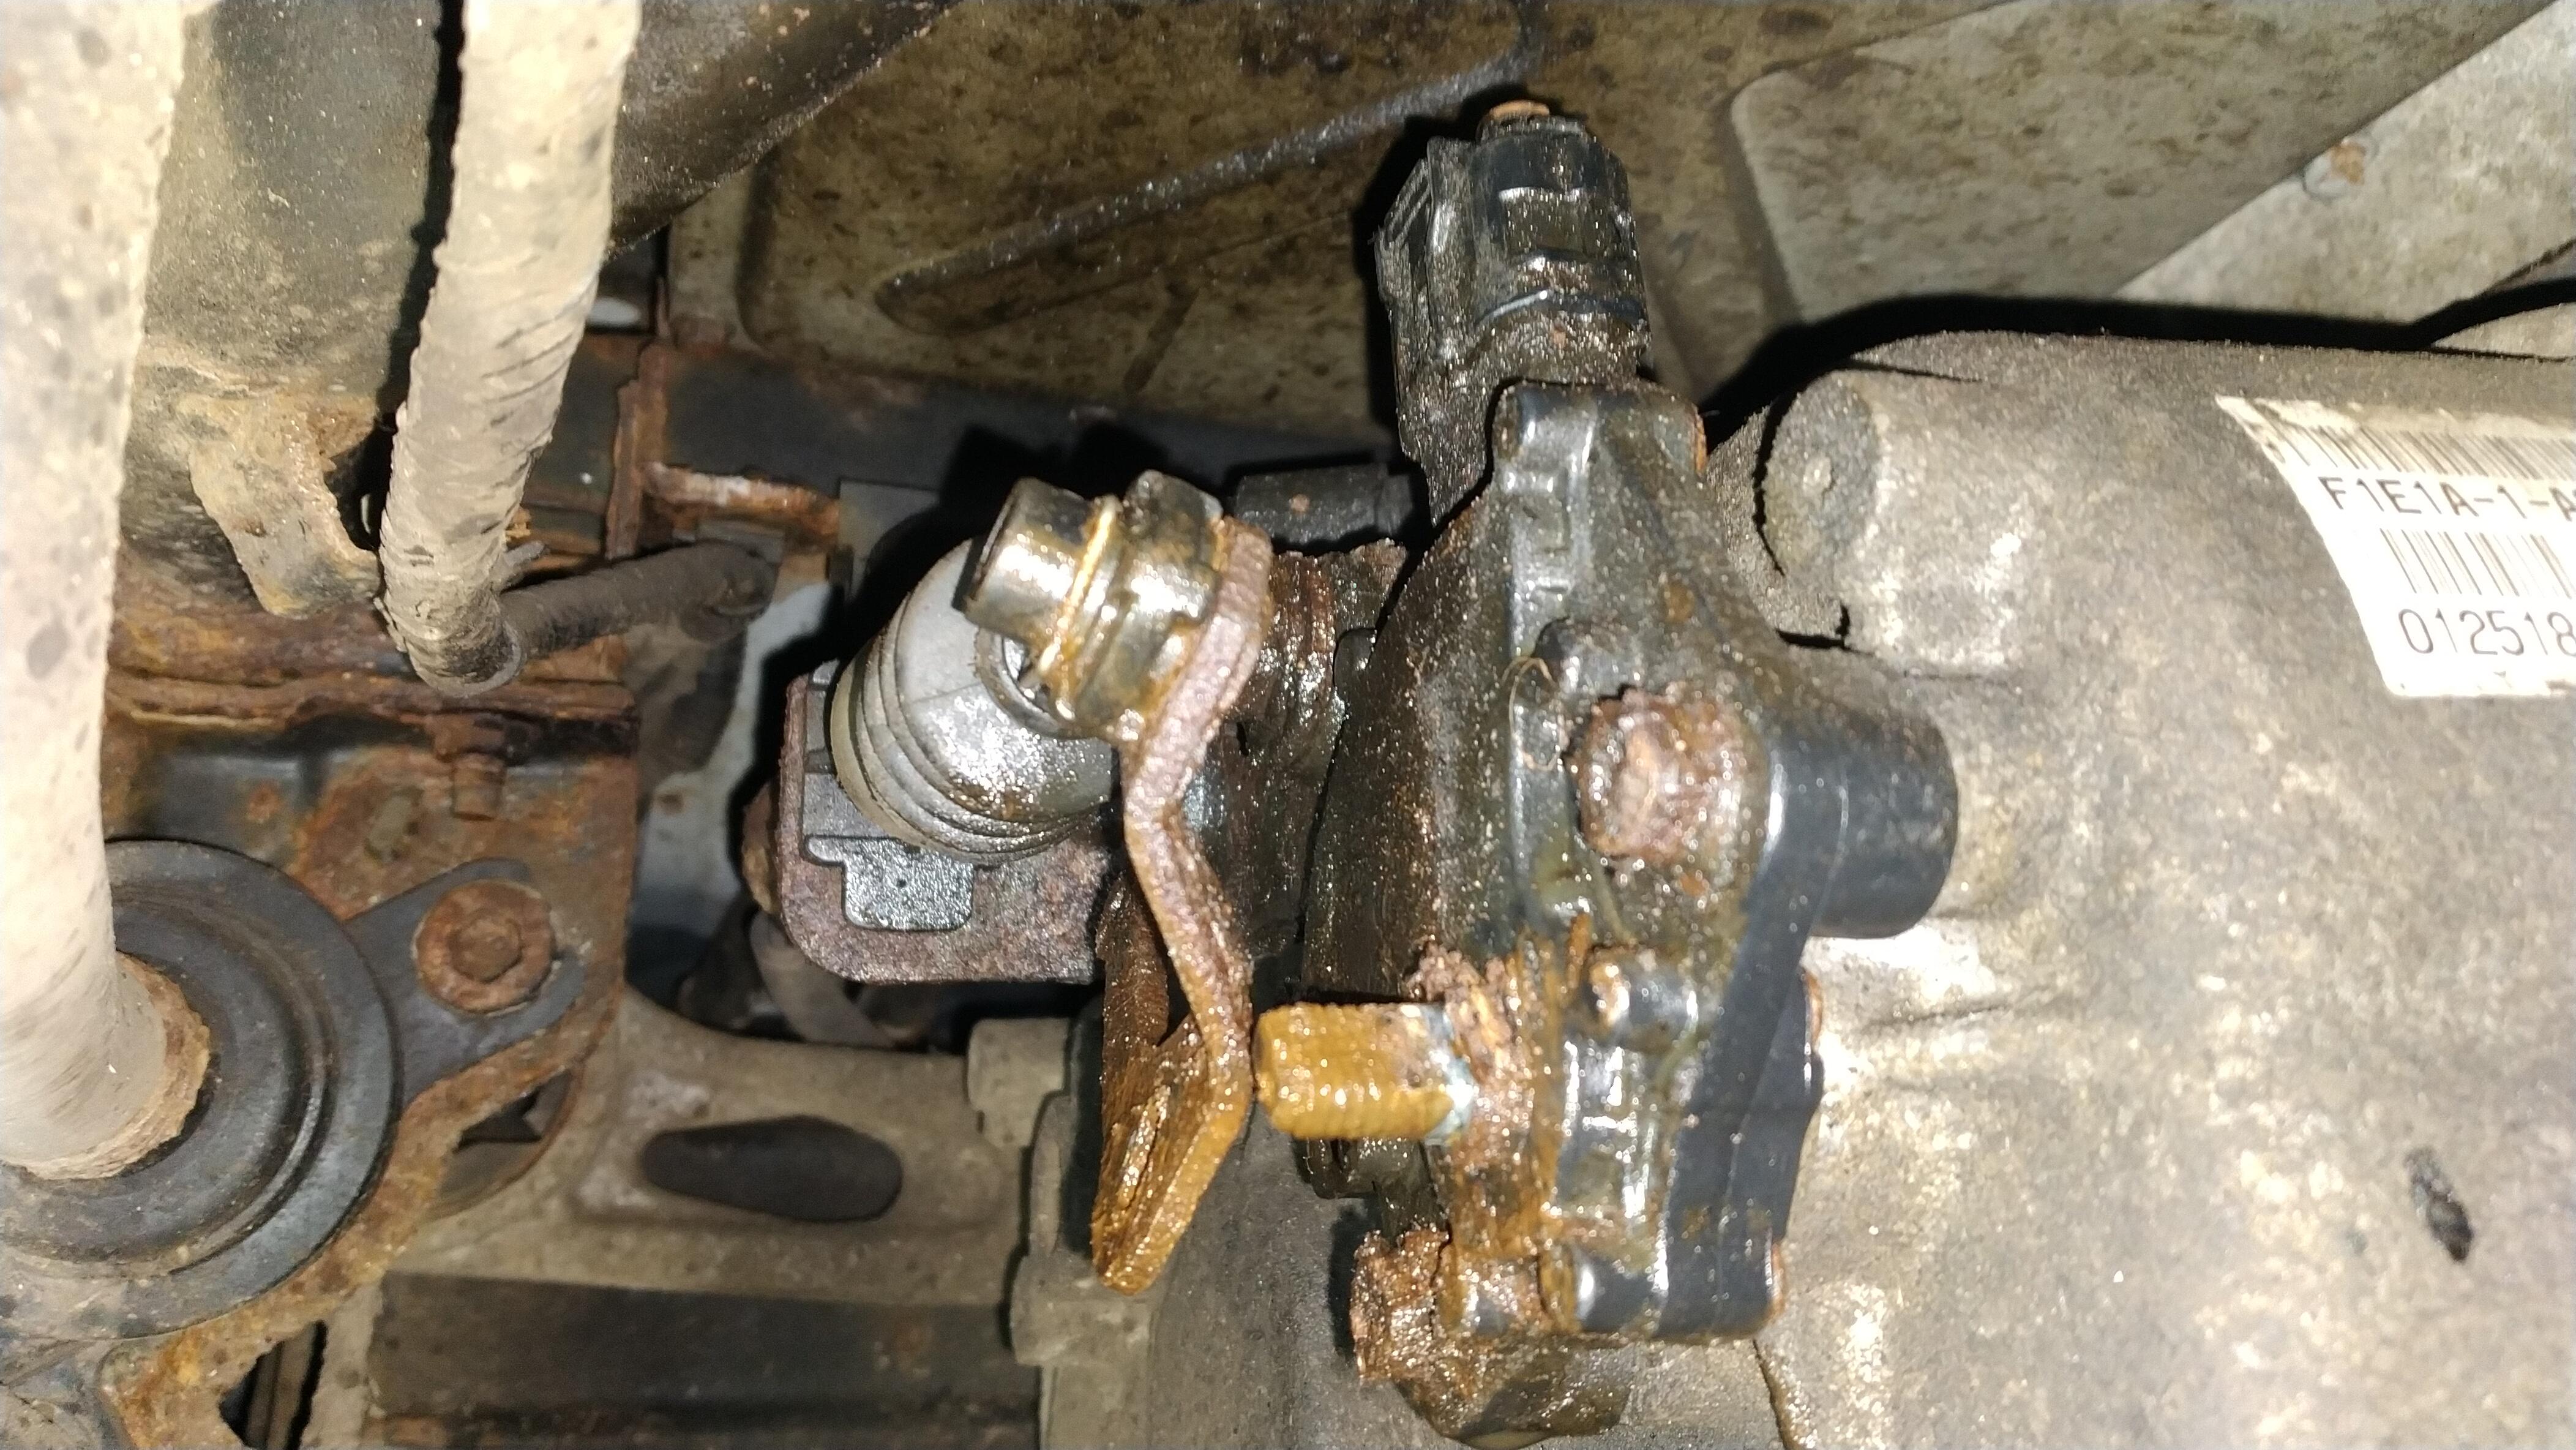
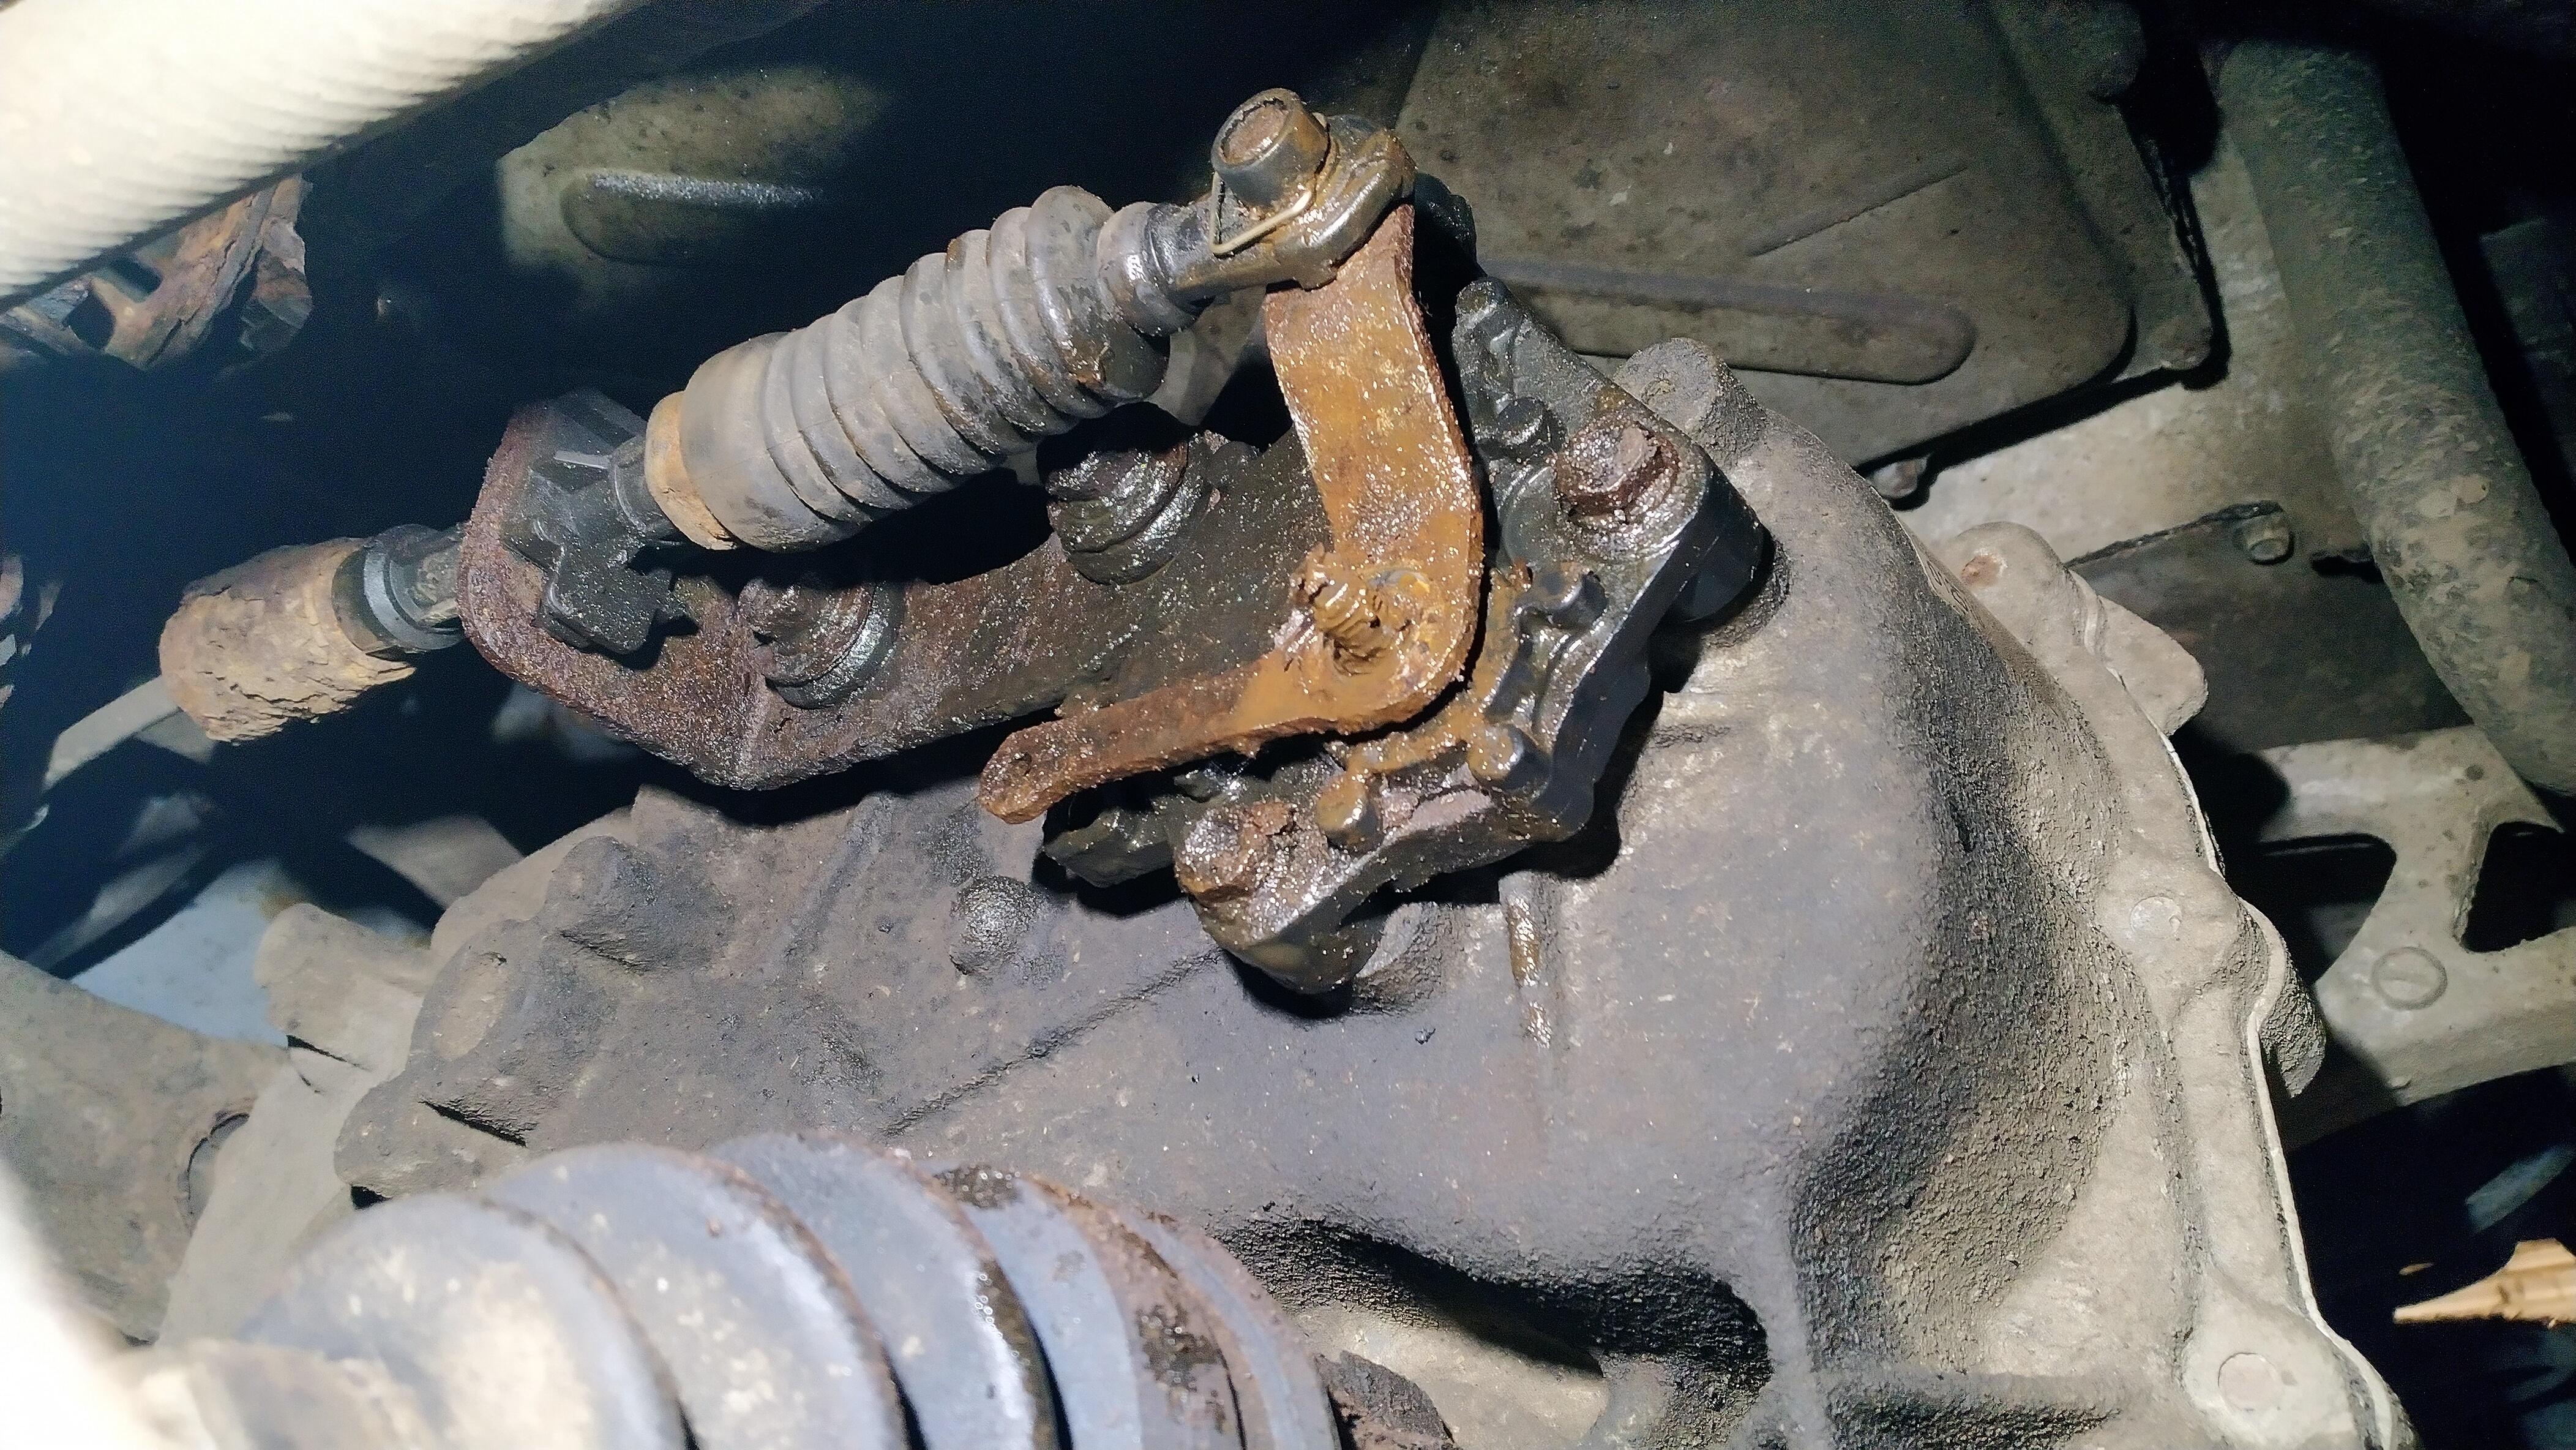
Back in November I had to get my iOn recovered after losing drive. It would go into reverse but when trying to go into drive the gear display would go blank. Looking at the diagnostics one of the 2 position sensors was always showing reverse (the shift position switch is actual 2 switches in one for redundancy, the earlier cars actually had 2 separate switches). So in reverse it was fine but going forward was a no go as the car was getting conflicting signals. So with a lot of penetrating oil I got the nut off.
nA46pgN.jpg

The shift lever off.
R0H1JFr.jpg

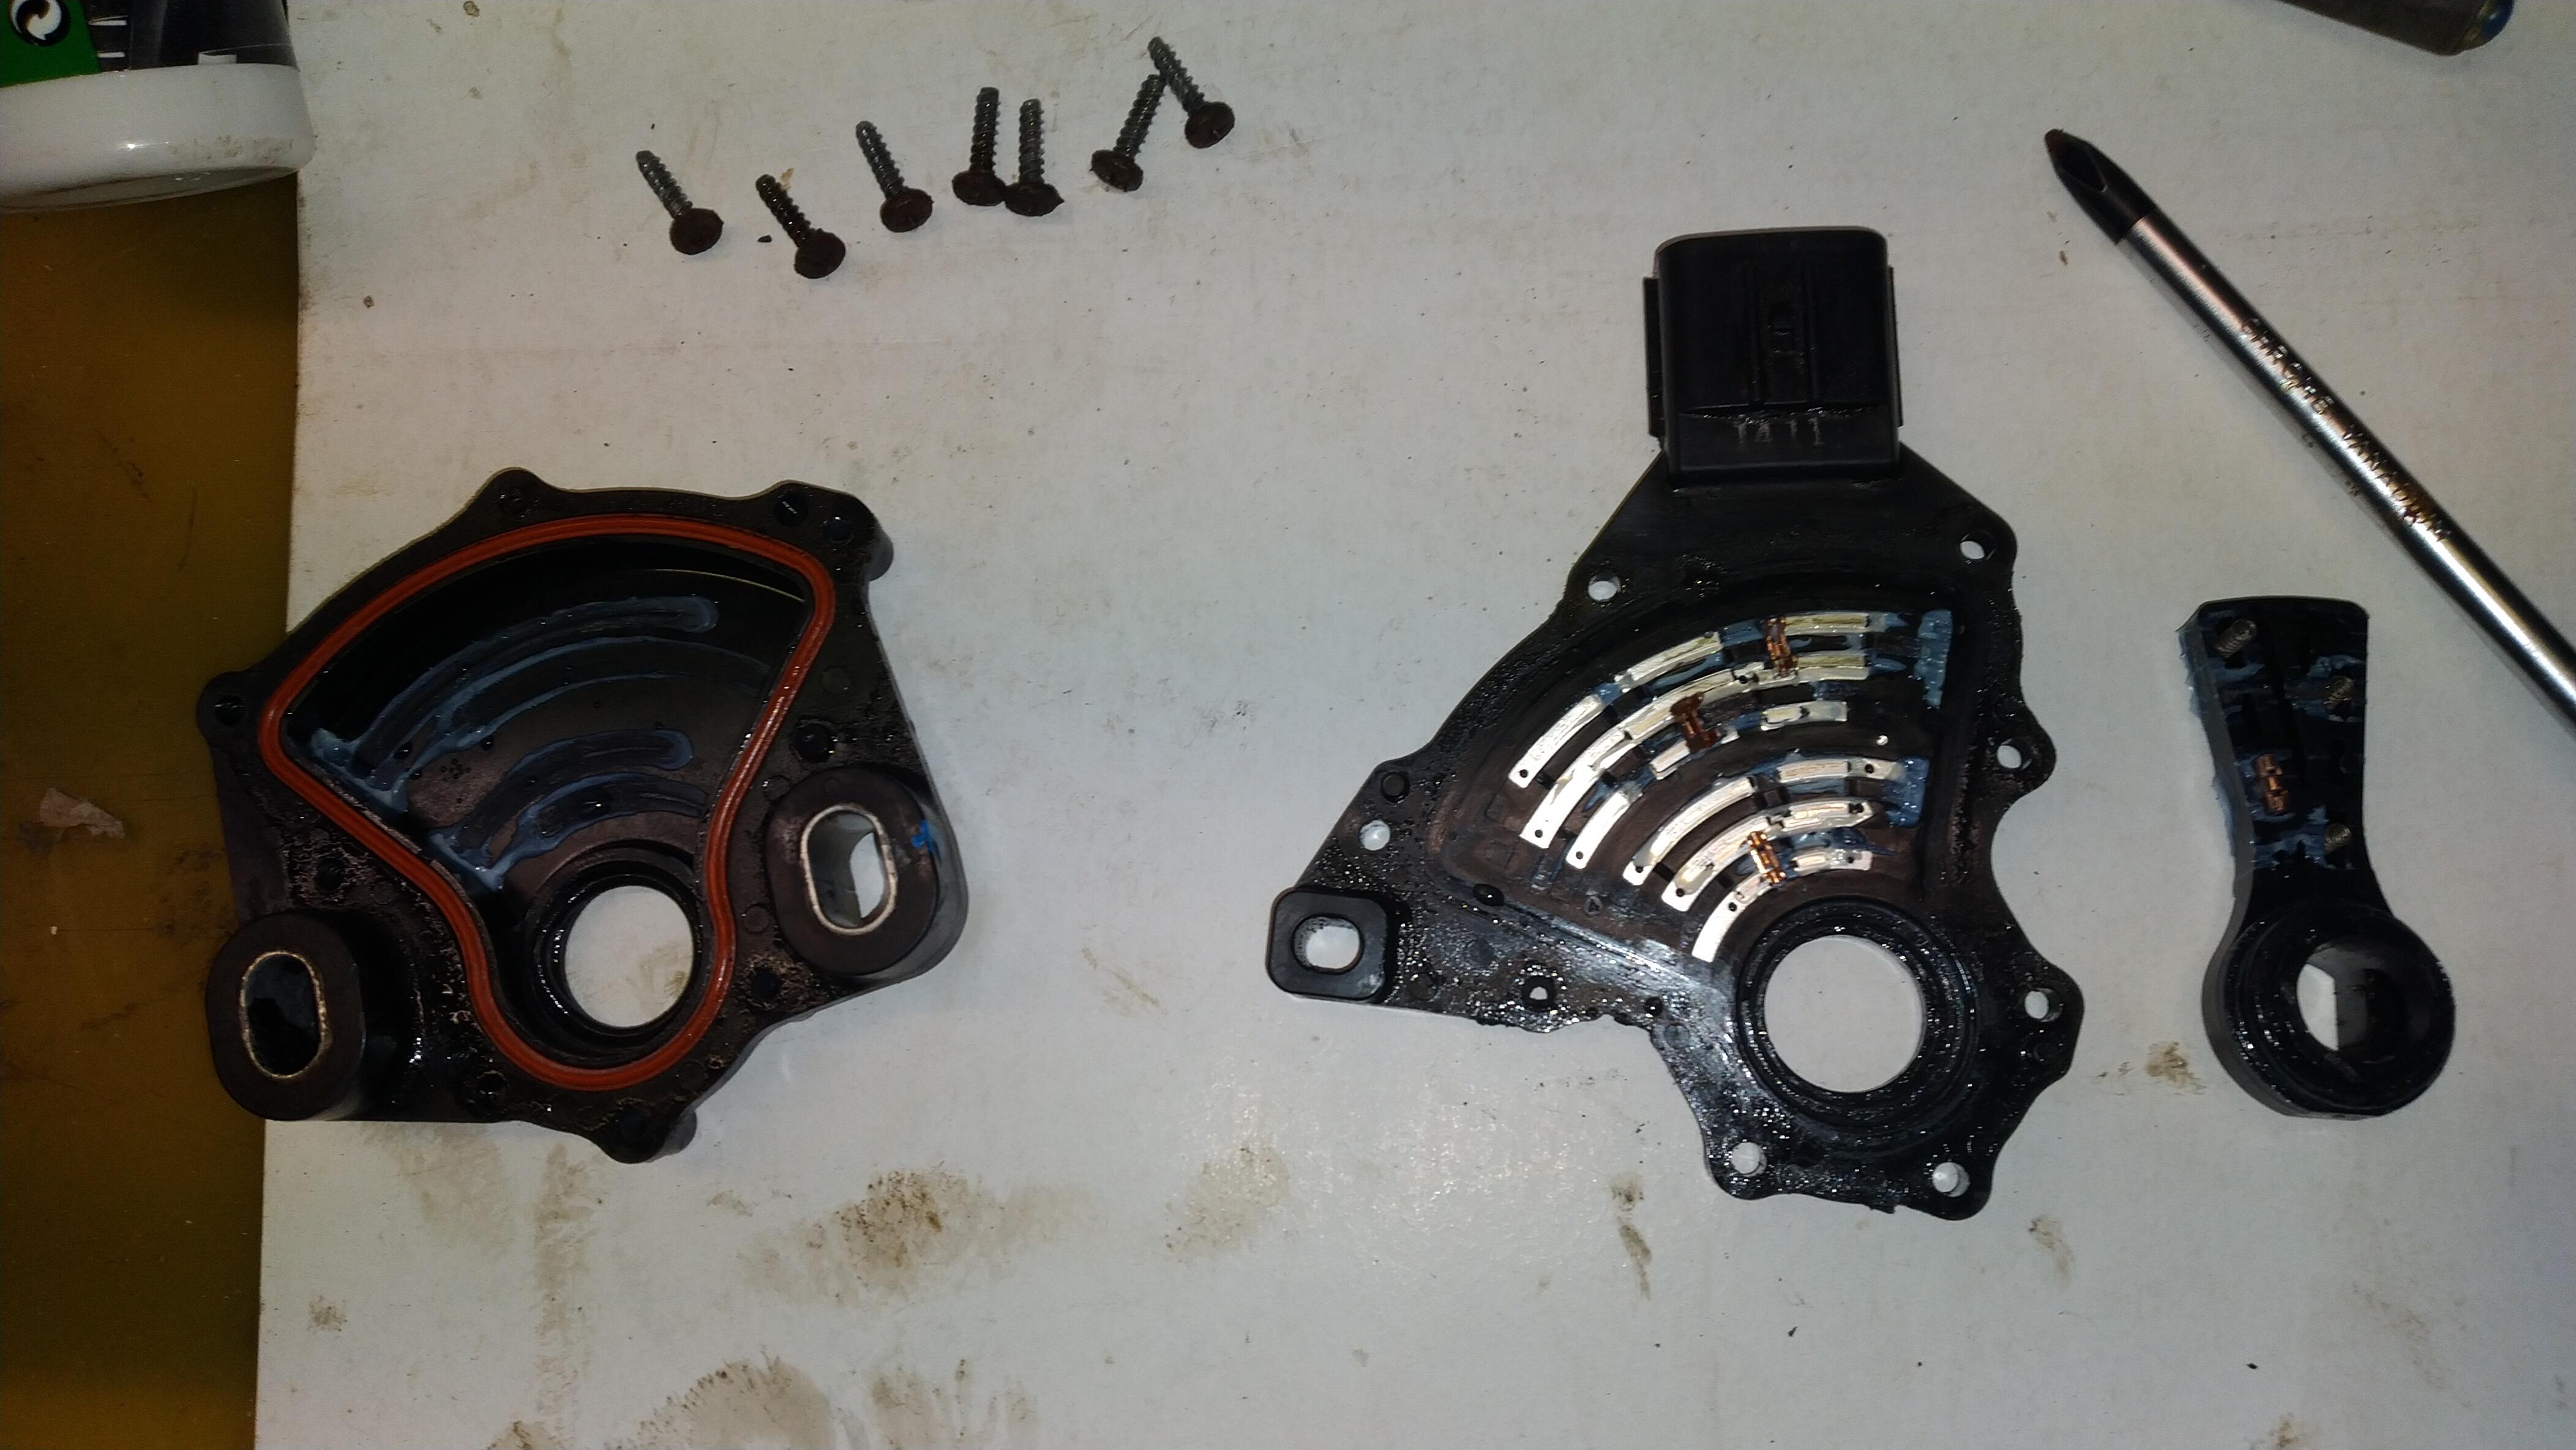
And the switch off. It is screwed together and came apart with only one of the screws breaking.
80eZjah.jpg

You can't see it in the picture but mixed in with the grease was some fine copper shavings worn off from the contacts. I cleaned out all the old grease and put a little new grease in the switch and screwed it back together. Then I cleaned all the rust off of the shaft going into the gearbox and also unclipped the lever from the cable and cleaned the rust off of the pin that the cable attaches to. Some new grease on the cable and refitted the switch.
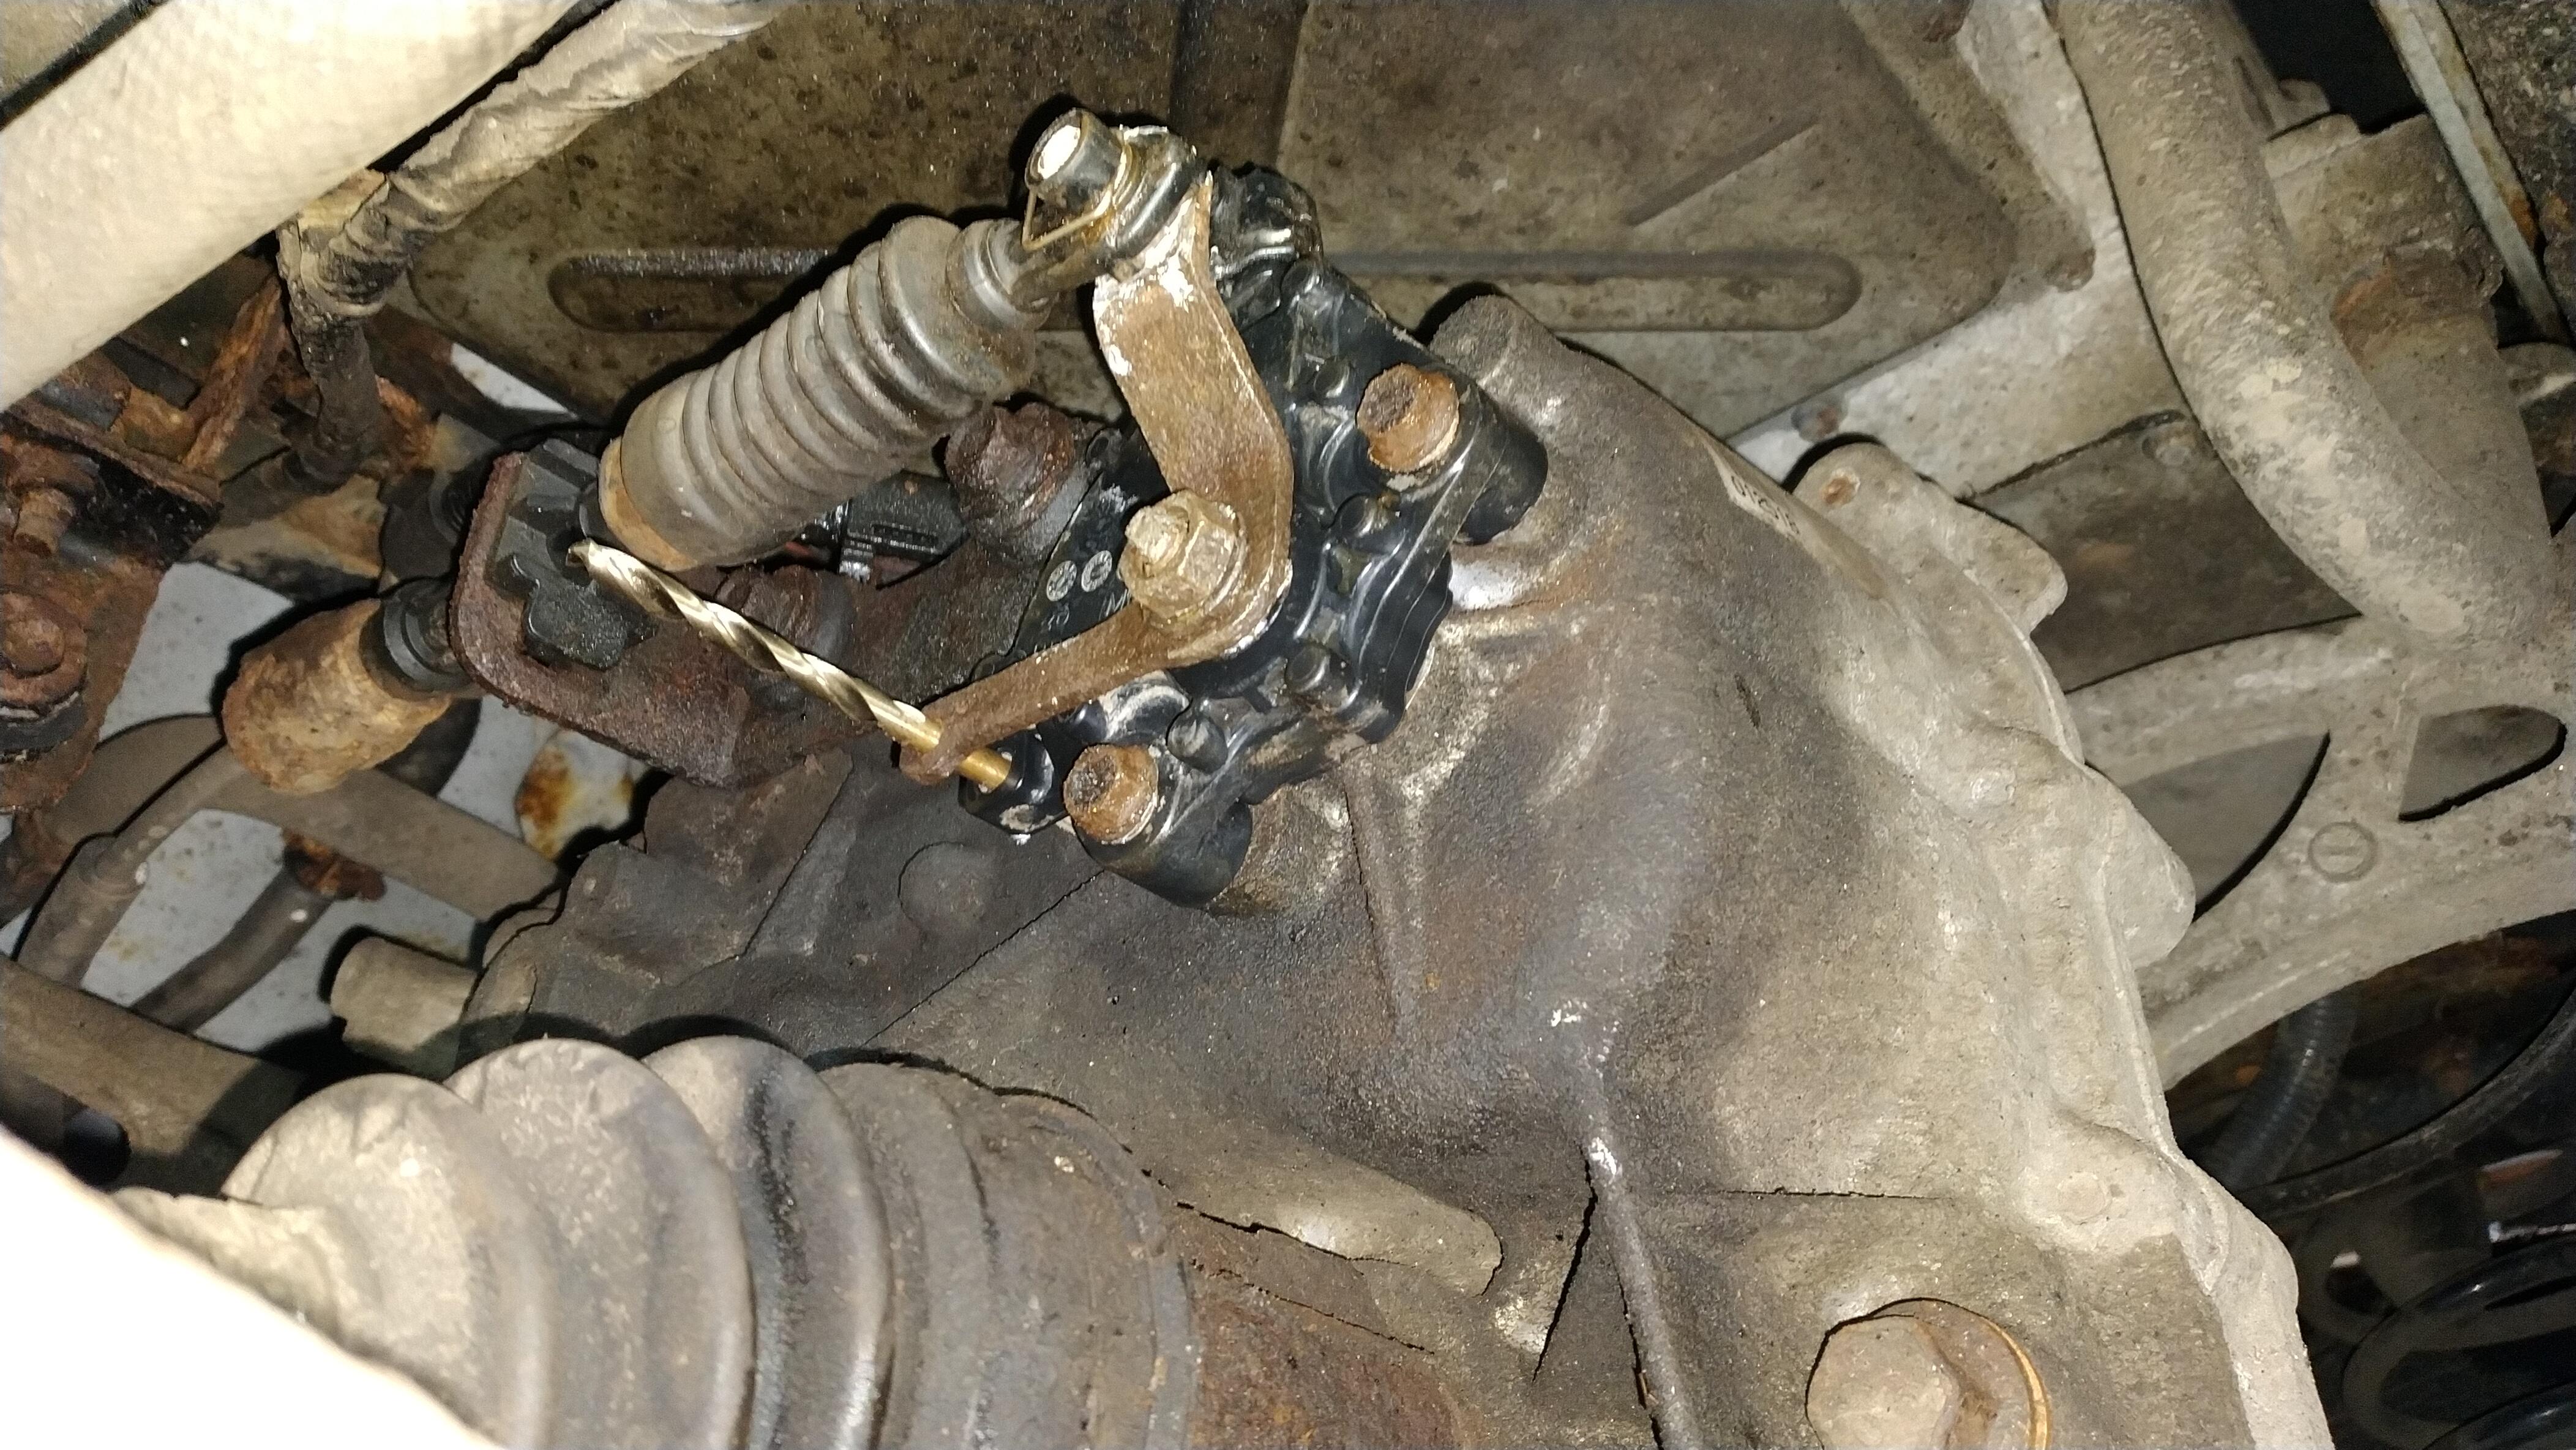
DWbY2sW.jpg

Final adjustment is done with the gear stick in neutral. Loosen the 2 bolts that hold the switch and rotate until a 5mm drill bit can be inserted through the lever into the guide hole on the switch. Tighten the 2 bolts (11Nm), remove drill bit and your done. Two months on and the switch is still working fine and has never shifted easier.
 
On my 2012 MiEV the shift position switch throws codes that lead to Turtle mode. Can this be fixed by cleaning ? P1A08 P1A0B
 
Back in November I had to get my iOn recovered after losing drive. It would go into reverse but when trying to go into drive the gear display would go blank. Looking at the diagnostics one of the 2 position sensors was always showing reverse (the shift position switch is actual 2 switches in one for redundancy, the earlier cars actually had 2 separate switches). So in reverse it was fine but going forward was a no go as the car was getting conflicting signals. So with a lot of penetrating oil I got the nut off.
nA46pgN.jpg

The shift lever off.
R0H1JFr.jpg

And the switch off. It is screwed together and came apart with only one of the screws breaking.
80eZjah.jpg

You can't see it in the picture but mixed in with the grease was some fine copper shavings worn off from the contacts. I cleaned out all the old grease and put a little new grease in the switch and screwed it back together. Then I cleaned all the rust off of the shaft going into the gearbox and also unclipped the lever from the cable and cleaned the rust off of the pin that the cable attaches to. Some new grease on the cable and refitted the switch.
DWbY2sW.jpg

Final adjustment is done with the gear stick in neutral. Loosen the 2 bolts that hold the switch and rotate until a 5mm drill bit can be inserted through the lever into the guide hole on the switch. Tighten the 2 bolts (11Nm), remove drill bit and your done. Two months on and the switch is still working fine and has never shifted easier.
How to remove the shift position sensor from gearbox? Should I use brute force ?
(How the data harness ?)

I have removed the three nuts 15mm and 10mm and the lock washer from the SPS shaft bolt.

Pry off the cotter pin [ thin wire on plastic, like a tight hat ] and remove cable anchor from SPS to prevent cable anchor breaking at its plastic weak point.

Vise grip was needed to hold SPS forward end while loosening its 15 mm nut, and a shim between grip and axle.

The SPS has now some play and 2 possible postions but stays snug on the shaft bolt.
[?]
 
Did you use penetrating fluid? Carefully read the first post again. Brute force not recommended, it is a plastic housing.

BTW you have absolutely not followed the directions or order of removal at all. No need to remove the cotter pin and cable to get the SPS off; also don't remove the mounting bolts/nut until after the shaft nut and bracket has been removed.
 
Last edited:
Back in November I had to get my iOn recovered after losing drive. It would go into reverse but when trying to go into drive the gear display would go blank. Looking at the diagnostics one of the 2 position sensors was always showing reverse (the shift position switch is actual 2 switches in one for redundancy, the earlier cars actually had 2 separate switches). So in reverse it was fine but going forward was a no go as the car was getting conflicting signals. So with a lot of penetrating oil I got the nut off.
nA46pgN.jpg

The shift lever off.
R0H1JFr.jpg

And the switch off. It is screwed together and came apart with only one of the screws breaking.
80eZjah.jpg

You can't see it in the picture but mixed in with the grease was some fine copper shavings worn off from the contacts. I cleaned out all the old grease and put a little new grease in the switch and screwed it back together. Then I cleaned all the rust off of the shaft going into the gearbox and also unclipped the lever from the cable and cleaned the rust off of the pin that the cable attaches to. Some new grease on the cable and refitted the switch.
DWbY2sW.jpg

Final adjustment is done with the gear stick in neutral. Loosen the 2 bolts that hold the switch and rotate until a 5mm drill bit can be inserted through the lever into the guide hole on the switch. Tighten the 2 bolts (11Nm), remove drill bit and your done. Two months on and the switch is still working fine and has never shifted easier.
Nice post! How did you get the nut off - I presume you need to clamp the lever, to prevent the internals of the switch from getting all the force/torque?
 
The steering hole on the switch is in the plastic housing, but I will try gently.
Otherwise, I will anchor the lever arm to a nearby bolt or something.

I first believed the centre bolt was part of the switch (hence easier to remove the cable), but the bolt obviously goes to the mechanical parking device inside the transmission. :)
 
Last edited by a moderator:
There are flats on the screw also, maybe those could be held while loosening the nut. Or hold the lever firmly with vise grips and then loosen the nut.
 
There are flats on the screw also, maybe those could be held while loosening the nut. Or hold the lever firmly with vise grips and then loosen the nut.
Yes, thanks. And also, the bolt may have a firm stop inside the transmission, towards the "drive" position. But better safe than sorry. :)
 
Hm, difficult to jiggle the switch off the bolt. The bolt slides outwards a little - no chance it will slide completely out of the transmission if I pry carefully?
(Or perhaps sneak in some shims behind the switch and hit the bolt gently inwards to loosen them apart.)
 
So you got the nut and bracket lever off the shaft screw?

Did you unbolt the switch assembly from the gearbox so you can take it to the workbench? From there you can take out the screws that hold the black plastic housing together?

Use a small wire brush to clean grime and rust off of the shaft where possible.

Study the photos in post #1 until you get a feel for what you are doing.
 
Last edited:
Thanks, but still on the car! :)
Nut and bracket lever off, two 10 mm bolts off, but difficult to remove the switch from the car.

It is stuck to the shaft which goes into the gearbox, and I am scared to apply to much force.
 
Clean the shaft as best possible with sand paper or scrubby pad, whatever it takes to remove the rust. Spray it with plenty of lube, then pry with a putty knife or two to work it off slowly side to side.
 
Short update: Managed to remove and open the switch. There is a crack on the internal plastic lever. I was first worried it happened during removal, but seems now more like a fatigue crack. Perhaps very cold winter weather makes the plastic brittle. It explains the slightly "out of position" and hence turtle mode.

I could glue/screw this part, but think I will check the cost of a new switch.

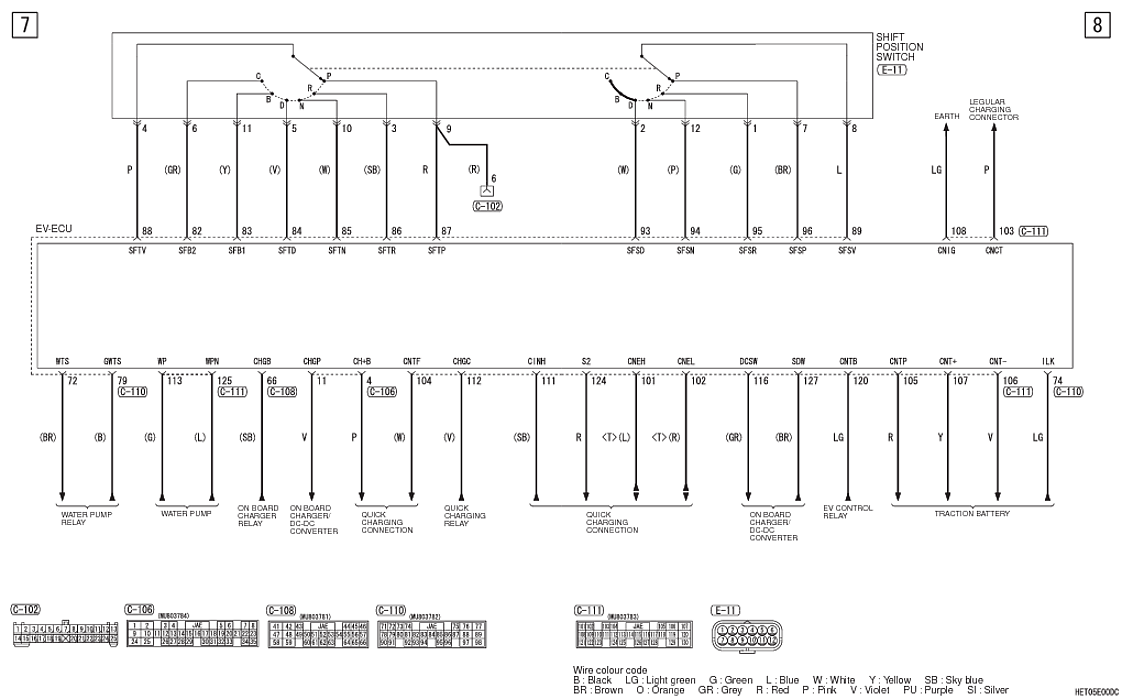
Also, very tempting to make a new switch inside the car, as it is only a matter of shorting the correct pairs of terminals on the plug underneath. I found the wiring diagram here:
http://mmc-manuals.ru/manuals/i-miev/online/Service_Manual/2017/22/html/M122120050002200ENG.HTM

But what is the "Inhibitor"? Is it just the second set of contacts in the switch?
(What does it "inhibit"? I wonder whether the contacts should be closed or open?)

1725206909393.png
1725206938859.png
 
What year and model are you working on, and where is your location?

Epoxy might make a good repair until you get a replacement part. or it might be plastic welded depending upon the composition.

This is from the 2012 version,
Hvjb3Sn.png
 
Last edited:
It's a 2015 - actually a Peugeot iOn (but made by Mitsubishi).
It has a single unit, not the twin setup from the early models. But the input to the ECU is possibly identical, thanks.

Yes, welding / glue is possible. But there are a lot of these vehicles over her (Norway), so I guess the dealer has a new on the shelf. More worried by the cost, but we'll see. They sell from Japan for app. USD 130.
 
i think it is a single unit but has the dual circuits internally. If the 2 don't agree then it throws a DTC and prevents READY mode, hence the name inhibitor.

Good luck with the repairs and back on the road.
 
Thanks. As far as I have seen, early vehicles had two physical units connected by a rod, later ones one single unit with double internals.
 
Back
Top