12 kW chademo charging

Mitsubishi i-MiEV Forum

Help Support Mitsubishi i-MiEV Forum:

This site may earn a commission from merchant affiliate links, including eBay, Amazon, and others.
jray3 said:
Yes Joe, the Sunny Island was based on 48V, but the new model will support packs anywhere between actual voltages of 100 and 600 VDC. Our 360V pack is right in the middle.
Here's the spec sheet.
http://files.sma.de/dl/30859/SBS3.8-5.0-6.0-US-DUS173415W.pdf
"Full backup functionality will also be available with a backup unit from 3rd party vendors." in addition to its "2000 W of convenience power". It's still grid-tied as it comes out of the box.

I'm afraid that I've lost sight of what it was we were trying to do.

In the few power outages we've had over the last couple of years all I did was hook up my 48vdc-->120vac inverter and ran an extension cord over to the refrigerator, and I was ready to run my 12vdc-->48vdc dc-dc converter from the i-MiEV's 12v battery to slowly recharge that 48vdc pack. Luckily, the outages were less than about ten hours.

The longest my power was out for was after the Loma Prieta earthquake of '89, and that was over a week. I figure if it happens again I'll be able to cobble up something to charge the i-MiEV - providing my garage is still standing. :roll: My ground-mounted solar array is well under 360vdc so I can't use it directly to charge the i-MiEV through the CHAdeMO port. At worst I can clamp that array's output directly onto the 48v pack and then use that to charge the i-MiEV using the 48vdc-->240vdc 4kW inverter through the throttled-down EVSEUpgraded Mitsu EVSE. :geek:
 
so has any one yet to connect a grid-tie inverter to the Chamedo port ? even with the grid on, to see if it works ?

Joes, Morningstar has a relatively new 600vdc charge controller:

https://www.morningstarcorp.com/products/tristar-mppt-600v/

which you could rig up to your ground mounted PV to charge your 48v pack. Price is coming down, but still around $1400. But in a jam, you can access your ground-mounted panel to disconnect the string and obtain lower DC voltage, even for a 12vdc system
 
pbui19 said:
so has any one yet to connect a grid-tie inverter to the Chamedo port ? even with the grid on, to see if it works ?
If I were to do that I'd start with a hefty resistor in series to limit the current. Sorry, don't have a spare inverter lying around, and haven't even done the switch mod to close the contactor to light up the CHAdeMO port itself, nor scrounged the pins to pick up the power leads.

pbui19, thanks for the lead for that Morningstar controller.
pbui19 said:
... But in a jam, you can access your ground-mounted panel to disconnect the string and obtain lower DC voltage, even for a 12vdc system
When you think of a PV panel as a current-source device rather than a voltage source, I can't think of a reason why I can't just take the solar array output and stick it across the battery pack directly without rewiring the series/parallel array arrangement, recognizing that I'd only get the 15A or so that it normally produces at the much higher voltage. On my list of things to try with my 48v pack as a backup for my solar trailer. Unfortunately, my panel array voltage is below 300v so that direct-coupled technique wouldn't work with the i-MiEV. Many moons ago when I first started playing with solar panels I remember being surprised that the quick and dirty way to test the panel's output was simply to short it out with an ammeter.
 
JoeS said:
If I were to do that I'd start with a hefty resistor in series to limit the current.

That's an excellent point. In a standard PV gridtie set up, the panels themselves are current the limiter. I guess one way is to add a panel in series to the Chamedo DC, without killing oneself first, to serve as current limiter. Of course the total string voltage would increase, but these grid-tie inverters have very high voltage range these days.

JoeS said:
When you think of a PV panel as a current-source device rather than a voltage source, I can't think of a reason why I can't just take the solar array output and stick it across the battery pack directly
Indeed in theory you could connect your 360vdc PV string directly to the iMiev Chamedo dc contacts, but the voltage swing would drive the BMS crazy

This is all hypothetical right, because in a real dire situation ala earthquake or hurricane, I am sure Joes wouldn't mind rewiring a few panel connections to get some juice. Furthermore, in such dire situation, sucking the imiev big pack juice via the dc/dc 12vdc straw and putting it back via even at level 1 EVSE would be quite adequate. Hope we will never have to try it.
 
pbui19 said:
JoeS said:
When you think of a PV panel as a current-source device rather than a voltage source, I can't think of a reason why I can't just take the solar array output and stick it across the battery pack directly
Indeed in theory you could connect your 360vdc PV string directly to the iMiev Chamedo dc contacts, but the voltage swing would drive the BMS crazy.
The panels put out around 15A so putting them directly across our low-source-impedance i-MiEV battery pack will merely bring the voltage down to pack level and charge at a miserly 15A, which the BMS shouldn't even blink at.

If the big one hits and my garage is still standing, I'll have lots of options of rewiring the solar panels to feed all the cars and batteries and house. :geek:
 
Looks like that Sunny Boy Storage inverter is finally coming to the US market this summer.
http://www.freecleansolar.com/SMA-Sunny-Boy-Storage-3-8-Battery-Inverter-p/sbs3.8.htm
$2500 for 3.8 kW solar and 2 kW backup from a 360V battery pack.
I'm picturing that with a Chademo cable on the Sunny Boy Storage, a CHAdeMO handle that shorts control pins #3 and 10, and a single throw 12V switch between pins #1 & 2 on the quick charging relay, and we could be in business for 2 kW of emergency backup power.

Of course, the official Mitsubishi Power Box at 1.5 kW would be cleaner and cheaper. Here's the JDM 50 hz version for $1750.
https://global.rakuten.com/en/store/suzukimotors/item/tuph004/
 
Been following this from a distance.
Just to let you know that SETEC (China) makes such DC-AC inverters:
www . setec-power . com/supply/vehicle-to-home

They call it Vehicle to Home or V2H.
Maybe that's common terminology for this type of application.

Cheers
 
Thanks to some trading with an electrician, I am now the proud owner of a CHAdeMO handle and long cordset to complement the salvaged i-MiEV CHAdeMO inlet that I picked up a while back. It is a first generation Yazaki CHV-03 (the heavy metal handle), removed in a station upgrade to the lightweight plastic handle.
http://charge.yazaki-group.com/english/product/quick_outlet.html

My goal is the ability to do DC bulk charges at home when I want a quick turnaround using a Manzanita Micro charger, as Siai47 first demonstrated. I've also got an Orion 2 BMS on the list for Karmann Eclectric to enable public CHAdeMO use with that car.
Using the actual CHAdeMO cable will enable me to jumper the port pins at the other end of the cable, and engage the second DC contactor from inside the car as Siai47 described.

Of course Setec would be the better way to get legitimate DCFC, but that involves $4k rather than spare parts on hand...
 
jray3 said:
Looks like that Sunny Boy Storage inverter is finally coming to the US market this summer.
http://www.freecleansolar.com/SMA-Sunny-Boy-Storage-3-8-Battery-Inverter-p/sbs3.8.htm
$2500 for 3.8 kW solar and 2 kW backup from a 360V battery pack.
I'm picturing that with a Chademo cable on the Sunny Boy Storage, a CHAdeMO handle that shorts control pins #3 and 10, and a single throw 12V switch between pins #1 & 2 on the quick charging relay, and we could be in business for 2 kW of emergency backup power.

Of course, the official Mitsubishi Power Box at 1.5 kW would be cleaner and cheaper. Here's the JDM 50 hz version for $1750.
https://global.rakuten.com/en/store/suzukimotors/item/tuph004/

hello all -
As I've just added some more PV to our roof, I am now revisiting the option of using the iMiev as a temporary house power backup during blackout. It recently dawned on me that the SunnyBoy Storage can also do AC-coupling, i.e. keeping the PV inverters on to produce current when sunny but no grid-connect (outage). So on sunny outage day, the solar PV can augment power drawn from the Chamedo, and presumably can charge the iMiev pack if there's access power.

While we know how to energize the 12v relay to energize DC to the Chamedo, does any know whether/how to also turn on the iMiev BMS ? or does the iMiev in "ready" turn on the BMS ?

Thanks
 
kiev said:
Howdy Ben,

i posted some info about that in the solar charging thread:

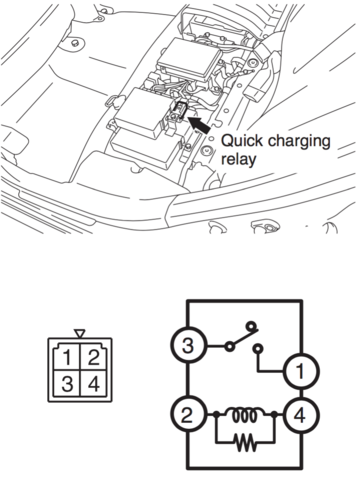
connect jumper between position 2 and 1 at relay connector, and jumper pin 3 and 10 at the chademo port to cause pack relays to close and reveal pack voltage at chademo port, positive voltage is on the right.

Hi kiev,
I just stumbled across this thread and will try this to close the QC relays.
To make doubly sure I understand your notes re the jumpers correctly:
jumper one is connecting pos 2 and 1 at the relay connector and
jumper two connects pin 3 ( Gnd) with pin 10 (S2) at the chademo port.
Is it correct that this will close the +& - quickcharge contactors
but not the pre-charge and the +& - main (pack) contactors?

Edit: Sorry I posted this before reading the attached link at the above post that confirms the jumpers.
 
kiev said:
Howdy Ben,

i posted some info about that in the solar charging thread:

connect jumper between position 2 and 1 at relay connector, and jumper pin 3 and 10 at the chademo port to cause pack relays to close and reveal pack voltage at chademo port, positive voltage is on the right.

And here are some pitchers:

zWIPt4x.png


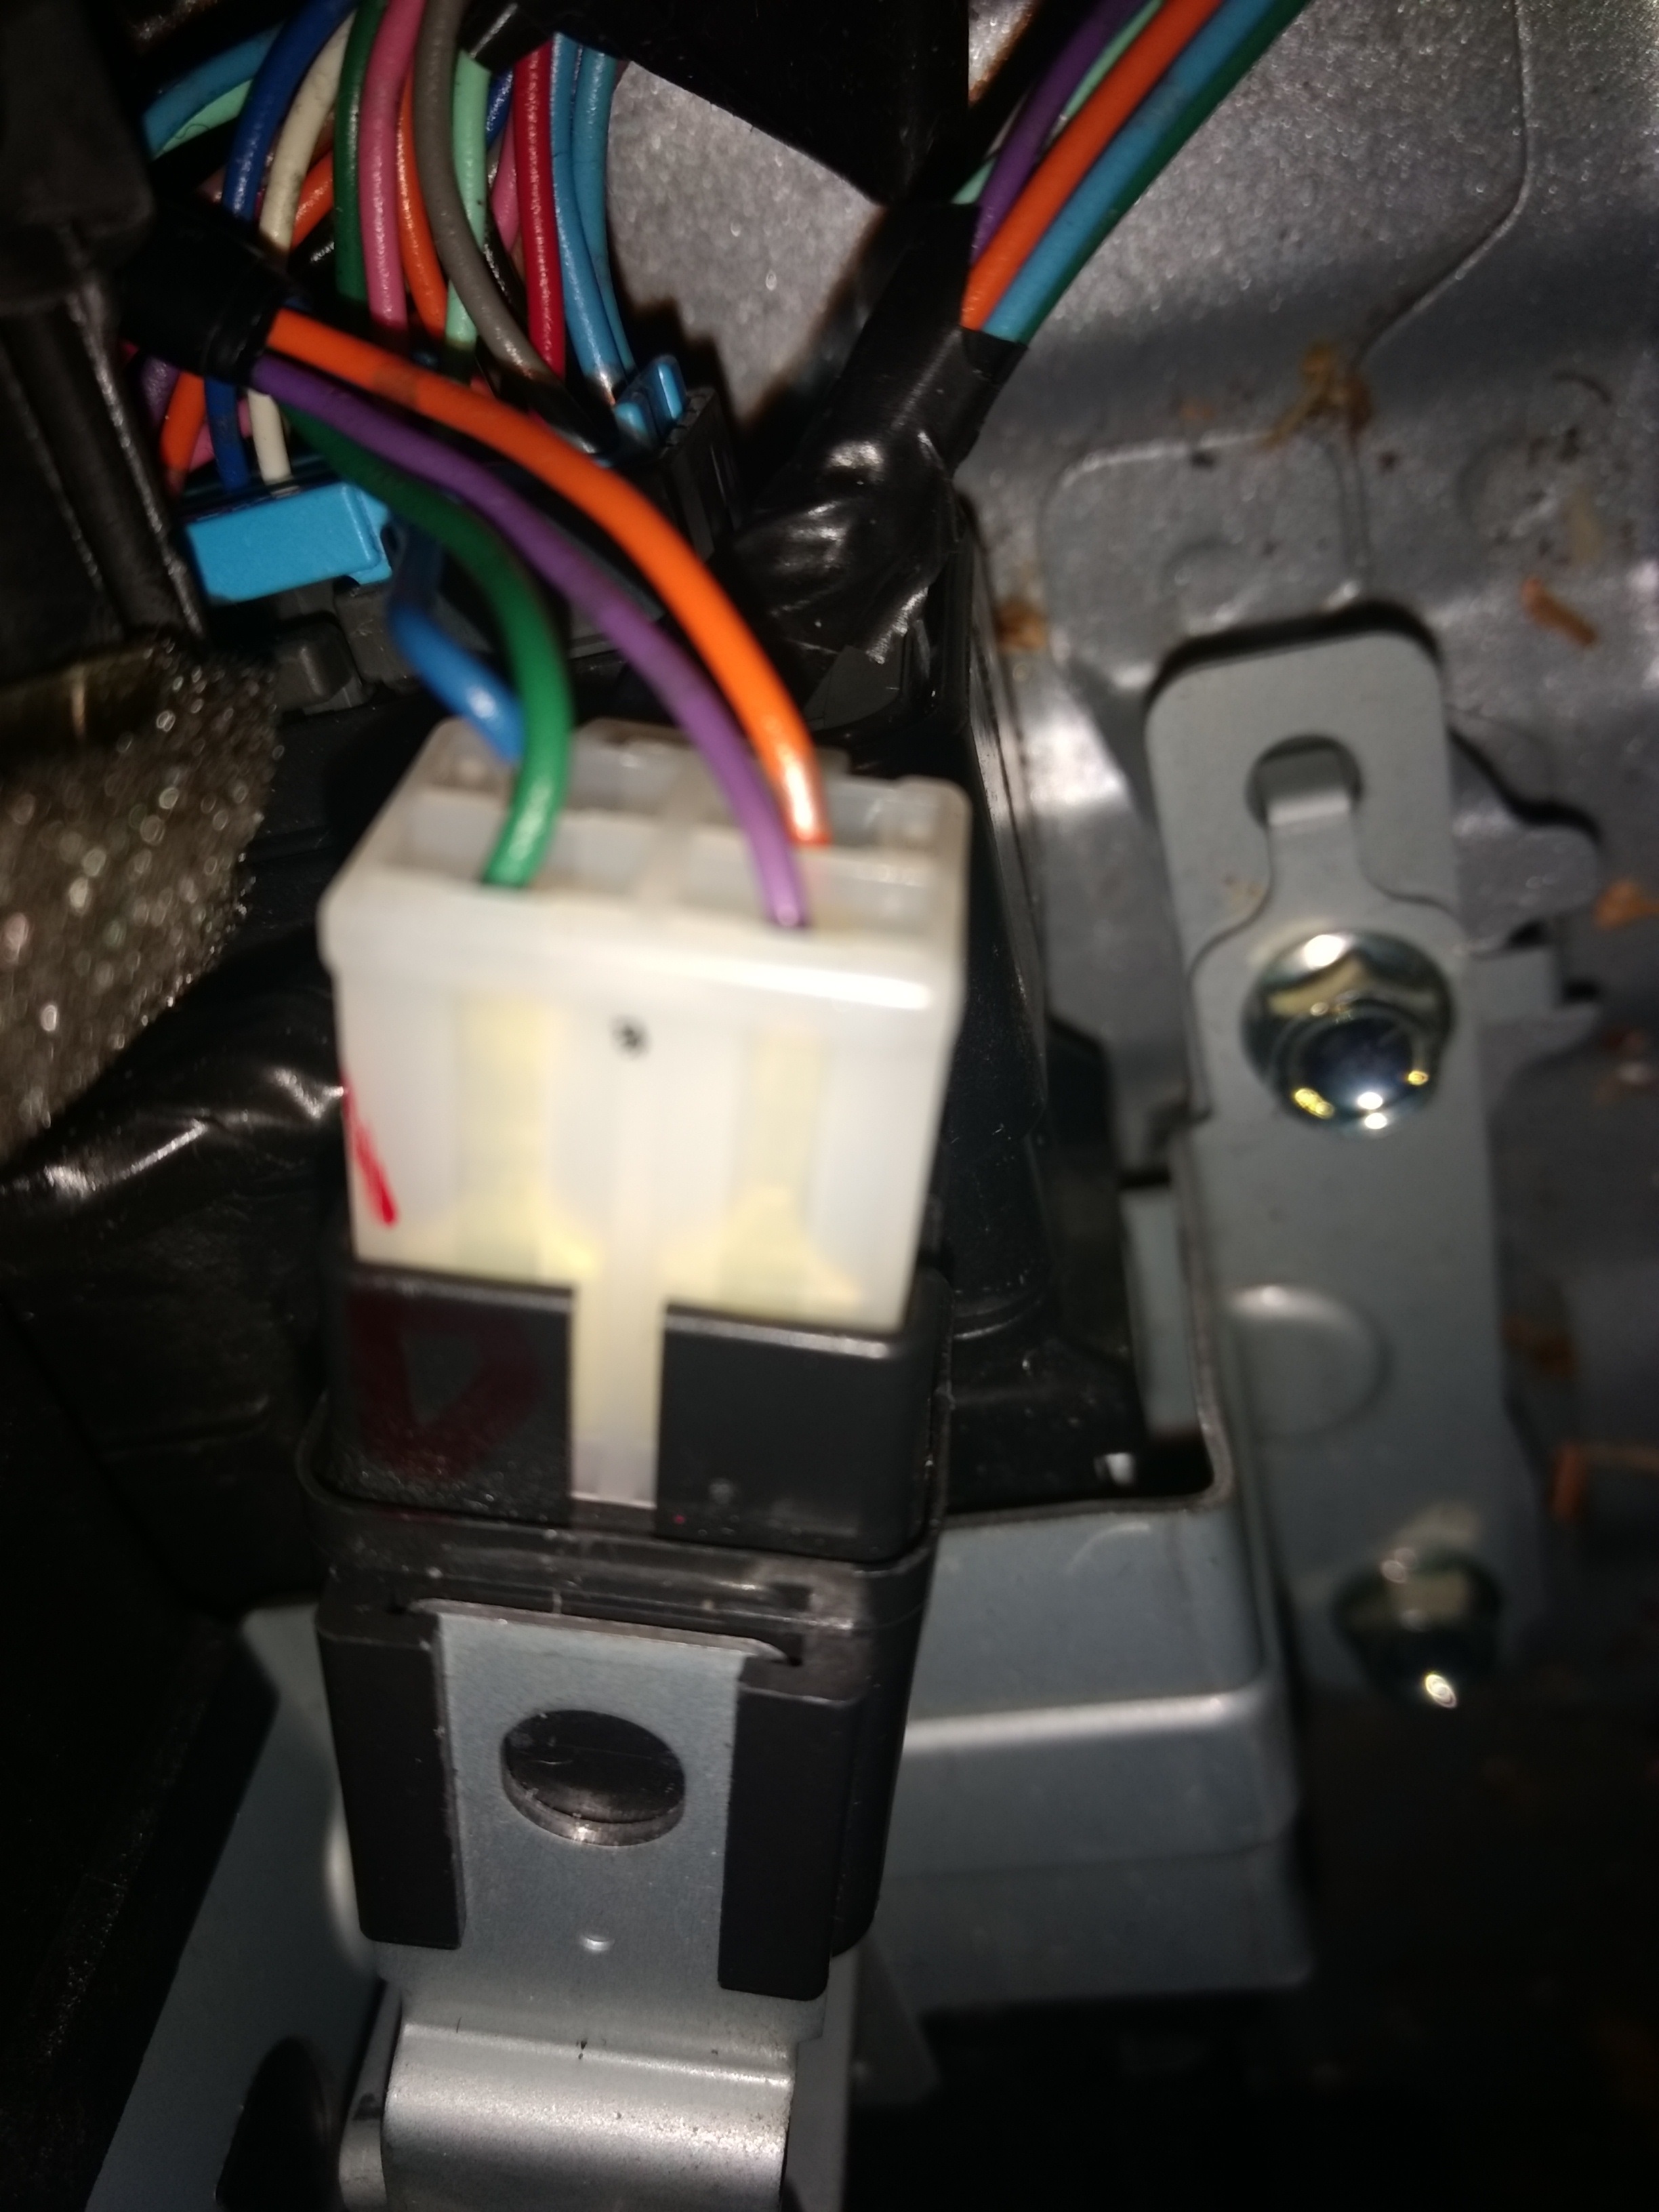
Today I lifted the back seat and checked out the quickcharge relay MB627895
and connector [C-105].
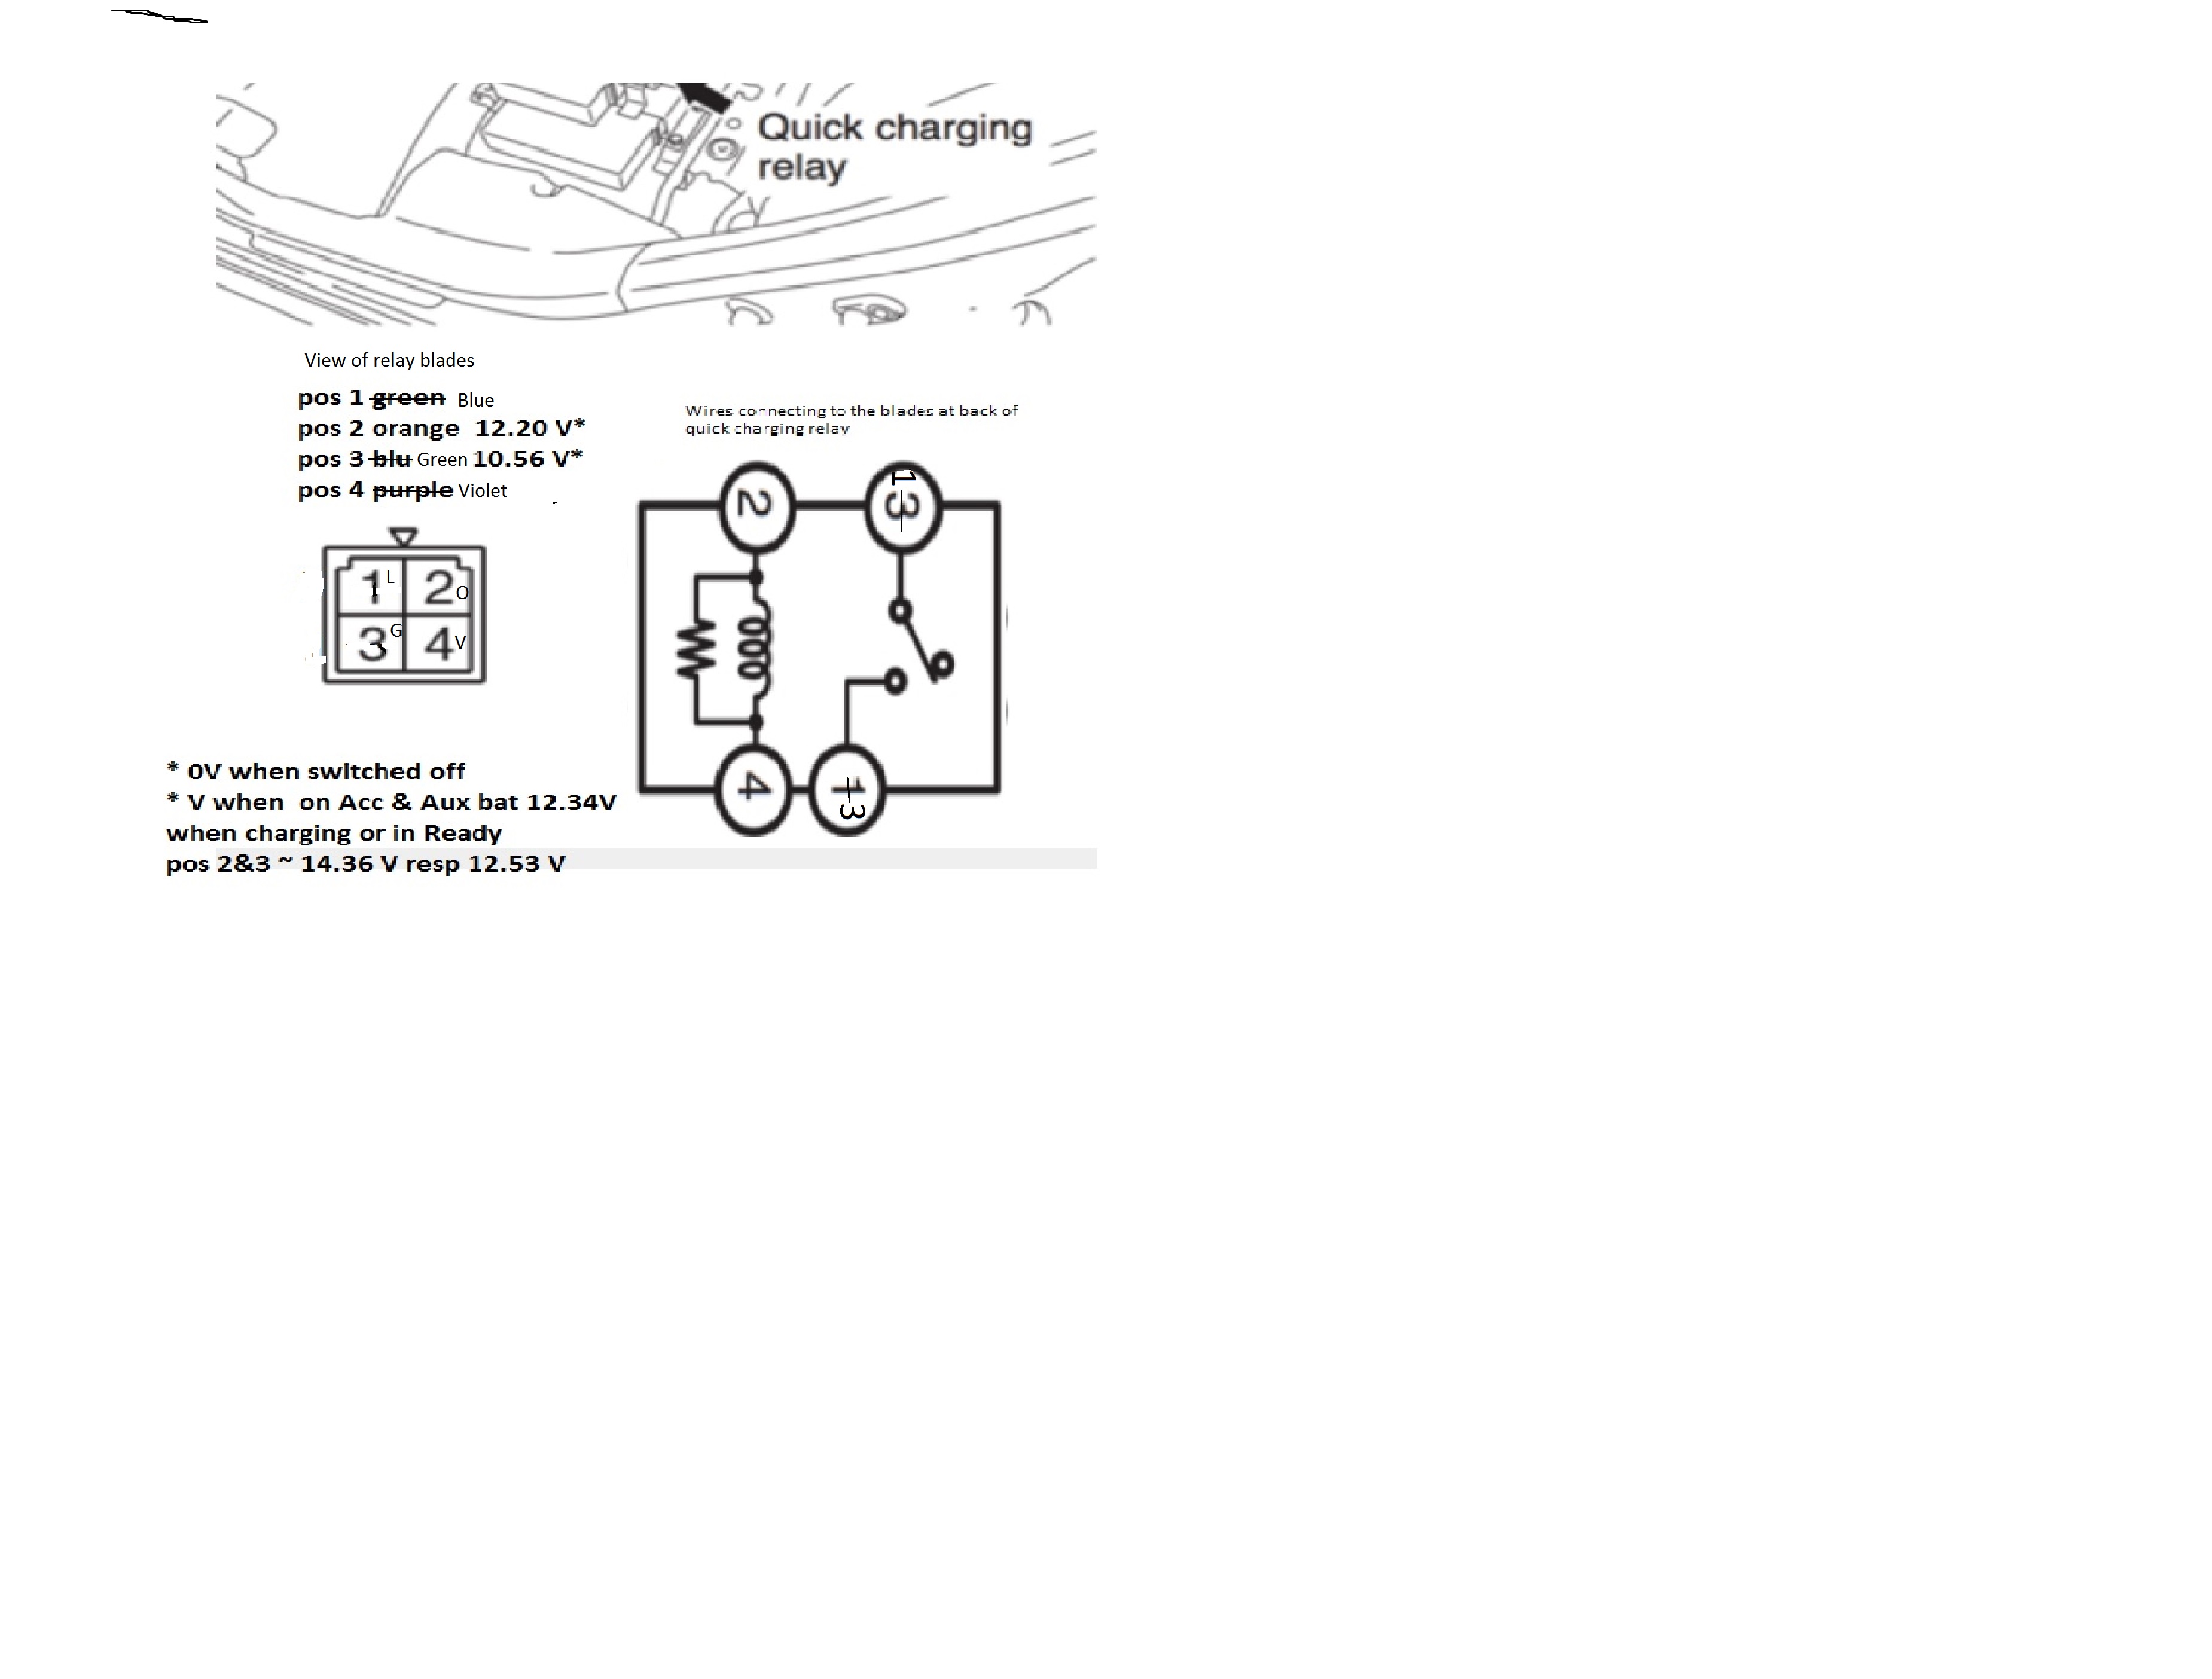
I found as with other wire colours on the OBC that on my car the colours do not match the
information on the circuit diagrams.
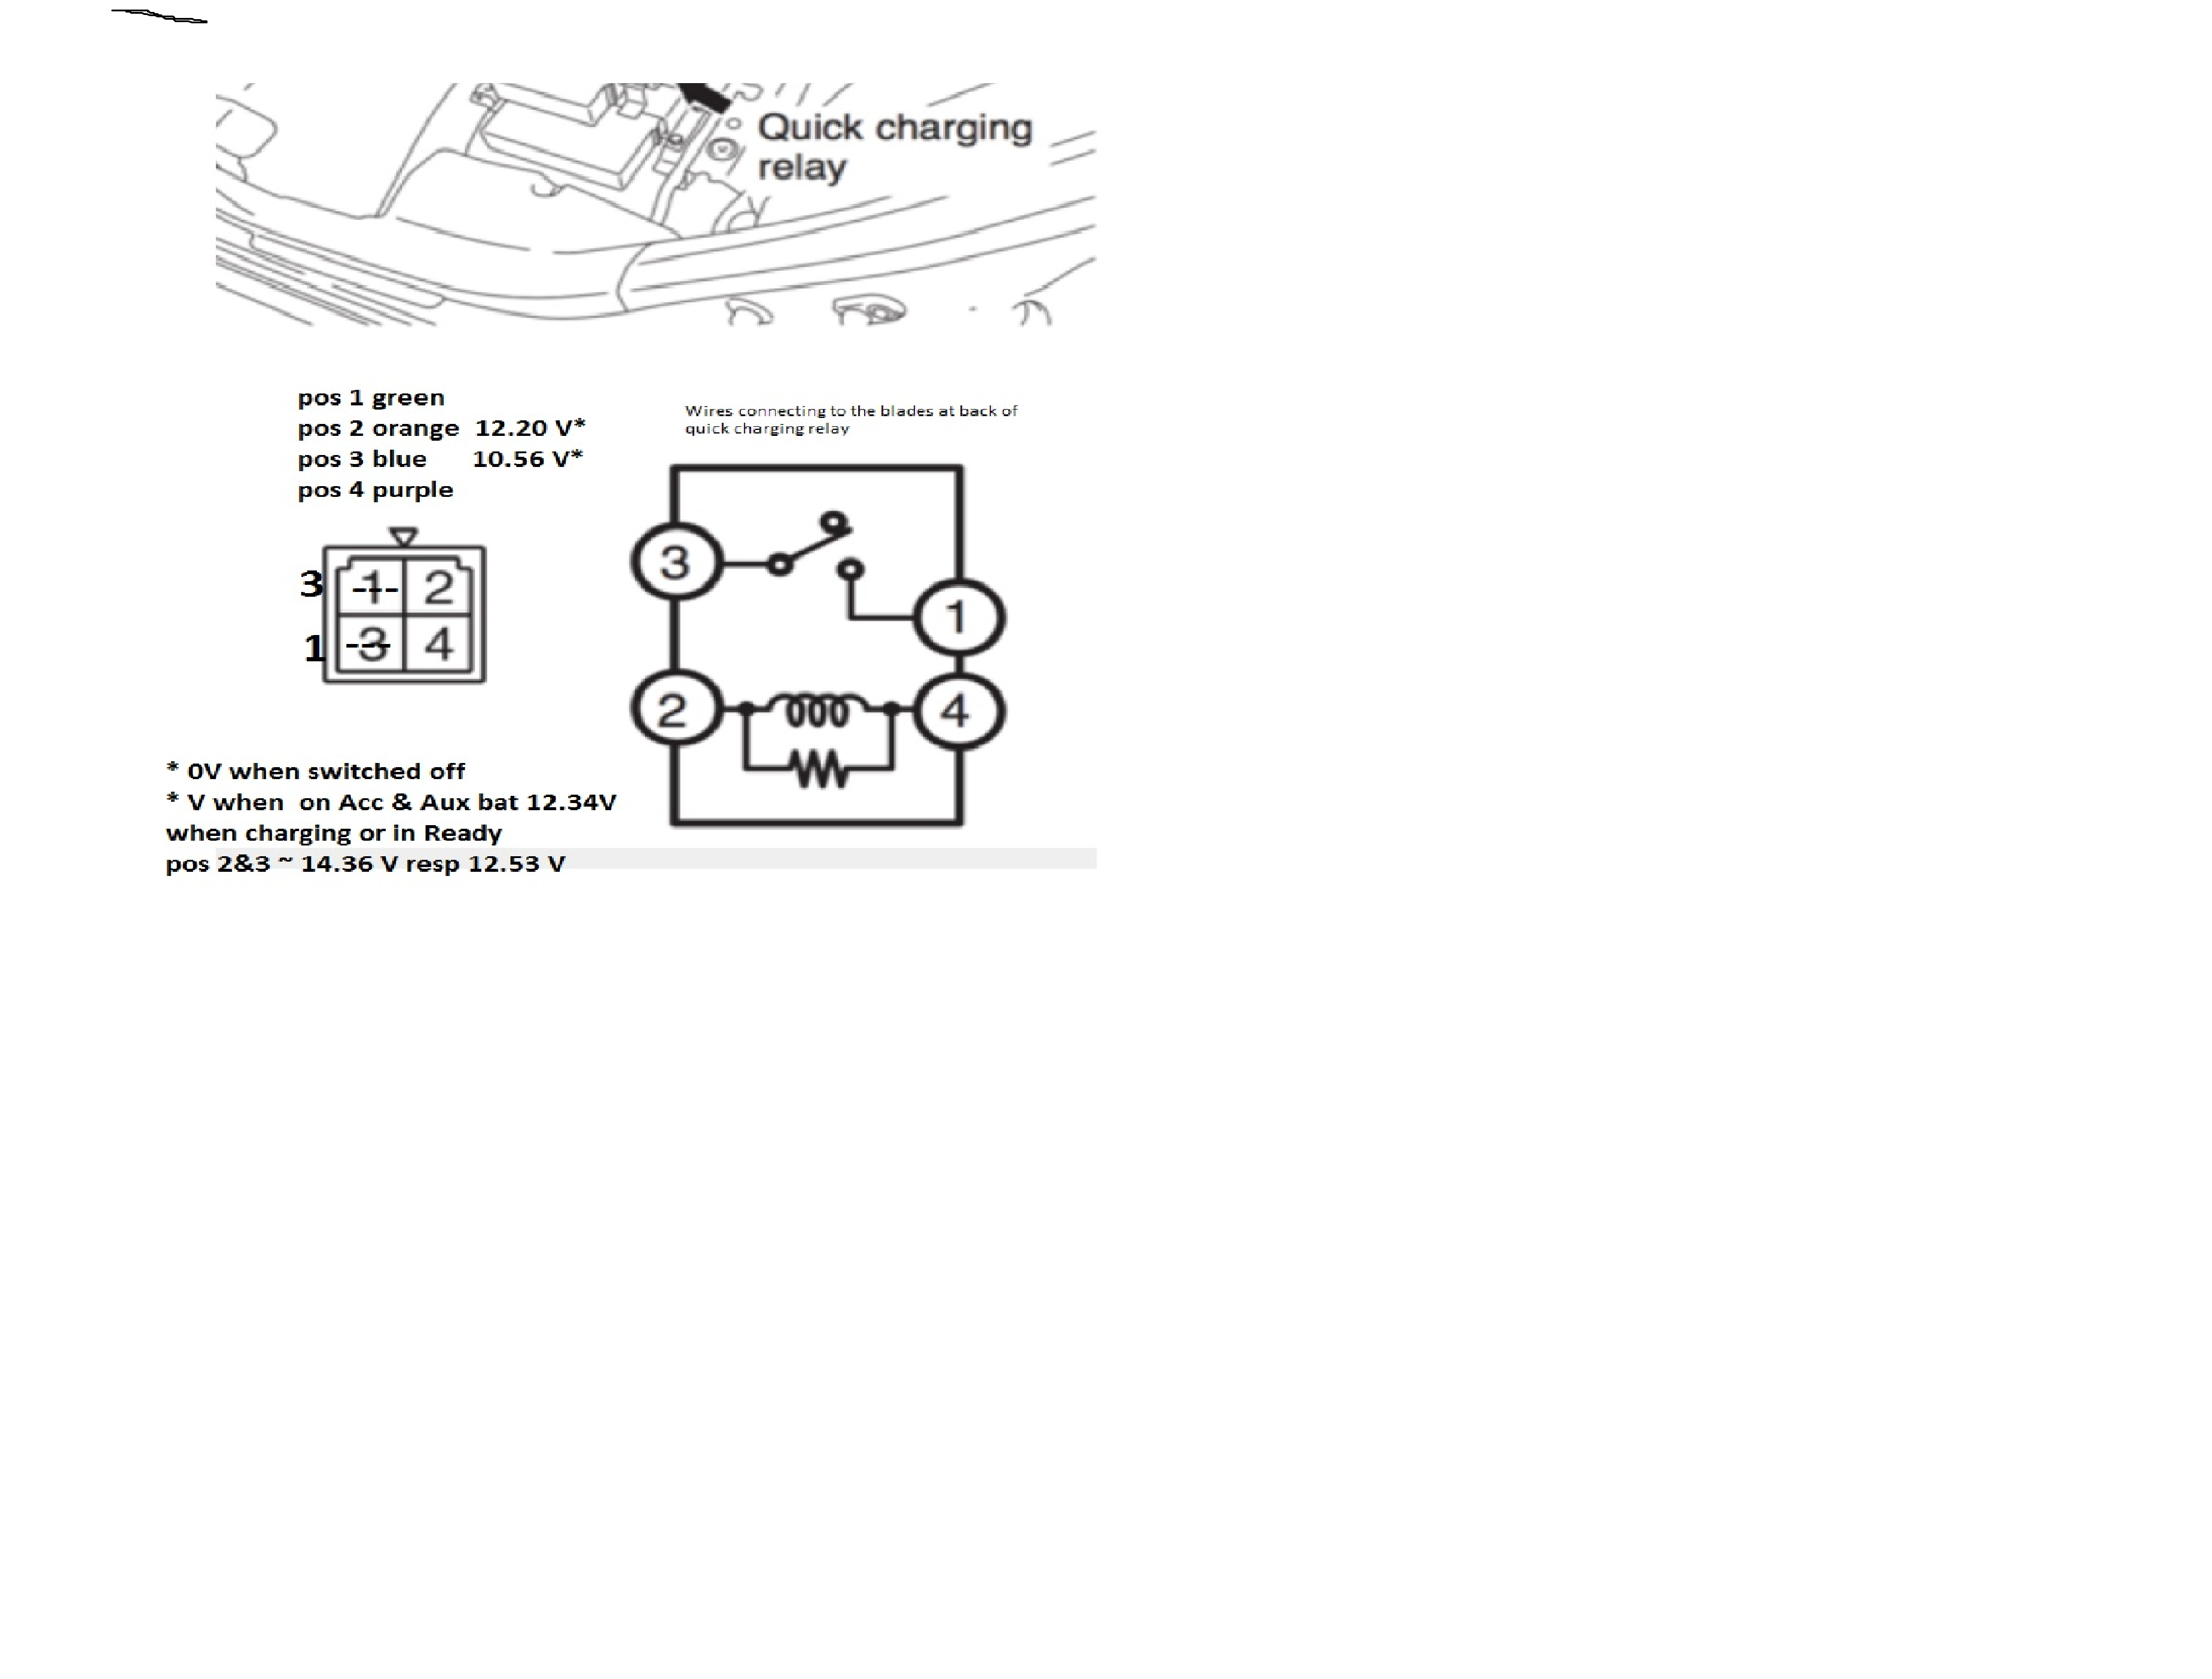
Did some testing but have not physically connected 12 V to pos 1 yet, I'm waiting for feed back just in case I missed something.
TgDF6RU.png

quote from kiev's DC Quick Charge (DCQC) Notes:
"updated: i made some jumpers to get the car to open the pack to the port pins, full pack voltage was 360.7 VDC, and the polarity was verified as shown above. In addition i tested the dcqc control relay under the rear seat and it was good; it is a general purpose G8HN-type relay by Omron with Mitsubishi part number MB627895, and the coil resistance measured 95 Ohms, it drew .13 Amps at 12.85 V. The connector has a catch-tab that was too tight for my normally super-human strength to release, so i opened up the slot to allow easier access–the connector is very tight and i’m not worried it will ever come loose.

A jumper is inserted at the relay connector between the white and blue wires in sockets 2 and 1. This uses 1/4 male spade lugs (aka faston tabs), and supplies +12 V into the pack to the coils of the big dcqc contactors. The contactors are also Omron relays, 400VDC, 200A, 36 Ohm coil.

The second jumper made of 1.5mm pins is inserted from socket 10 to socket 3 of the chademo connector, and this takes the 12V return line from the contactor coils in the pack to ground to complete the circuit and cause the contacts to close. Now the big 9mm sockets of the chademo are energized and let the sparks begin…"
 
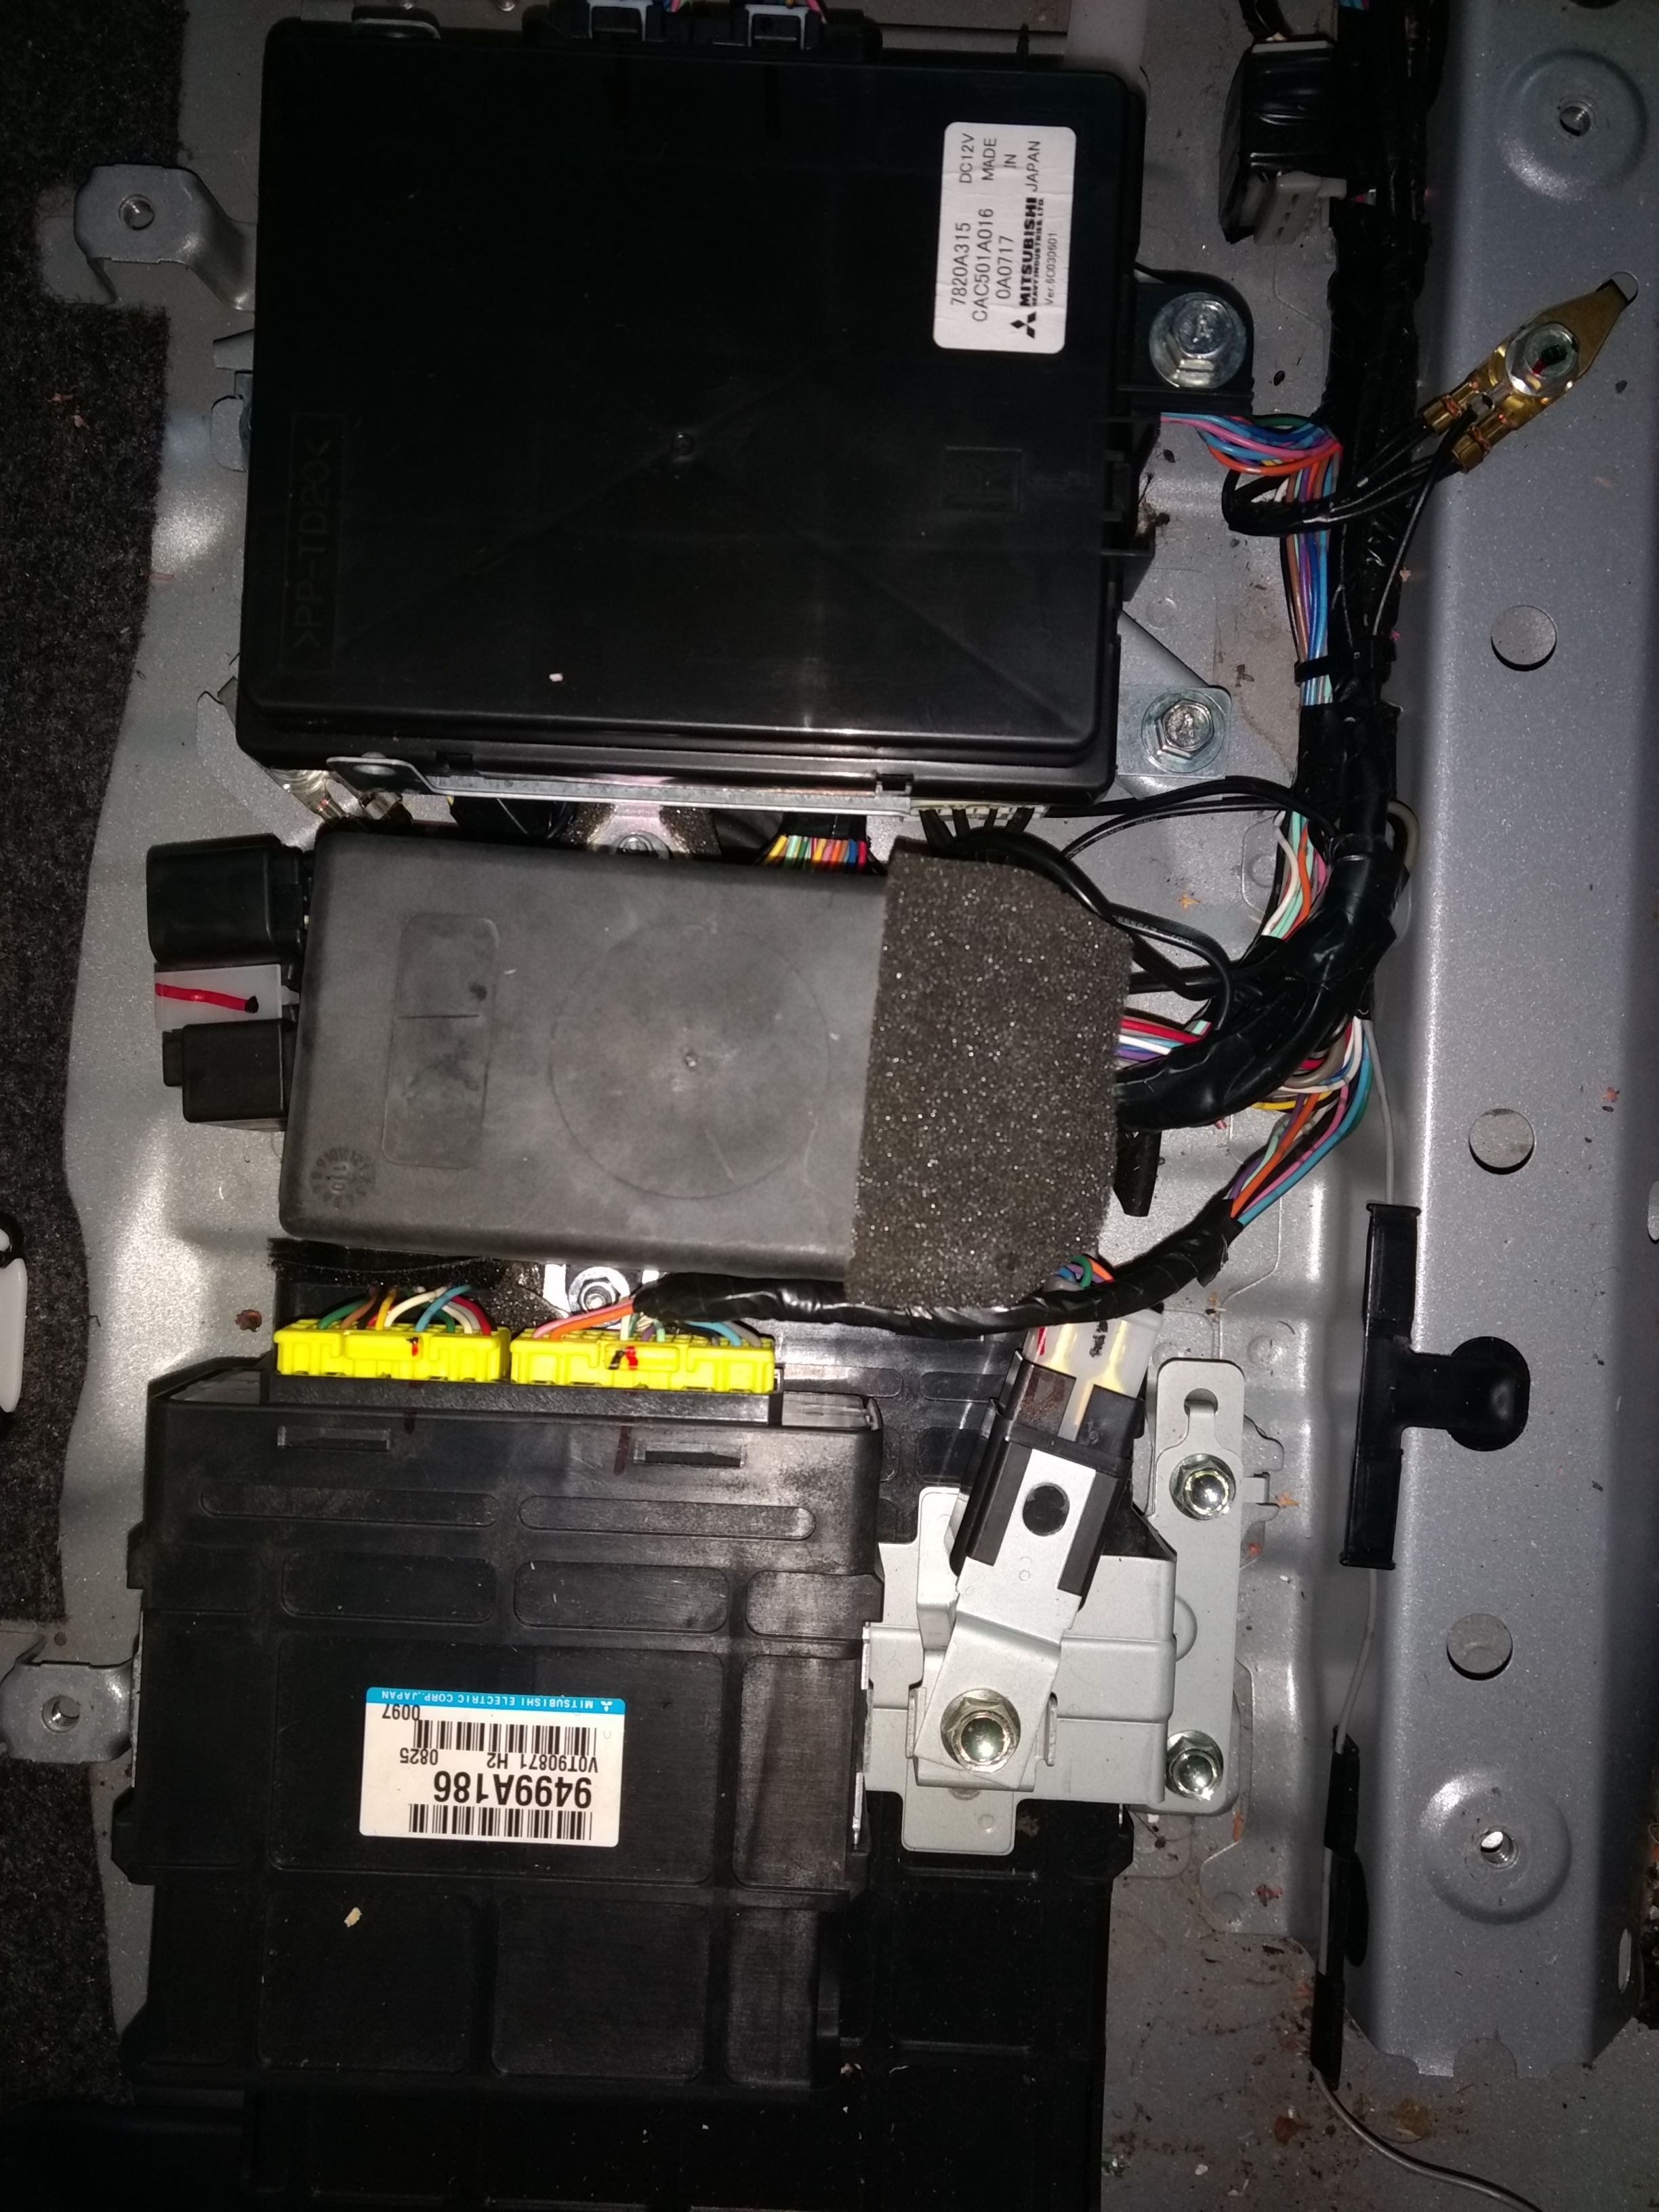
it almost sounds like you have found a different relay; how does your layout compare with the picture of the ECU with the relay.

What year is your car? LH or RH drive?

[edit] i checked the circuit diagrams for 2011-2013 and they were all identical to the wiring colors and connector pinout that i had posted.
 
kiev said:
it almost sounds like you have found a different relay; how does your layout compare with the picture of the ECU with the relay.

What year is your car? LH or RH drive?
2010 RH drive (Australia)

[edit] i checked the circuit diagrams for 2011-2013 and they were all identical to the wiring colors and connector pinout that i had posted.

As I have found earlier on the OBC repair, even though the OBC is the newer type (replaced due to a recall before I bought the car) very few wire colours match the circuit diagrams or the wiring on the other cars I have access to. But with the Covid restrictions still in force in Melbourne, I am just now unable to double check the quick charge relay wires on other units.

iJ78cYq.jpg

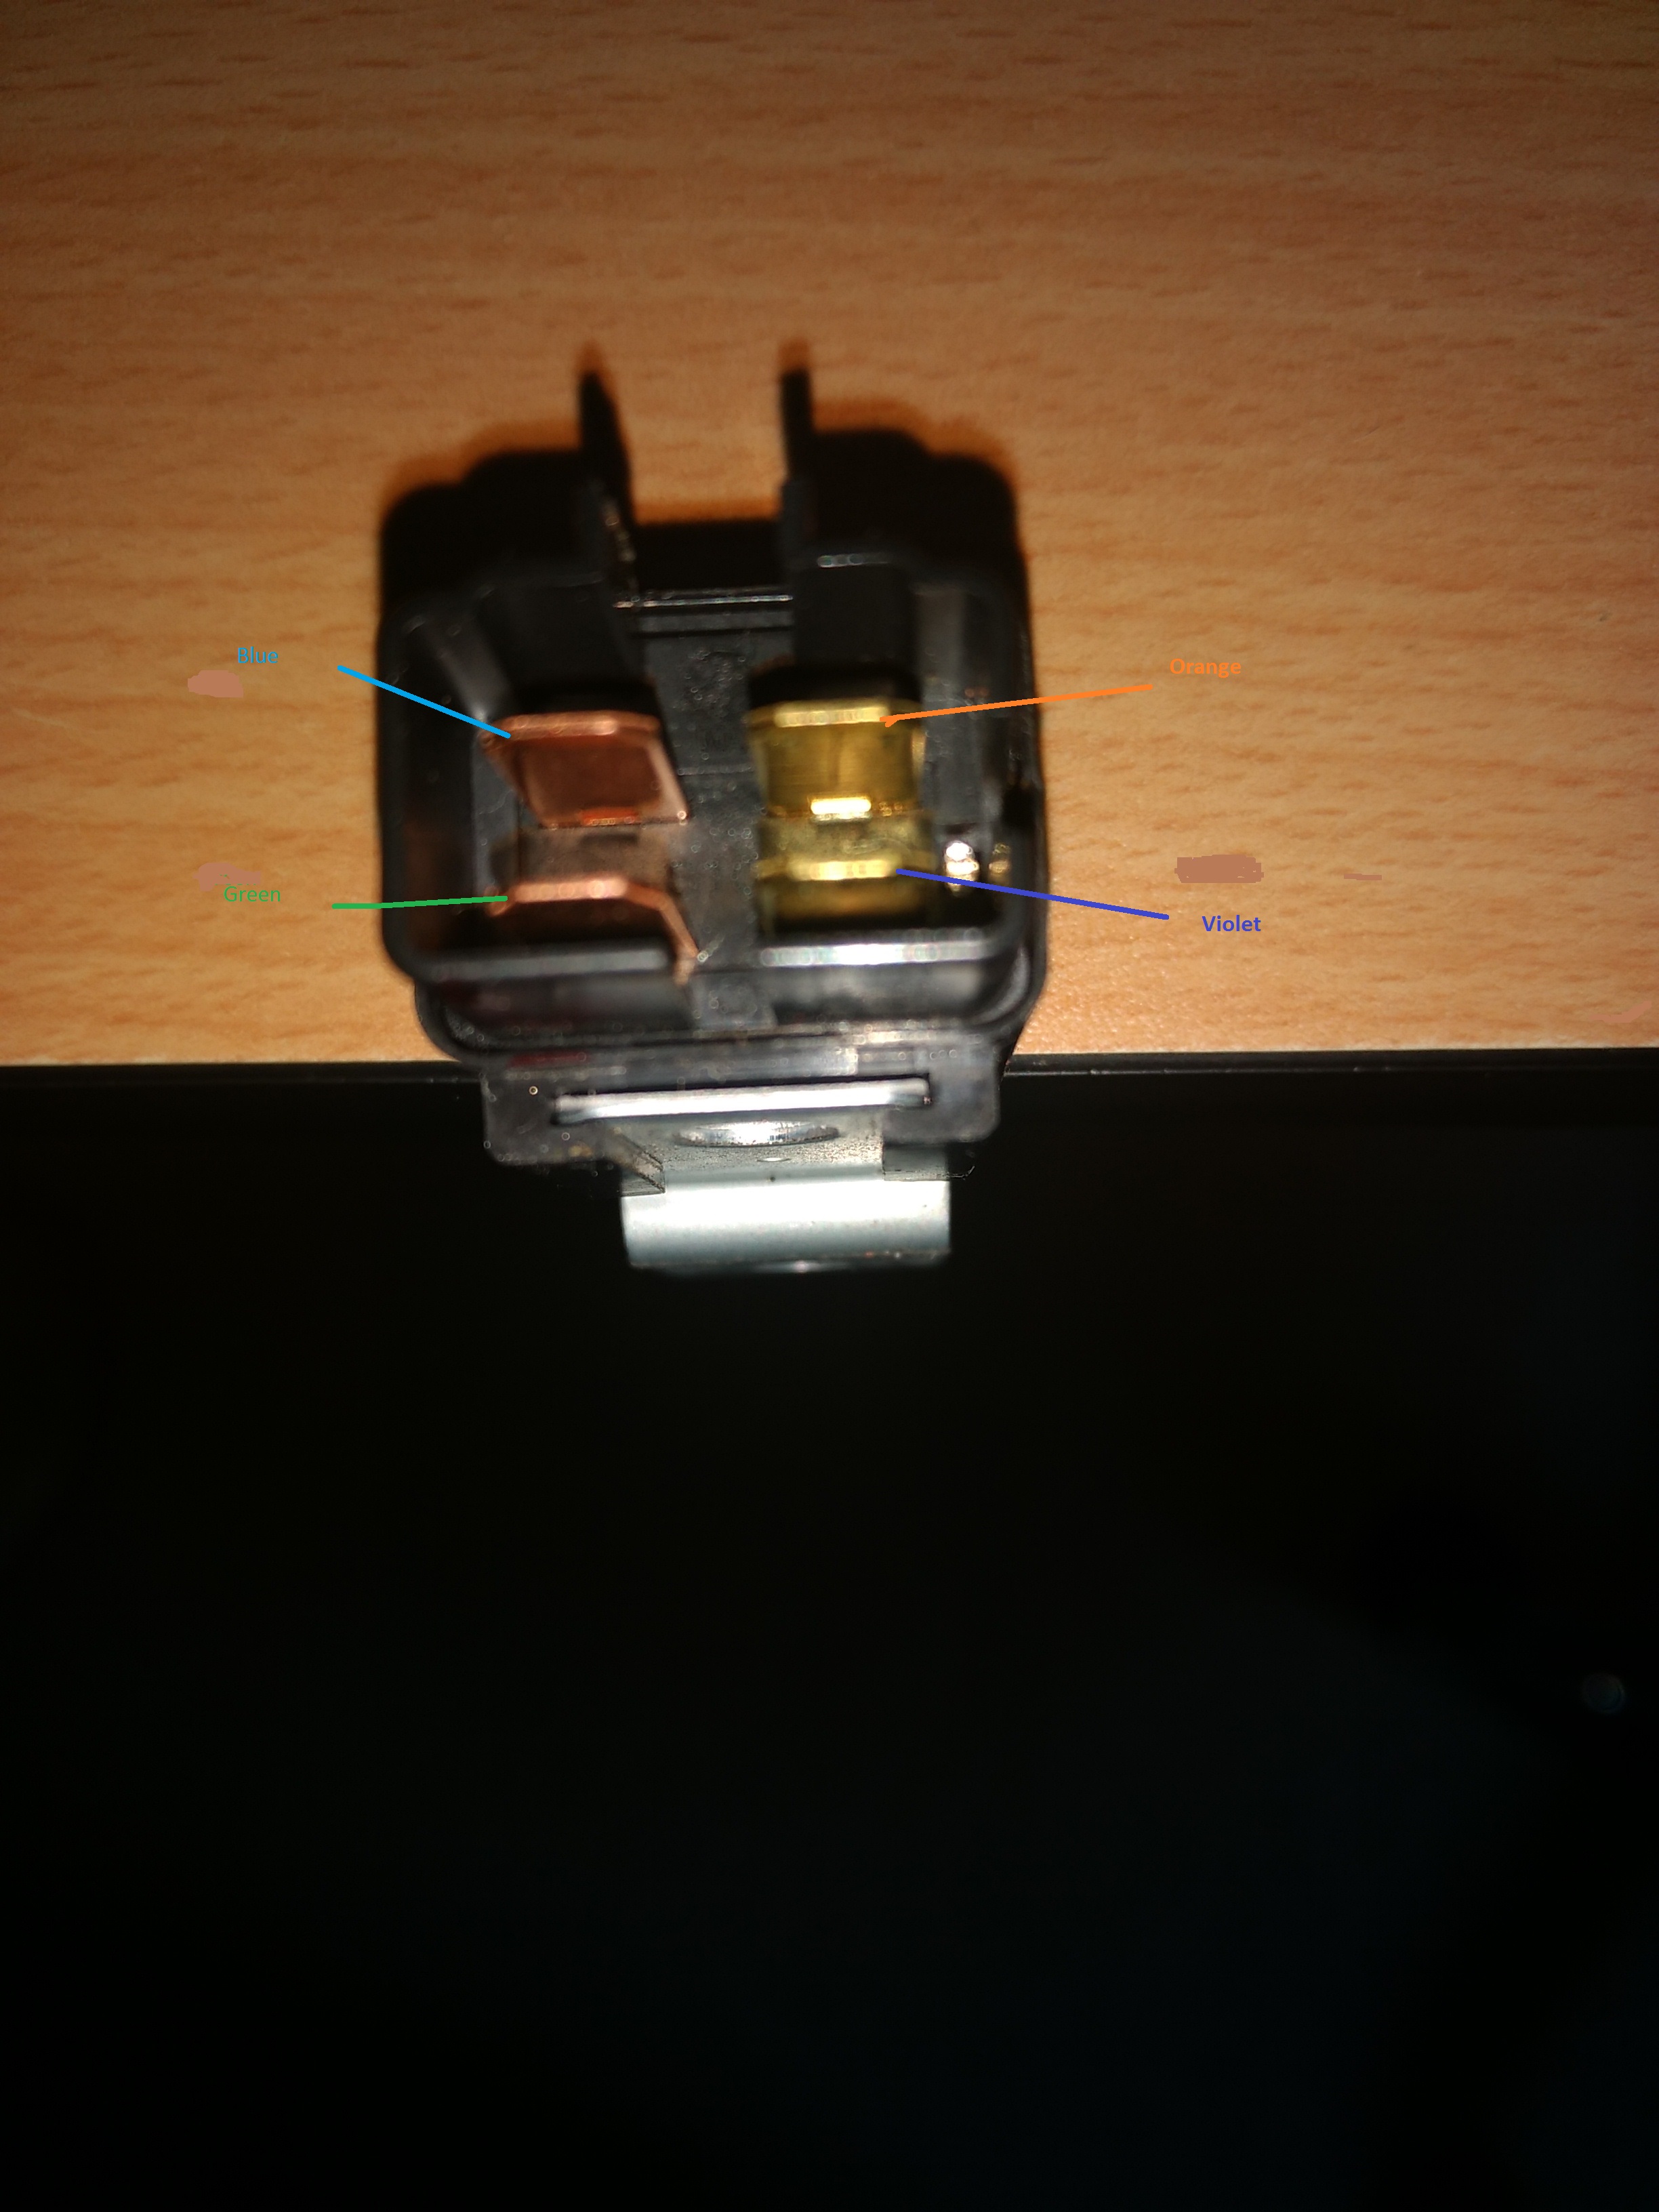
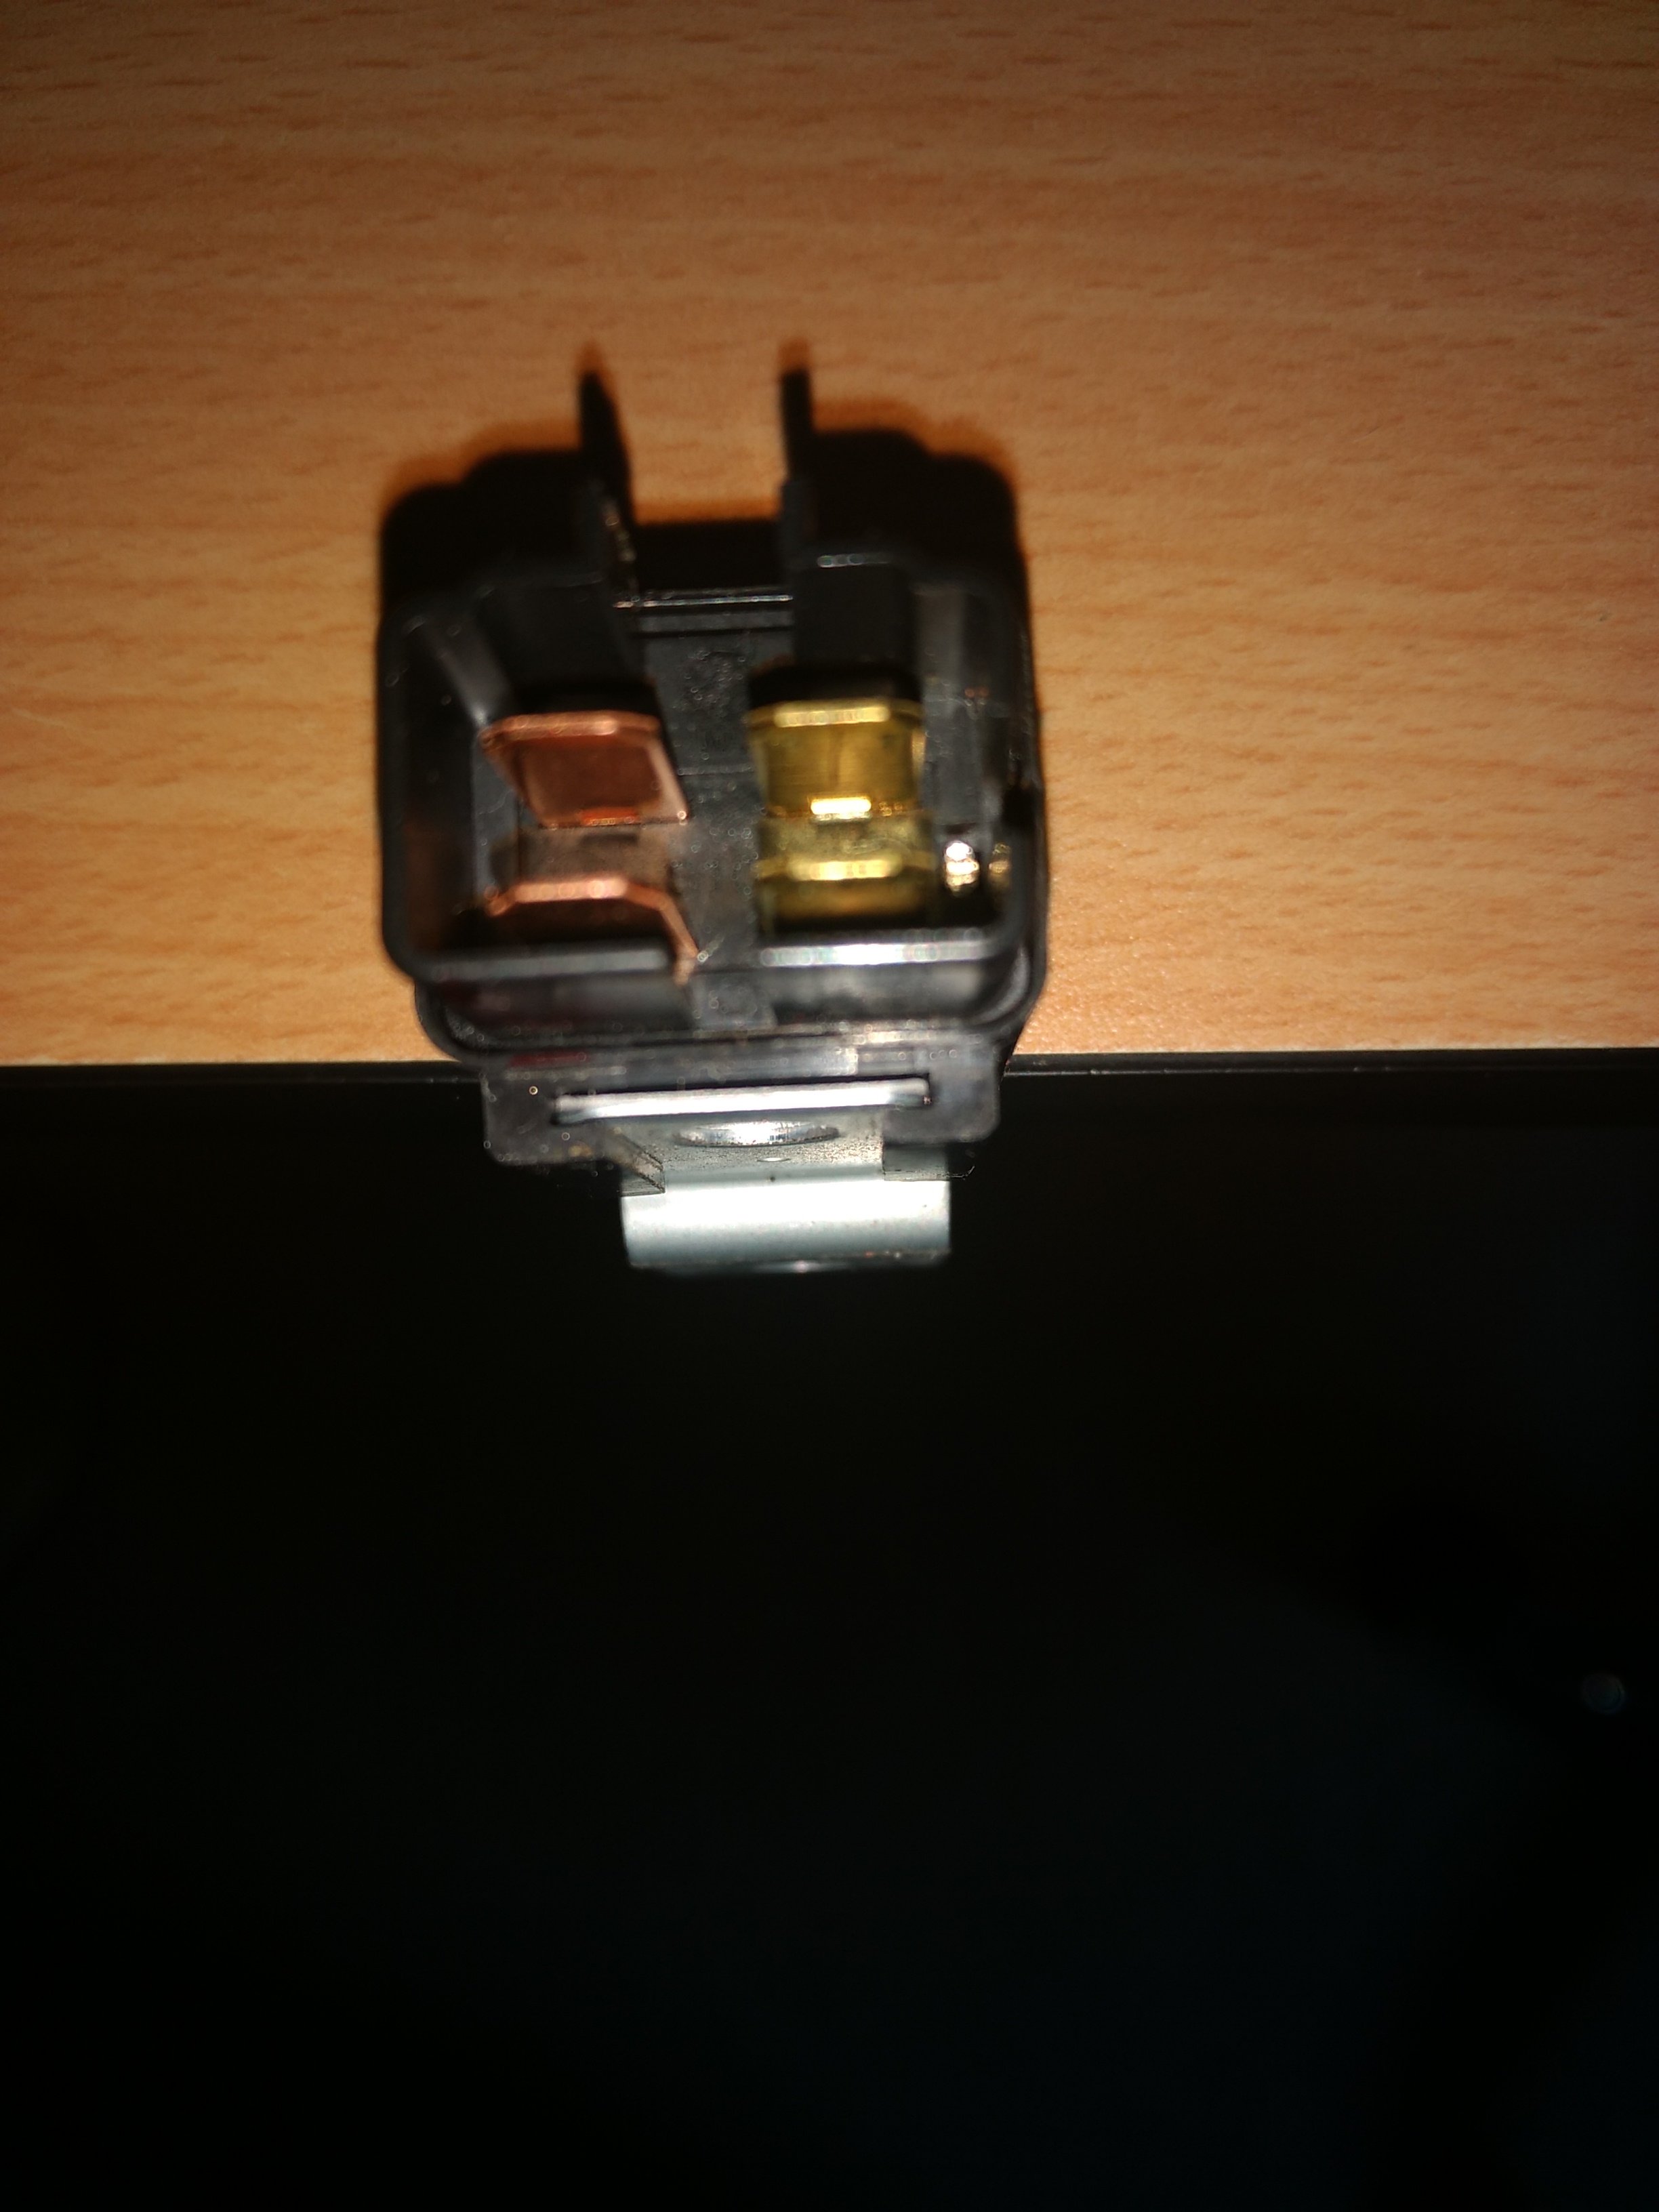
It is definitely the same relay, as seen here
MWU5zAy.jpg


3el7Vff.jpg

The copper blades on the left are pos 1 & 3 NO contacts
the brass blades on right are pos 2 & 4 ~ 93 Ω of the relay coil.
I see the numbering and wire colours on the circuit diagram but on my connector [C-105] I have different colours as noted in last post.
Quote from your notes re quick charge relay:
"A jumper is inserted at the relay connector between the white and blue wires in sockets 2 and 1. This uses 1/4 male spade lugs (aka faston tabs), and supplies +12 V into the pack to the coils of the big dcqc contactors. The contactors are also Omron relays, 400VDC, 200A, 36 Ohm coil."
End quote.
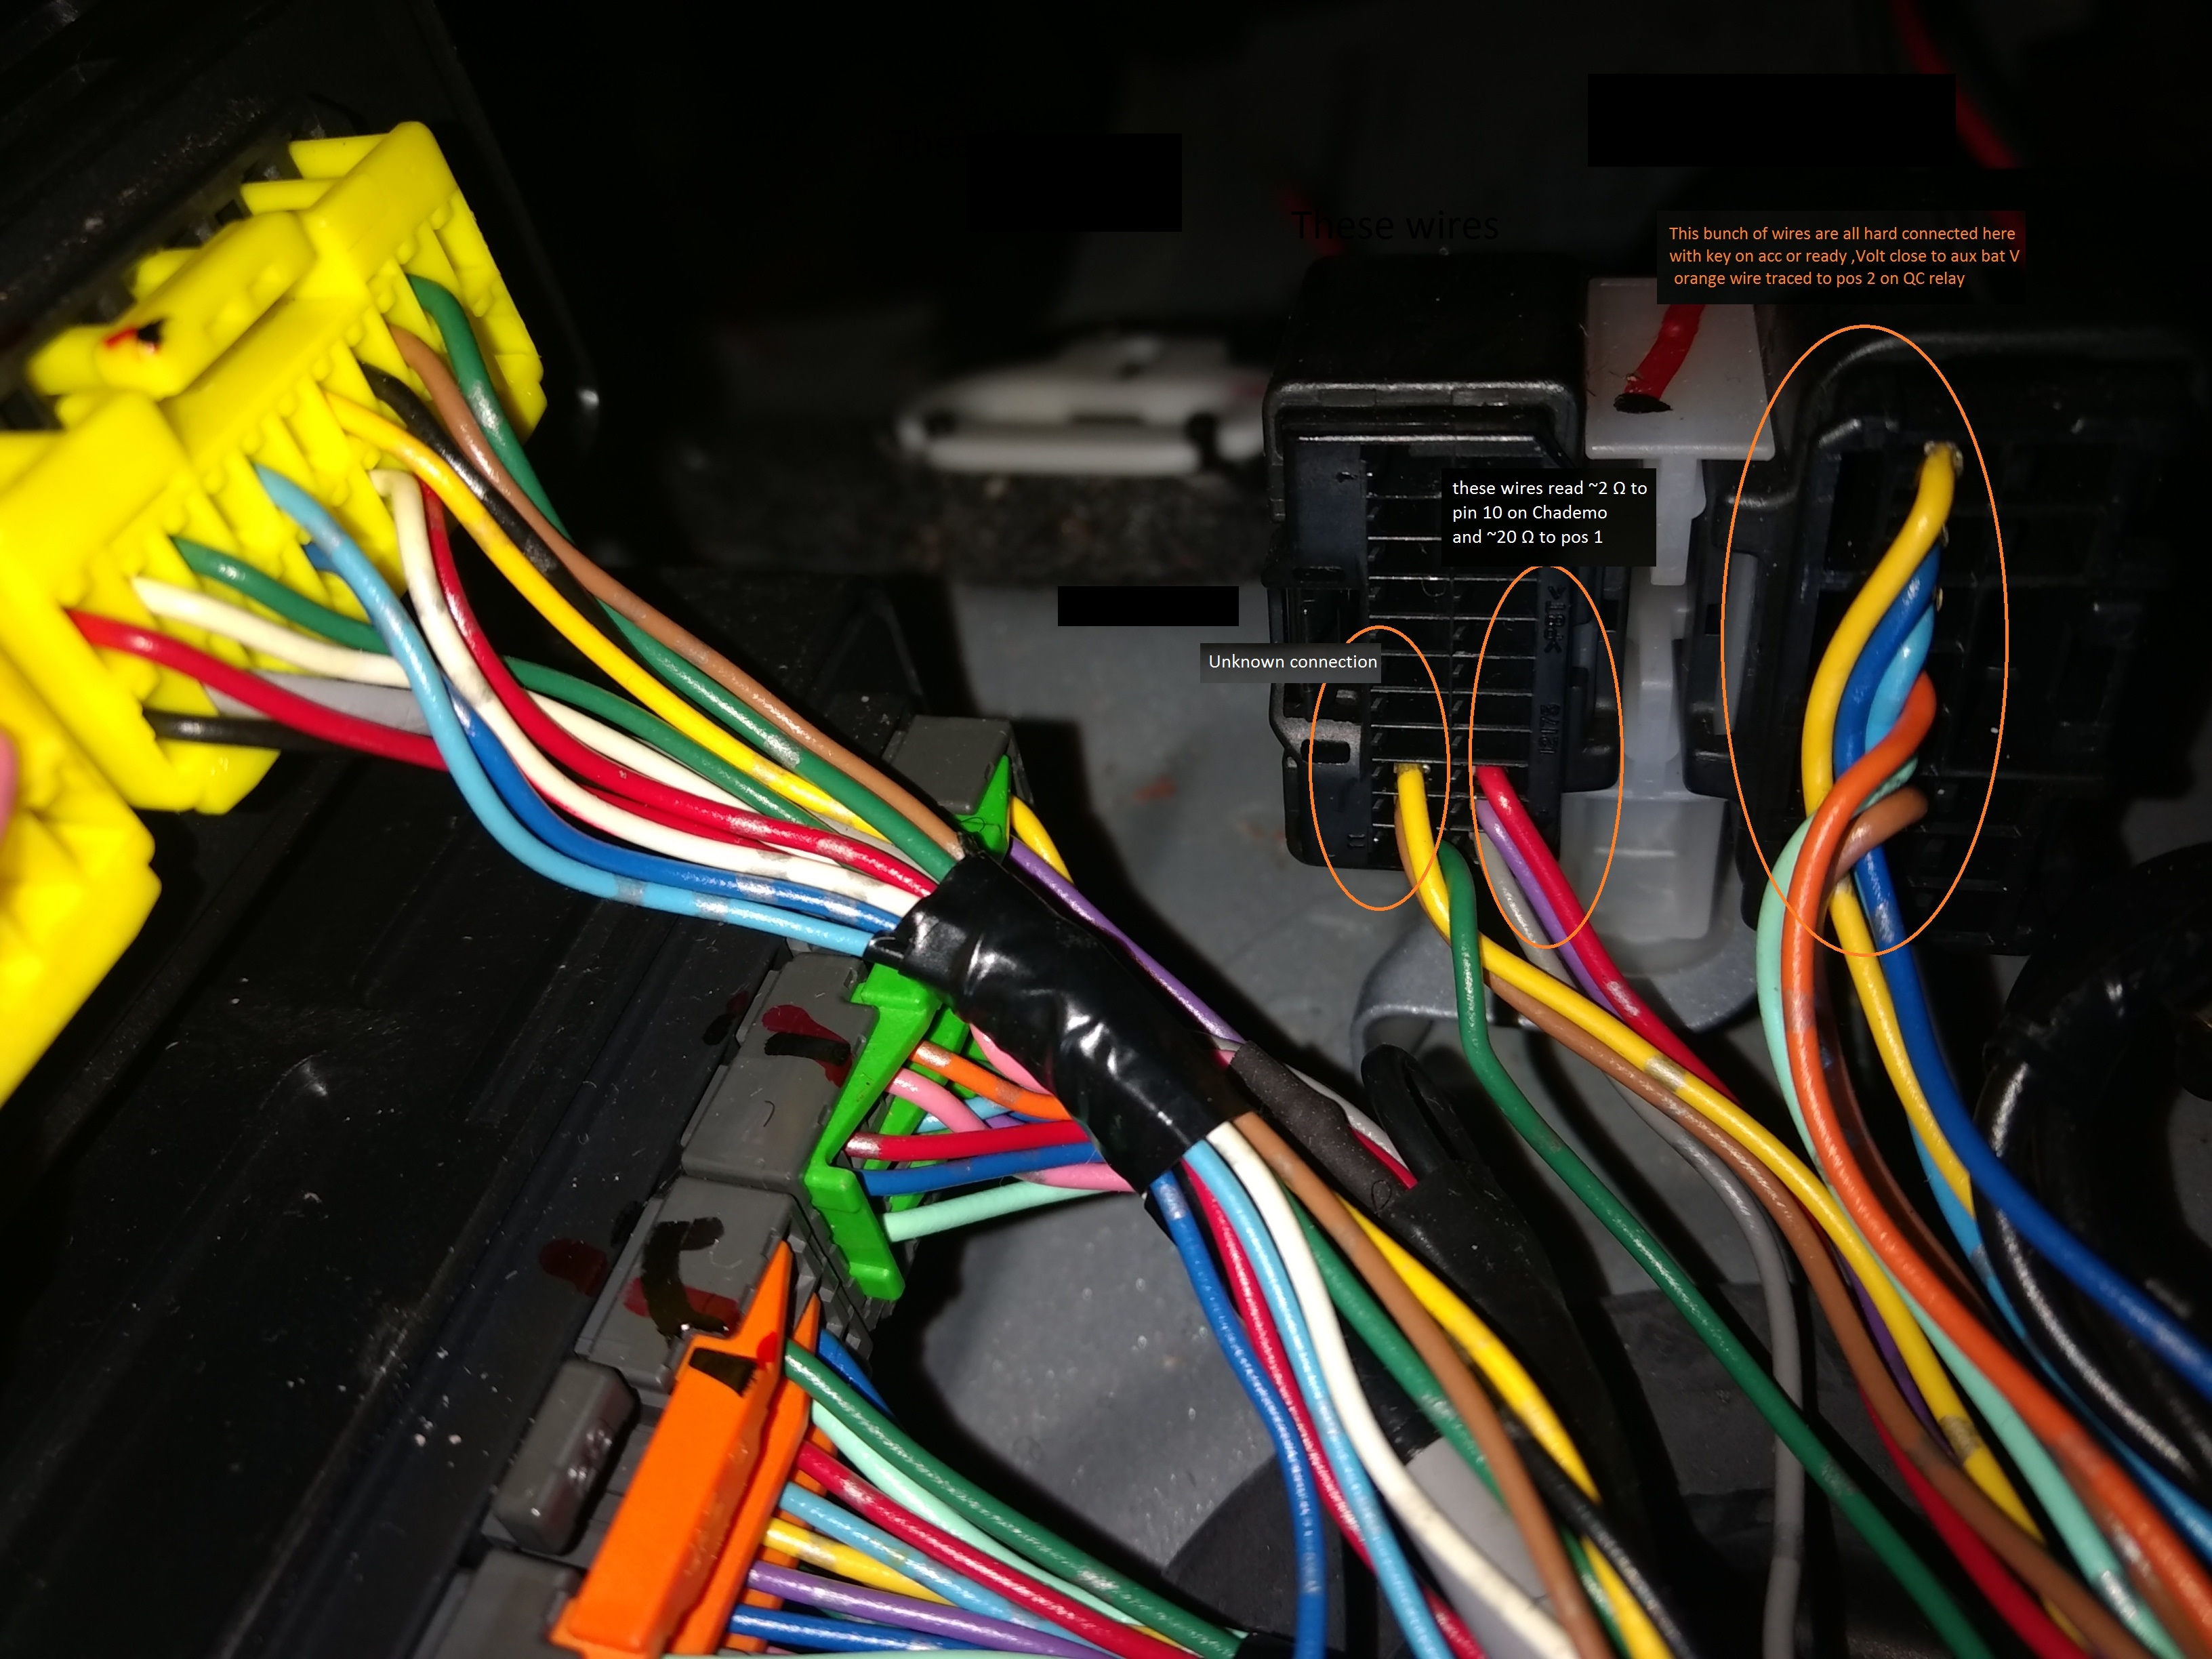
I measured V to ground with the relay disconnected from car:
In key position Acc (aux bat ~12.34 V) I get ~10.6 V on blue wire and ~12.2 V on orange wire
In key position ready (aux bat ~14.4) I get ~12.5 V on blue wire and ~14.3 V on orange.
wires green and purple 0 V.
Chademo pin 10 the same V as on blue wire (~ 20 Ω pin 10 to blue wire on connector)
With the relay back in [C-105] , no surprise, V on purple and orange identical through the relay coil, no change to blue and green ( NO).

I tried to fire up the QC contactor with the relay disconnected, but no success. I just had thought, the jumper I made to connect the pins on the chademo port may not be good enough,
reads resistance ok but power to drive the contactor maybe not. Is that a possible reason?
I did observe that when the relay is disconnected, the high voltage alarm on the dash stays on.
So it somehow knows that there is an issue. Error P1A14 is set (i909 tells me QC contactor circuit low) .
With the relay back in, the alarm light goes off as normal, but even though the i909 claims it did reset the error, it still is there, I doubt that the i909 actually can reset fault codes as others have found out too.
 
It looks like the exact same relay as mine, and the connector layout is the same other than the white wire has been replaced by an Orange one in position 2.

You showed positions 1 and 3 reversed in your notes earlier, but position 1 is the blue wire and 3 is the green, and 4 is violet.

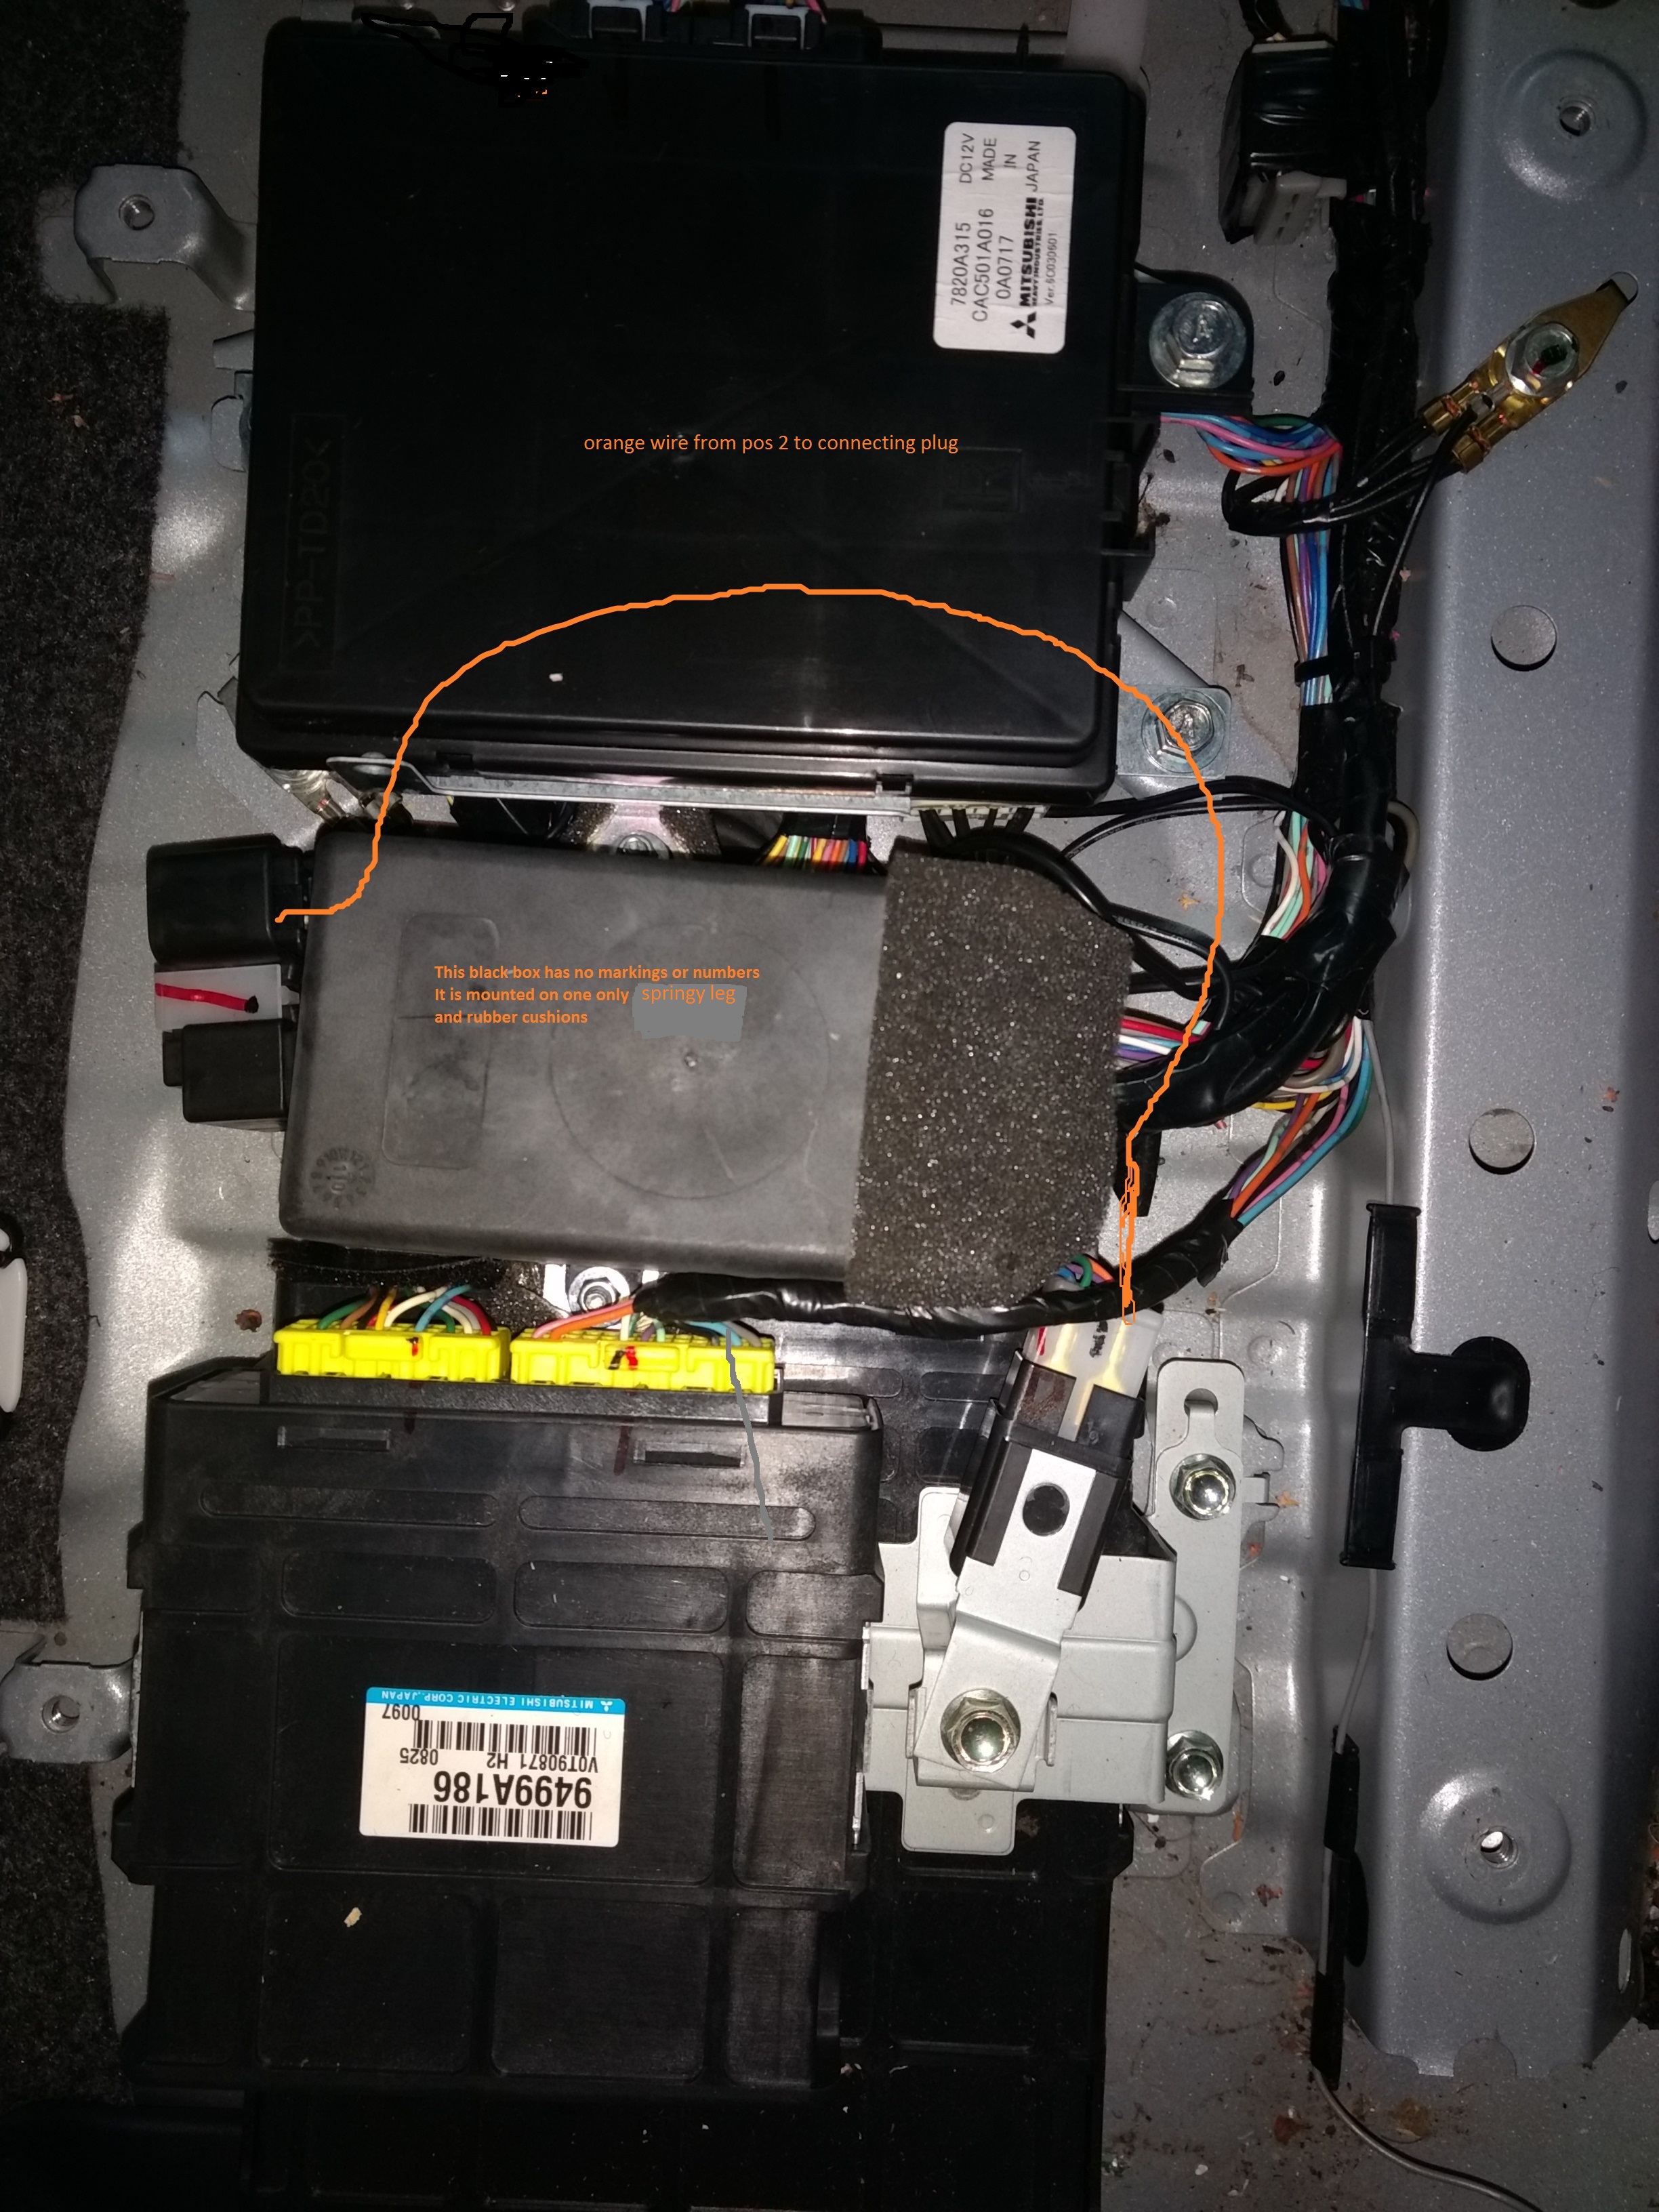
i don't recognize that black box control unit in the middle between the BMS/EV-ECU boxes and the A/C controller at the top of the picture.

i don't have access to the 2010 wiring diagrams, so indeed they could be different and include some sort of check on the QC relay coil continuity and it throws that code.

The jumper connection that i wrote up bypasses the EVECU and puts 12V from the EV control relay on the line into the high side of the DCQC contactor coils. The low side or return for those coils is routed out of the pack to pin 10 of the CHAdeMO connector and to pin 124 of the EVECU, aka S2. Adding the jumper from pin 10 to pin 3 again bypasses the EVECU and provides a path to ground for the coil low side which closes the DCQC contactors and puts voltage on the big pins 1 and 2.

So the EVECU may be throwing a code but it should have no control authority to stop this bypass, as far as i can tell from reviewing available wiring diagrams. i used the relay position 2 as the 12V source just because it was the most handy, but this bypass should work using any available direct 12V line, i.e. even with the key OFF

The voltage checks you made with the key indicate that +12V is getting to pin 2. This bypass should probably not be attempted with the car in READY.

[edit] The Orange wire may be a low current or current limited 12V source directly from the EVECU and not thru the EV Control Relay. You should ring out the Orange wire to find where it goes on the other end. In the mean time you could carefully route 12V directly from a hot-all-the-time source or from the aux battery and use that as the source instead of the Orange wire at position 2.
 
:D
kiev said:
It looks like the exact same relay as mine, and the connector layout is the same other than the white wire has been replaced by an Orange one in position 2.

You showed positions 1 and 3 reversed in your notes earlier, but position 1 is the blue wire and 3 is the green, and 4 is violet.
Yes I got this wrong, I was confused by the voltage on the blue wire.


65ec66q.jpg

sn0KxXY.jpg

kiev said:
i don't recognize that black box control unit in the middle between the BMS/EV-ECU boxes and the A/C controller at the top of the picture.
XyOK2aJ.jpg

There is a picture of this black box somewhere on a blog, but for the life of me i cannot find it again
kiev said:
i don't have access to the 2010 wiring diagrams, so indeed they could be different and include some sort of check on the QC relay coil continuity and it throws that code.

The jumper connection that i wrote up bypasses the EVECU and puts 12V from the EV control relay on the line into the high side of the DCQC contactor coils. The low side or return for those coils is routed out of the pack to pin 10 of the CHAdeMO connector and to pin 124 of the EVECU, aka S2. Adding the jumper from pin 10 to pin 3 again bypasses the EVECU and provides a path to ground for the coil low side which closes the DCQC contactors and puts voltage on the big pins 1 and 2.

So the EVECU may be throwing a code but it should have no control authority to stop this bypass, as far as i can tell from reviewing available wiring diagrams. i used the relay position 2 as the 12V source just because it was the most handy, but this bypass should work using any available direct 12V line, i.e. even with the key OFF

The voltage checks you made with the key indicate that +12V is getting to pin 2. This bypass should probably not be attempted with the car in READY.

[edit] The Orange wire may be a low current or current limited 12V source directly from the EVECU and not thru the EV Control Relay. You should ring out the Orange wire to find where it goes on the other end. In the mean time you could carefully route 12V directly from a hot-all-the-time source or from the aux battery and use that as the source instead of the Orange wire at position 2.
ynwD4Y4.jpg

Key on Acc.,volts on blue wire, pin 10 and the bunch of wires on the second bridge plug are identical.
With the jumper in the chademo port (draws about 2.5 mA), V drops to zero on all other above wires.
Jumpering pos 1 (blue) with pos 2 (orange), volts at pins 1&2 at the chademo port are 340, EvBatMon confirms that pack voltage is 340 .
Thank you kenny.
 
I posted earlier that my iCarsoft i909 did read error code P1A14 but does not reset.
I have questions to any of you owning one of these scanners:

1) Are you able to reset any DTCs?

2) did you successfully read the balance drive status down to the last cell in the pack (CMU 12 cell D).
respectively past CMU 09 cell H?

3) can you access the airbag section?

Much appreciated as I think my scanner is faulty, but have no proof.
Cheers
Edit:
I checked if the car objects to charge with the QC contactors closed and the HV alarm light on (due to the QC relay being unplugged).
That was successful so I took the punt and put it into ready and went for a drive. No obvious harm done!
 
nuggetgalore said:
I posted earlier that my iCarsoft i909 did read error code P1A14 but does not reset.
I have questions to any of you owning one of these scanners:

1) Are you able to reset any DTCs?Yes i have been able to reset some DTCs but not necessarily all.

2) did you successfully read the balance drive status down to the last cell in the pack (CMU 12 cell D).
respectively past CMU 09 cell H? No i can't read all the data either. i have tried to contact them about this issue but never got past the sales folks to the technical experts. The issue seems to be related to the use of an 8-bit counter for the data items, so it is limited to only 256 possible selections; there are 4 data items per page and 64 pages for selection, then it hits the limit of an 8-bit address. It would be great if they could issue an updated software for our device and i would join you in that request if you get a contact person.

3) can you access the airbag section? Haven't tried that section, but i could if need be. i would guess that is not accessible for legal liability reasons. Your unit is likely ok; it doesn't do everything like a MUT but is fairly good for the price. i looked inside to see about reverse eng it, but decided it would be too much work for too little to be gained. i bought one of their generic ICE car versions for $25 and they are nearly identical inside, same hardware the difference seems just in the software.

Much appreciated as I think my scanner is faulty, but have no proof.
Cheers
Edit:
I checked if the car objects to charge with the QC contactors closed and the HV alarm light on (due to the QC relay being unplugged).
That was successful so I took the punt and put it into ready and went for a drive. No obvious harm done!
The P1A14 is listed as a fail-safe function code in that it turns on the HV error and will block the use of DCQC, but does not prevent getting to READY
 
kiev said:
nuggetgalore said:
I posted earlier that my iCarsoft i909 did read error code P1A14 but does not reset.
I have questions to any of you owning one of these scanners:

1) Are you able to reset any DTCs?Yes i have been able to reset some DTCs but not necessarily all.

2) did you successfully read the balance drive status down to the last cell in the pack (CMU 12 cell D).
respectively past CMU 09 cell H? No i can't read all the data either. i have tried to contact them about this issue but never got past the sales folks to the technical experts. The issue seems to be related to the use of an 8-bit counter for the data items, so it is limited to only 256 possible selections; there are 4 data items per page and 64 pages for selection, then it hits the limit of an 8-bit address. It would be great if they could issue an updated software for our device and i would join you in that request if you get a contact person.

3) can you access the airbag section? Haven't tried that section, but i could if need be. i would guess that is not accessible for legal liability reasons. Your unit is likely ok; it doesn't do everything like a MUT but is fairly good for the price. i looked inside to see about reverse eng it, but decided it would be too much work for too little to be gained. i bought one of their generic ICE car versions for $25 and they are nearly identical inside, same hardware the difference seems just in the software.

Much appreciated as I think my scanner is faulty, but have no proof.
Cheers
Edit:
I checked if the car objects to charge with the QC contactors closed and the HV alarm light on (due to the QC relay being unplugged).
That was successful so I took the punt and put it into ready and went for a drive. No obvious harm done!
The P1A14 is listed as a fail-safe function code in that it turns on the HV error and will block the use of DCQC, but does not prevent getting to READY
Thanks for the quick reply.
Re the P1A14 , so what would happen if I connected the QC relay with jumpers and added a switched 12 V into pos 1. Obviously without the 12 V into pos 1 the car would see nothing different until pin 10 is to ground in the chademo port. But would there be a problem when the QC contactors close but the QC relay is not on?
The other option would be to get a relay to take pos 4 to ground, that closes the QC relay and have a relay that connects pin 3 with pin 10.
 
nuggetgalore said:
...
Re the P1A14 , so what would happen if I connected the QC relay with jumpers and added a switched 12 V into pos 1. Obviously without the 12 V into pos 1 the car would see nothing different until pin 10 is to ground in the chademo port. But would there be a problem when the QC contactors close but the QC relay is not on?
The other option would be to get a relay to take pos 4 to ground, that closes the QC relay and have a relay that connects pin 3 with pin 10.

What is it that you are trying to do--i don't understand this mess, it doesn't make any sense to me. For all we know the Orange wire gets powered from the EV-ECU similar to how the EV Control Relay is powered. Your car has modifications from the FSM with an unknown additional black box...?
 
Back
Top