The Troubleshooting and Repair for On-board Charger (OBC) Thread

Mitsubishi i-MiEV Forum

Help Support Mitsubishi i-MiEV Forum:

This site may earn a commission from merchant affiliate links, including eBay, Amazon, and others.
That's a good instructional post, i've added a link to it in the HOW-TO Section in post #2.

i don't have an intact OBC in front of me, but it seems like the black wedge piece comes out while attached to the cable on the upper control board side, and the black wedge remains loosely attached in the white connector on the power board (and just the ribbon cable slides out). Maybe i'm just dreaming this.
Have you noticed anything similar in your repairs?

i gently press the release tab with my thumb and use my fingernails to pry the black wedge back at the indents at each end. With my luck i would poke a hole in the ribbon cable when the screwdriver slips off :lol:
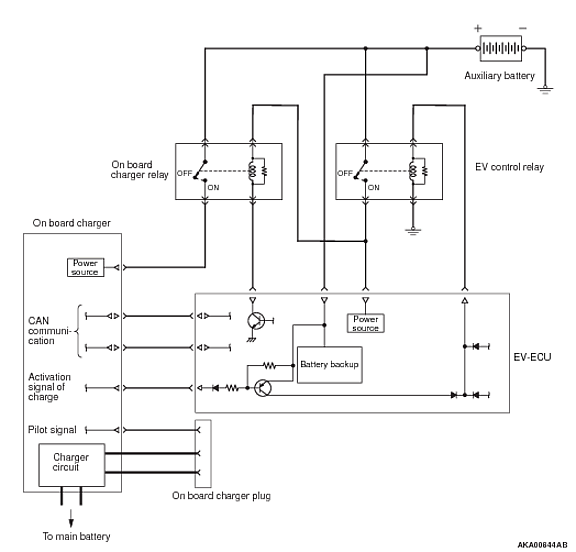
 
Hi guys,
I've got my hands on a 2010 OBC which failed similarly to Coulomb's charger.

The car would go into READY and fast charge with no issues, and when plugged in to slow charge it would kick in the contactors, and start the pack fan before cutting out with a HV warning light after about half a second. Leaving the typical P1A15 code behind.

NVtf1s6.jpg


Before I go ahead and attempt to repair this by following along I'd like to ask for a few pointers.


Although the capacitors adjacent to the resistor are visibly undamaged would it be a good idea to replace them just in case?
And if I do what capacitance should be used?
0.1 μF was mentioned but I wasn't 100% sure if this was in relation to them as the application note seems to indicate 4.7 μF (assuming I'm looking in the right place lol)

Secondly, was the thermal pad mentioned used to replace the white compound between the MiniPlate and the board?
https://www.digikey.co.nz/en/product-highlight/p/parker-chomerics/cho-therm-1671-high-power-electrical-insulator-pads
or was something more suitable used in the end.


Cheers.
 
It appears that the "fuse-resistor" is a weak link in the 2010 OBCs.

What is the white substance? It looks like it was injected to fill the gap, but is it an expanding foam product, or something dense like caulk? Is it stiff and rigid like the black epoxy, or is it flexible like rubber or an RTV sealer? What purpose does it serve: vibration damping, electrical isolation, thermal conduction or thermal insulation, etc?

i didn't realize how large a volume it fills, but with the precision of your surgical extraction it may be that you can re-use as is. The little wedge cut out would have no significant effect on any vibration, electrical or thermal function of that blob.
 
318iEV said:
Although the capacitors adjacent to the resistor are visibly undamaged would it be a good idea to replace them just in case?
I think so. I'd also consider adding a suitably rated fuse.

And if I do what capacitance should be used?
0.1 μF was mentioned but I wasn't 100% sure if this was in relation to them as the application note seems to indicate 4.7 μF (assuming I'm looking in the right place lol)
These need to be rated at 400 VDC or higher. I'm suspicious about the long term reliability of SMD high voltage capacitors. So I'd consider through-hole replacements, as I used.

I don't believe that 4.7 μF 400 V come in that smallish package, so I don't believe that it's actually supposed to be 4.7 μF. It seems to be decoupling, and 0.1 μF seems to be a good value for that purpose.

Secondly, was the thermal pad mentioned used to replace the white compound between the MiniPlate and the board?
https://www.digikey.co.nz/en/product-highlight/p/parker-chomerics/cho-therm-1671-high-power-electrical-insulator-pads
or was something more suitable used in the end.

Neither. That thermal pad from Digi-Key is way too thin. In the end, I decided what I needed was thermal plaster. But the repair was urgent, so I didn't want to wait. I ended up using heaps of thermal paste, which is not ideal, as its thermal conductivity is only 0.9 W/m·K, when plaster would be over 5 W/m·K, I decided that it's mainly the inductor that is getting heat-sunk, and it can stand getting quite hot, so this gunk is not critical. Also, it sinks its heat partly through the PCB components, which doesn't seem like a great idea. The rest of it transfers heat via the thick black compound, which doesn't seem very effective.

I agree with Kiev that you don't need to do anything really special there; I'd consider just filling the gap with silicone. Silicone is basically a thermal insulator, so it won't aid with heat transfer, it will just keep dirt and moisture away from the high voltage.

BTW, the report from the owner who lives 1000 km (625 mi) away, is that the repair was successful in his car, having been installed by a local auto electrician. Hopefully it will stay fixed for a good many years.
 
kiev said:
It appears that the "fuse-resistor" is a weak link in the 2010 OBCs.
Indeed. But the key question is, is it the resistor itself that fails, or does it burn when the capacitor(s) fail? My guess is the latter.

What is the white substance? It looks like it was injected to fill the gap, but is it an expanding foam product, or something dense like caulk? Is it stiff and rigid like the black epoxy, or is it flexible like rubber or an RTV sealer? What purpose does it serve: vibration damping, electrical isolation, thermal conduction or thermal insulation, etc?
My assessment is that it's for thermal conduction. It's not stiff or hard, it's flexible and flaky like rubber. Not particularly stretchy like silicone.

I can't see that it would do much vibration damping, but I suppose it's possible.
 
i suspect an old, weak or worn out 12V starter battery. For an EV the demands on this battery are modest and they tend to last a long time. But this gives a false sense of security. The lead acid battery can tolerate lots of abuse and not show signs of impending failure, but when they go over the edge it's too late and the damage is done.

So the battery may appear to be okay when just measuring the static no-load voltage, but over time the plates have sulfated and reduced the capacity drastically (~90% reduction). The new capacity may be 30 A-hrs and after a few years this may be down to 3 A-hrs. Measuring the voltage it may appear as good, but the voltage may collapse when it is put under load.

Even a momentary collapse results in interruption of the low voltage supplies created in the multiple ECUs located across the vehicle, and can result in numerous DTCs or even circuit failures, such as relays or contactors opening while under load to damage contact surfaces or overloading the ceramic precharge resistors in the OBC.

In the age of digital electronic controls the 12V battery is much more critical in all cars, EVs, hybrids and combustion engines.

Periodic battery health checks such as capacity test or specific gravity would be a good item to add to the vehicle service and maintenance list.
 
Thanks for the help, I'll seal up the remaining gap with some silicone once everything is done since I've got most of the original compound intact.

Now after sitting back down and having a closer look at the board I've realised the Inductor L601 below the burnt out resistor is also open circuit and the value on it is unreadable, does anyone remember what it is or have a good photo to reference?
 
318iEV said:
I've realised the Inductor L601 below the burnt out resistor is also open circuit and the value on it is unreadable, does anyone remember what it is or have a good photo to reference?
Alas, I don't have a good photo, and didn't have equipment to measure it.

The least-worst photo I have is this:

cl1ZO8z.jpg

It looks to me that it says "107", but that makes no sense. I recall thinking it said "/01" (reading it the other way), but that makes no sense either. It might be 101, or 100 μH, but the slope seems too high.

I can't see any decent photos of the other equivalent inductors. Here is the least worst of those:

3rtMCBl.jpg

It might also read 107, though the last character is basically unreadable, and the middle character could possibly be an "R", meaning it's 1.7 or 1.something micro henries.

For what it's worth, I don't think that the value is critical; it's just for transient suppression.
 
Ah, perhaps 401, with vestiges of underlines indicating which side is down. So 400 uH. I have no idea if you can get that value in that size.

Edit: though 400 isn't an E12 value, 390 would be closest. And another nearby similarly sized inductor does look like it's marked 104.

I guess 10mH may be possible in a tiny package with enough iron or other material.
 
Or how about "102" after blinking at them some more? i can look at them and blink, and it changes from a 4 to a 2 to a 7.
The clear coat on the chips could be removed to help make an id.
 
A similar looking inductor L603 on the board reads 101 with a slanted 1

SGaZ9IM.jpg


Which could explain the possible "/01"

With dull markings and the reflective clear coat it was borderline impossible to see clearly with the naked eye.
 
That's a great picture, thanks for posting it. 101= 100uH makes more sense for the smaller filter inductors compared to the larger wound "102" power device at L602.

It appears to have a dot before the slanted 1 , such as used to indicate that the part is lead-free. Maybe the mold maker somehow blundered a bit when setting up the mold die and thats how they all look?
 
PM from makey
Hello, I had a lot of MIEV chargers in the repair, and this is my opinion about the 4.7R resistors that are burning.
What do you think if you put a relay with a delay of 3 seconds in parallel with the resistors, and power it from 220V.
For example, here is this https://tervix.ua/product/Tervix/sistem ... c_12_230v/
...
Hello, thank you for answering me
I realized my mistake, it won't work because of the delayed relay :(

I had 10-15 OBC in repair, the malfunctions were different
Errors of previous masters, damage to the wafer plate, but most of all - burnt resistors (4.7R)
After replacing the resistors, they burn again (80%), they burn both at the start of charging and in the middle, after a day or a month ((((

I'm looking for a reason

On the forum, you wrote that the problem is with the 12V battery, but the power supply of the relay is 5V, there cannot be such a large drawdown

maybe during the pause for BMS balancing the relay turns off and does not turn on???
is it possible that the problem is in the FPC -plume?
if you replace the resistors, then you should also replace the AC relay because it is suspect as being the culprit or being damaged also.

If the 12V supply gets a glitch due to an old or weak cell, or sulfated plate in the battery, then it puts a glitch on the 5V supply also, which can drop out the relay--then the 4.7 resistors end up carrying all the current and blow the fuse or burn up. If the relay opens while under high current load, then the contact surface of the relay will be damaged. The OBC controls the current and pulls back the load current whenever it wants to shut itself down; but a sudden or unexpected loss of 5V while the relay is at high current is an abnormal shutdown, and the controller is not fast enough to prevent the damage.

A strong and healthy 12V battery is VERY important for operation of an EV. Most people don't pay enough attention to keeping the 12V fully charged all the time, and making capacity and/or specific gravity checks twice a year. Early detection of a battery getting worn out or weak can help prevent electrical damage of ECUs.
 
I disassembled the two relays to find out what the problem was, the relay contacts were in perfect condition (looking under a microscope) there was no carbon deposits

P6Wte5C

https://imgur.com/a/P6Wte5C

What do you think about installing a 4700uF (10 000uF) capacitor in the OBC on the VCC (12V)? To compensate for surges in battery voltage
 
That's good data about the AC relay contact surfaces. So maybe they can be ruled out as culprits.

Consider that the resistors are not in the circuit during charging, they only carry AC power for a very brief time during the initial pre-charge at OBC start up. There is a chain of abnormal events (culprit) leading to the resistor failure (symptom). Just replacing the resistors without correcting the root cause does not solve the problem. Unfortunately it is difficult to test an OBC to troubleshoot this circuit.

Maybe the 5V supply circuit has been compromised by a previous failure, or was the root cause of the initial 4.7R resistor failure?

Without knowing the culprit it is difficult to determine what might be a good solution, e.g. adding large capacitor to the 12V supply.

There are external factors to consider in addition to the internal OBC circuits
GwwvVnq.png
 
Back
Top