Power Delivery Module (PDM) aka the DC-DC Converter/Junction box on Nissan Leaf Gen1 (wiring info)

Mitsubishi i-MiEV Forum

Help Support Mitsubishi i-MiEV Forum:

This site may earn a commission from merchant affiliate links, including eBay, Amazon, and others.

TrueSoln

Member
Joined
Feb 12, 2020
Messages
10
This is the Power Delivery Module (PDM)
aka the DC-DC Converter/Junction box on Nissan Leaf Gen1
Part #EM57

Trying to work out how the DC/DC junction box (converter) works
So can use in own EV project
As it has the High voltage to 12v to keep the car battery side alive when in use
Plus the switching links for the HV in from battery and HV out to battery.
And quick charge and slow change links all in it.

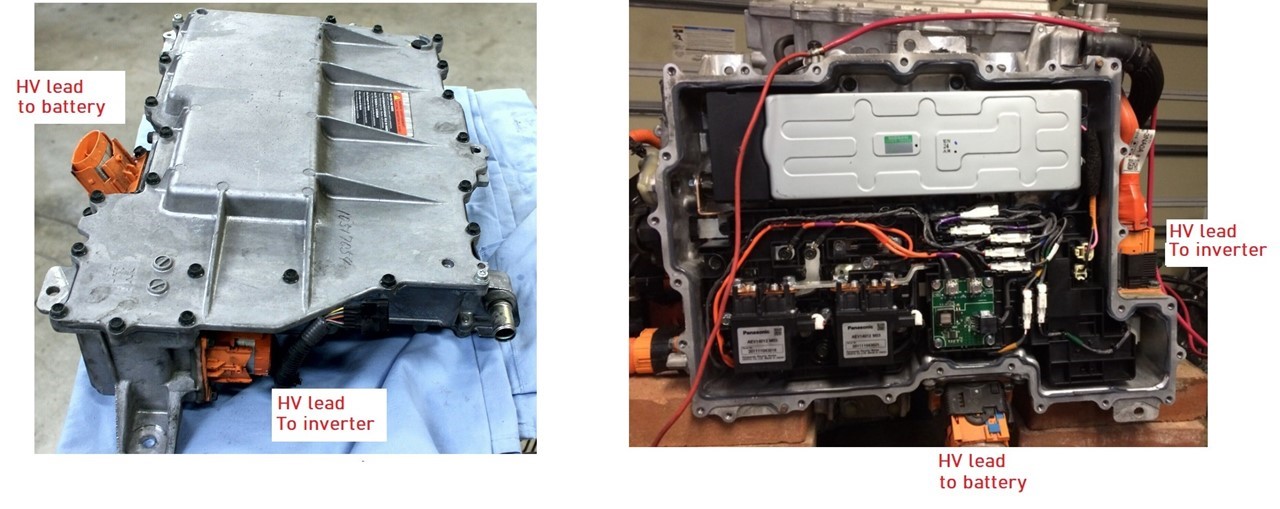
So this is the box and where the High Voltage comes in and goes out for battery and inverter
open


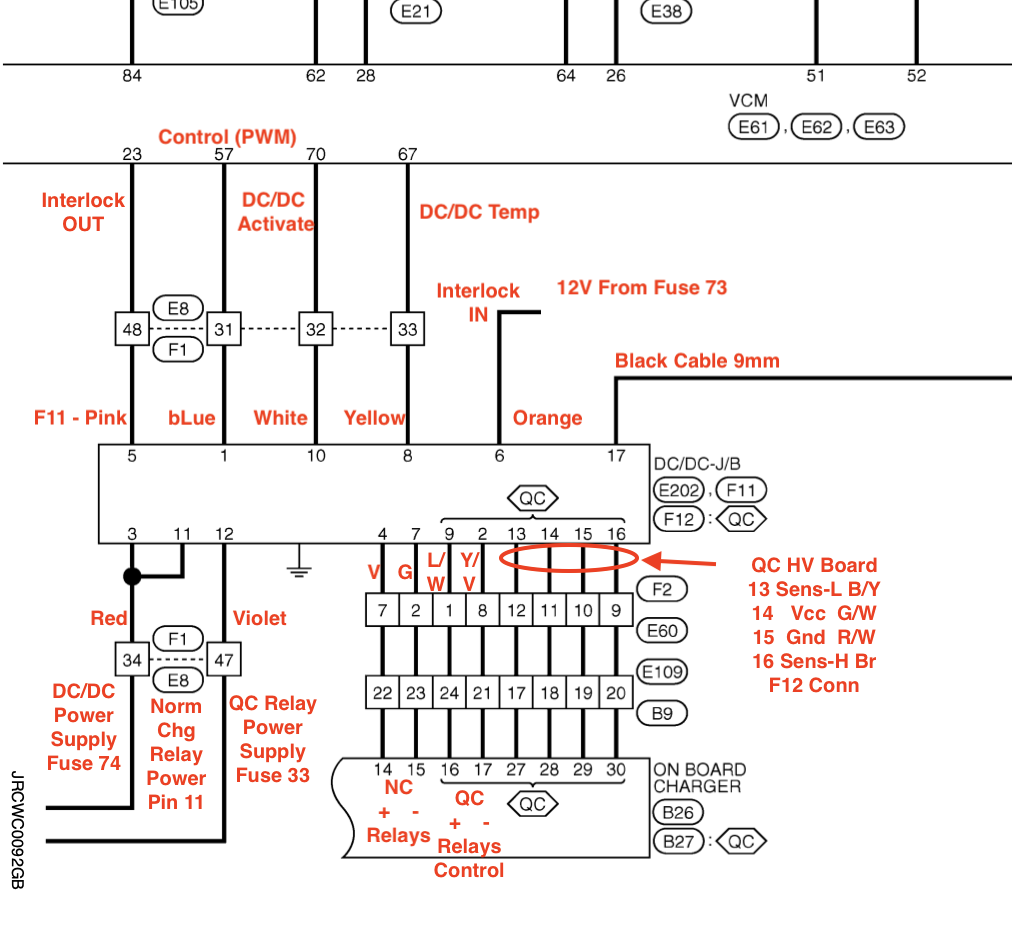
Based on the manuals, I was able to try and get idea of the control wires that go in to it.
0000627_blogimages.jpeg


So have two plugs that need to control
Were the manual was no that helpful as showed boxes with no info in them
So I used above wire diagram to work out where they went
0000628_blogimages.jpeg


Starting with connection of the 12v lead back to battery
And then GND the case back to battery - terminal

Then referring to plugs F11 & F12
Terminal #3 #11 would need +12v for Battery power supply
And then I was guessing that I would power up the #5 the high voltage cable interlock

But I tried this and did not get any voltage out of High Voltage to inverter ;-(

When you turn on the relays in the battery you hear them engage (with a click)
So so would expect some click also when turing on the DC to DC between the battery and inverter connection

So can any one confirm the wiring out of this box and how can connect it up please


13 Feb 2020 Update:
Pin #1 needs a PWM signal to it
Seem with that and +12 connected to pin #3 you can control the voltage that you 12v battery gets charged at
(Not sure how to make this PWM signal yet, any one have knowledge about creating the signal)

In video he talks about charging voltage
https://youtu.be/ipEzK1yzxHY?t=6723

He says
Min Voltage was 13.04 volts
Max was 15 volts

20% duty cycle is 15v
50% duty cycle is 14v

I think I recall it ranges up to 80% the higher the duty cycle goes the lower the voltage out put will be

So you might want to put some limits on your code
To go from 20% to 80% max

----------------------------------------------------------------------------------
15 Feb 2020 Update:
Worked out that HV battery to HV battery is not switch in junction box as thought
Just was not measuring incorrectly, as is a inter lock on the HV out (to inveter) so meant when tested I was reading zero volts

----------------------------------------------------------------------------------
16 Feb 2020
Managed to get the charging of DC aux battery now
And have main wire info now for the box or leads
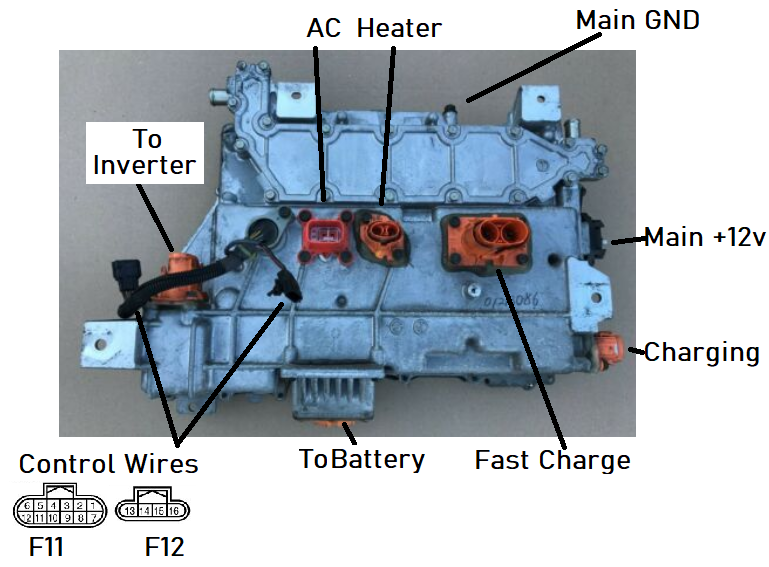
0000629_blogimages.png

If you get #1 live
Then it starts charging,
Not sure the PWM signal needed as when it was liven up started to charge
May have a default, and the PWM can set the desired value


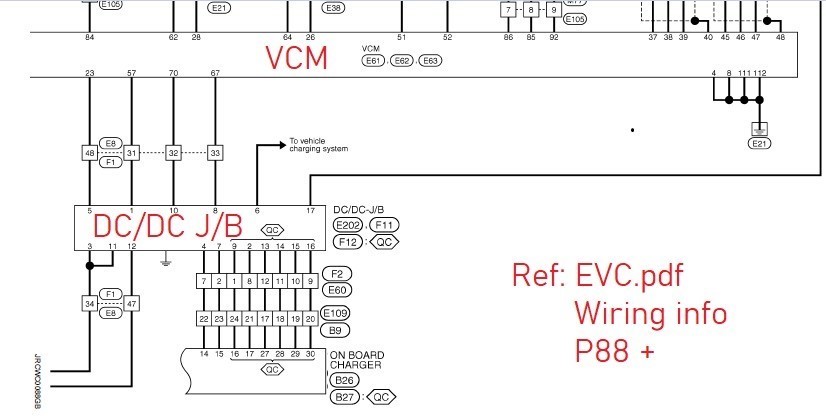
Thanks to Kenny, who pointed out a diagram in the EVC.pdf manual
It shows more of the wiring at high level and can see how its wired up now
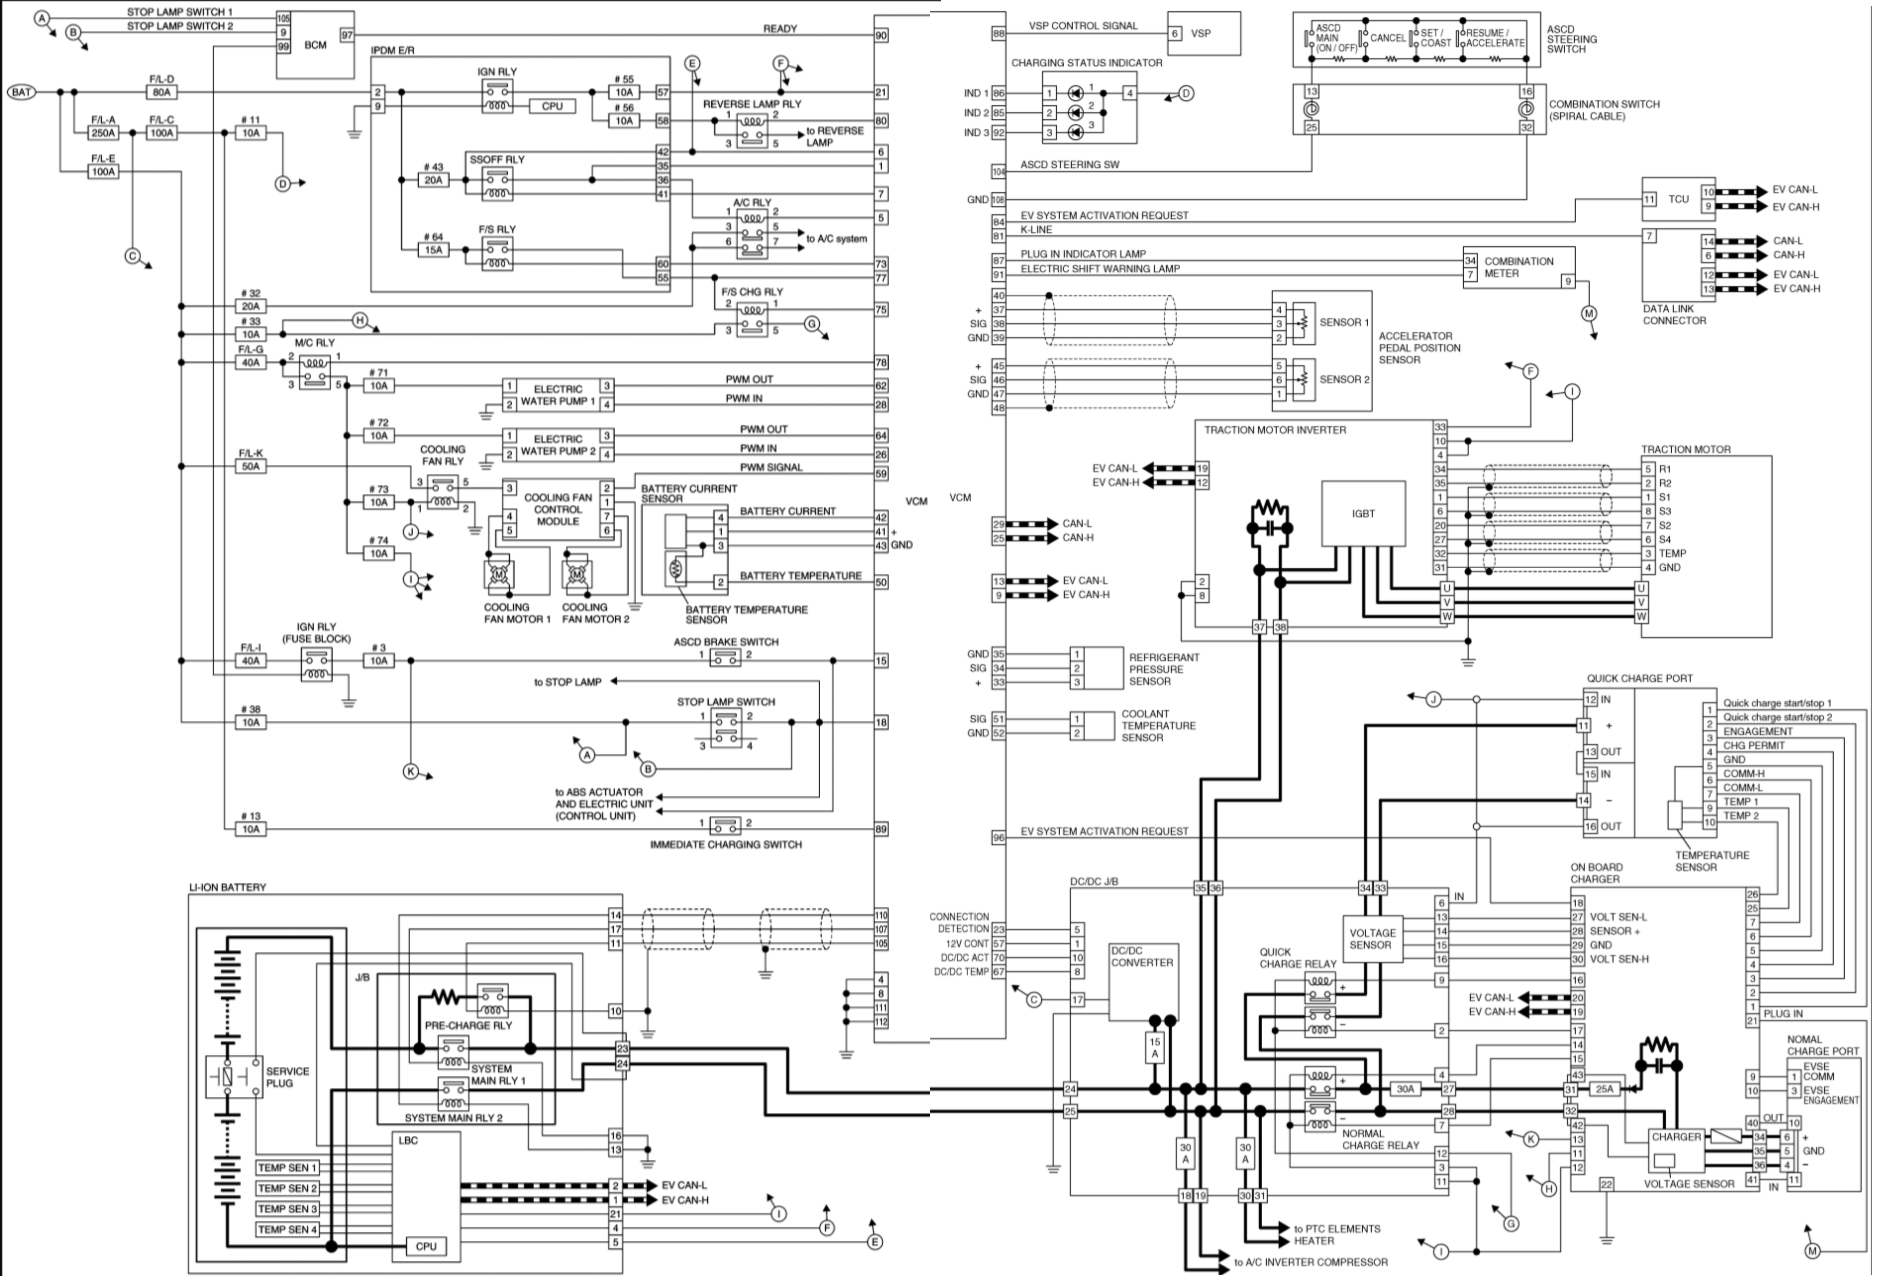
HTFAvxY.png


------------------------------------------------------------------------------------
31 March 2020
More info on what connect to it, this is info on the onBoard charger that links to it also.
http://myimiev.com/forum/viewtopic.php?f=23&t=4579
-------------------------------------------------------------------------------------
 
Been testing more, and found that is not any relay in for HV leads
Just need to make sure the HV interlock connected else no Volts out.
Not sure how that works though as seem to be able to get HV out with out any power to DC/DC box
 
This guy show the control the the DC charging of 12v battery using UNO
https://www.youtube.com/watch?v=NJq6gt5YG_E
 
This is another great video to watch on DC/DC talks about control of voltage to AUX battery (+12 car battery)
https://youtu.be/ipEzK1yzxHY?t=6424
 
i have an On Board Chargger that i traced the circuit boards, but don't have a DCDC junction box. That is a good finding about needing to vary the duty cycle of the square wave oscillator to control the LV output. i was thinking an arduino board such as UNO could be used to easily do this, or an analog op amp oscillator circuit with PWM.

tqkRdl3.png


When i was driving a Laef i noticed that the aux battery wasn't being charged properly by the DCDC, it was running at 13.0 most of the time. Except when you turned on the wipers, then it went up to 14.4 V.

Here is a top level diagram of the VCM for 2011 if it might help

HTFAvxY.png
 
@kiev where is the diagram from please.
Did you know the work shop manual pdf name and page number?

I want to work out the charging next also.
Have the onboard unit and wiring and want to see if can charge it up
 
That was in the 2011 EVC manual, pages 25-26. i didn't make one for 2012, but i found the manuals at this web site

https://carmanuals2.com/brand/nissan/leaf-2012-372
 
@Kenny thanks,
Found in the manuals

Also found
about page 40 is "LI-ION BATTERY CHARGE CONTROL : Normal Charge Control"
and about page 42 is "LI-ION BATTERY CHARGE CONTROL : Quick Charge Control"

They show images of wires and data flow for charging it on board charger and the fast charger.
So will have to look at these manuals and see what need and work out how to power up charger.

I did manager to get AUX charging, but not work out controlling it with UNO yet.
 
In video he talks about charging voltage
https://youtu.be/ipEzK1yzxHY?t=6723

He says
Min Voltage was 13.04 volts
Max was 15 volts

20% duty cycle is 15v
50% duty cycle is 14v

I think I recall it ranges up to 80% the higher the duty cycle goes the lower the voltage out put will be

So you might want to put some limits on your PWM
To go from 20% to 80% max, or just set to 50% to stay at 13v
 
TrueSoln said:
This is the Power Delivery Module (PDM)
aka the DC-DC Converter/Junction box on Nissan Leaf Gen1
Part #EM57

Trying to work out how the DC/DC junction box (converter) works
So can use in own EV project
As it has the High voltage to 12v to keep the car battery side alive when in use
Plus the switching links for the HV in from battery and HV out to battery.
And quick charge and slow change links all in it.

So this is the box and where the High Voltage comes in and goes out for battery and inverter
0000630_blogimages.jpeg


Based on the manuals, I was able to try and get idea of the control wires that go in to it.
0000627_blogimages.jpeg


So have two plugs that need to control
Were the manual was no that helpful as showed boxes with no info in them
So I used above wire diagram to work out where they went
0000628_blogimages.jpeg


Starting with connection of the 12v lead back to battery
And then GND the case back to battery - terminal

Then referring to plugs F11 & F12
Terminal #3 #11 would need +12v for Battery power supply
And then I was guessing that I would power up the #5 the high voltage cable interlock

But I tried this and did not get any voltage out of High Voltage to inverter ;-(

When you turn on the relays in the battery you hear them engage (with a click)
So so would expect some click also when turing on the DC to DC between the battery and inverter connection

So can any one confirm the wiring out of this box and how can connect it up please


13 Feb 2020 Update:
Pin #1 needs a PWM signal to it
Seem with that and +12 connected to pin #3 you can control the voltage that you 12v battery gets charged at
(Not sure how to make this PWM signal yet, any one have knowledge about creating the signal)

In video he talks about charging voltage
https://youtu.be/ipEzK1yzxHY?t=6723

He says
Min Voltage was 13.04 volts
Max was 15 volts

20% duty cycle is 15v
50% duty cycle is 14v

I think I recall it ranges up to 80% the higher the duty cycle goes the lower the voltage out put will be

So you might want to put some limits on your code
To go from 20% to 80% max

----------------------------------------------------------------------------------
15 Feb 2020 Update:
Worked out that HV battery to HV battery is not switch in junction box as thought
Just was not measuring incorrectly, as is a inter lock on the HV out (to inveter) so meant when tested I was reading zero volts

----------------------------------------------------------------------------------
16 Feb 2020
Managed to get the charging of DC aux battery now
And have main wire info now for the box or leads
0000629_blogimages.png

If you get #1 live
Then it starts charging,
Not sure the PWM signal needed as when it was liven up started to charge
May have a default, and the PWM can set the desired value


Thanks to Kenny, who pointed out a diagram in the EVC.pdf manual
It shows more of the wiring at high level and can see how its wired up now
HTFAvxY.png

19 Feb 2020
Uploaded video of getting it to charge.
watch
 
TrueSoln said:
...

20% duty cycle is 15v
50% duty cycle is 14v

I think I recall it ranges up to 80% the higher the duty cycle goes the lower the voltage out put will be

So you might want to put some limits on your PWM
To go from 20% to 80% max, or just set to 50% to stay at 13v

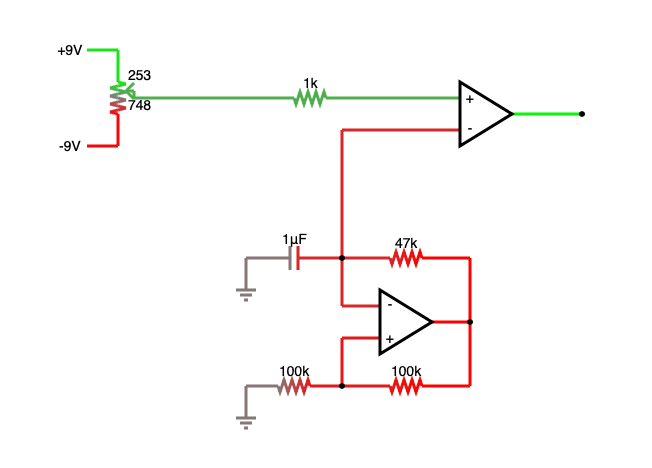
In the schematic of post #5, The potentiometer on the input of the op amp can be used to adjust the duty cycle or pulse width. If a fixed voltage is desired, then the pot can be replaced with two resistors to set it to a fixed value.
 
@kiev you might like this : http://myimiev.com/forum/viewtopic.php?f=23&t=4579
I start new thread with details of onBoard charger in Gen1
I altered the diagram to make little easier to follow and added on plug info so can find them

At moment working on trying to get the standard charger to work
 
i opened up a Gen 1 DC/DC Junction box and have some findings to report.

It is a dumb and simple box with no CAN buss service--basically 4 big ass Panasonic relays, a Panasonic High Voltage isolation board to measure the voltage during Chademo Quick Charge, a Denso DC/DC converter to charge the 12V starter battery, and a HV connector Interlock string that will inhibit the vehicle systems unless all six of the HV connectors are inserted into their respective positions, and 4 fuses. It's a heavy unit weighing 39.8 lbs with the PTC, A/C, Inverter, DCQC, and Pack harness cables connected.

The DC/DC converter unit is like a separate box inside the box, and it will be somewhat difficult to reverse engineer because the reference designators are missing on some of the circuit boards.

The interlock system is powered by the M/C relay activation thru fuse #73 that supplies 12V to pin 6 of J12; it can be bypassed using a jumper between pin 6 and pin 5 of the J12, i.e. using a jumper inside the box from the Inverter (Green taped pair) Light Green wire socket to the Pink wire socket of the PTC Heater (Violet taped pair).


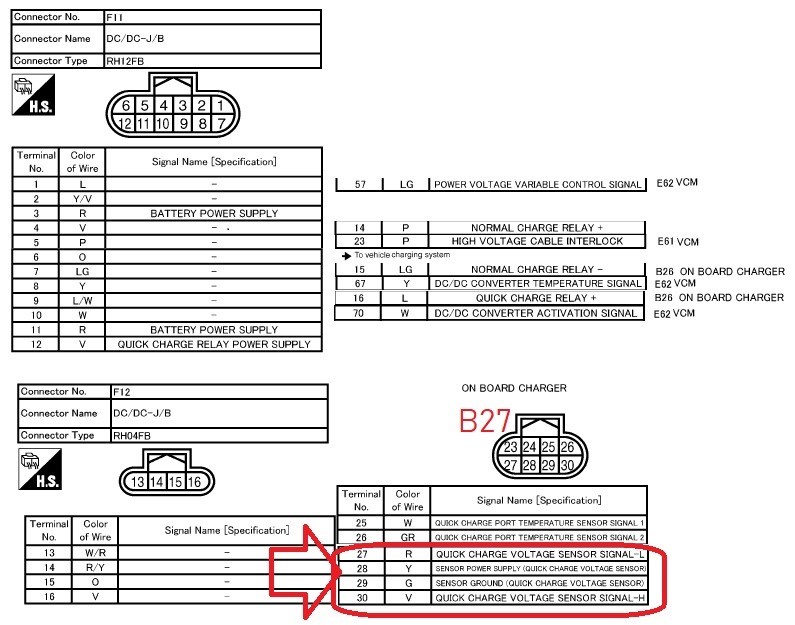
Wiring colors for J11 and J12
Jp690rN.png
 
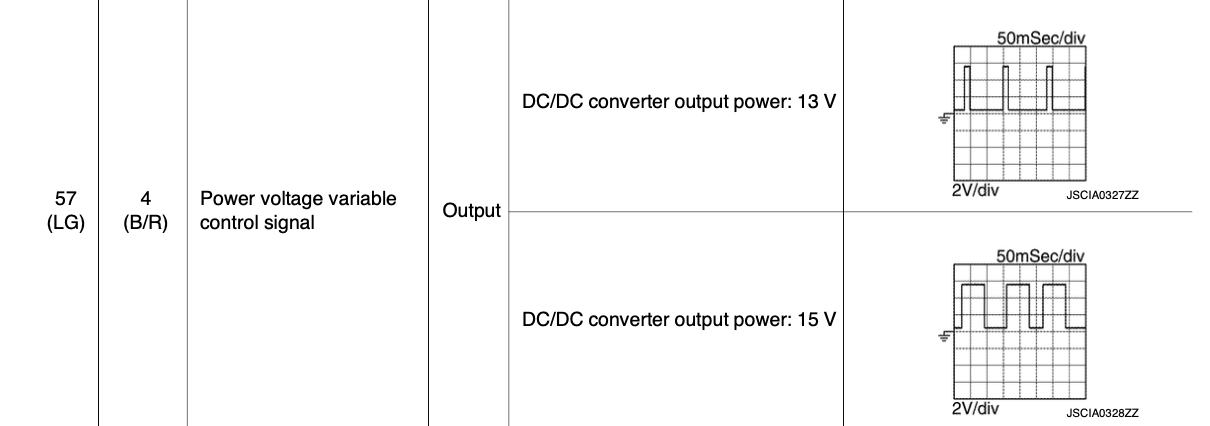
The PWM frequency is 8 Hz, and the duty cycle for 13V (13.5%) and 15V (55%) is shown here from the FSM. But nearly all the reports from diy folks using the DCDC in projects indicate an opposite trend, in that higher duty cycle reduces the output voltage...? Is the FSM in error.

SWAnOnv.png
 
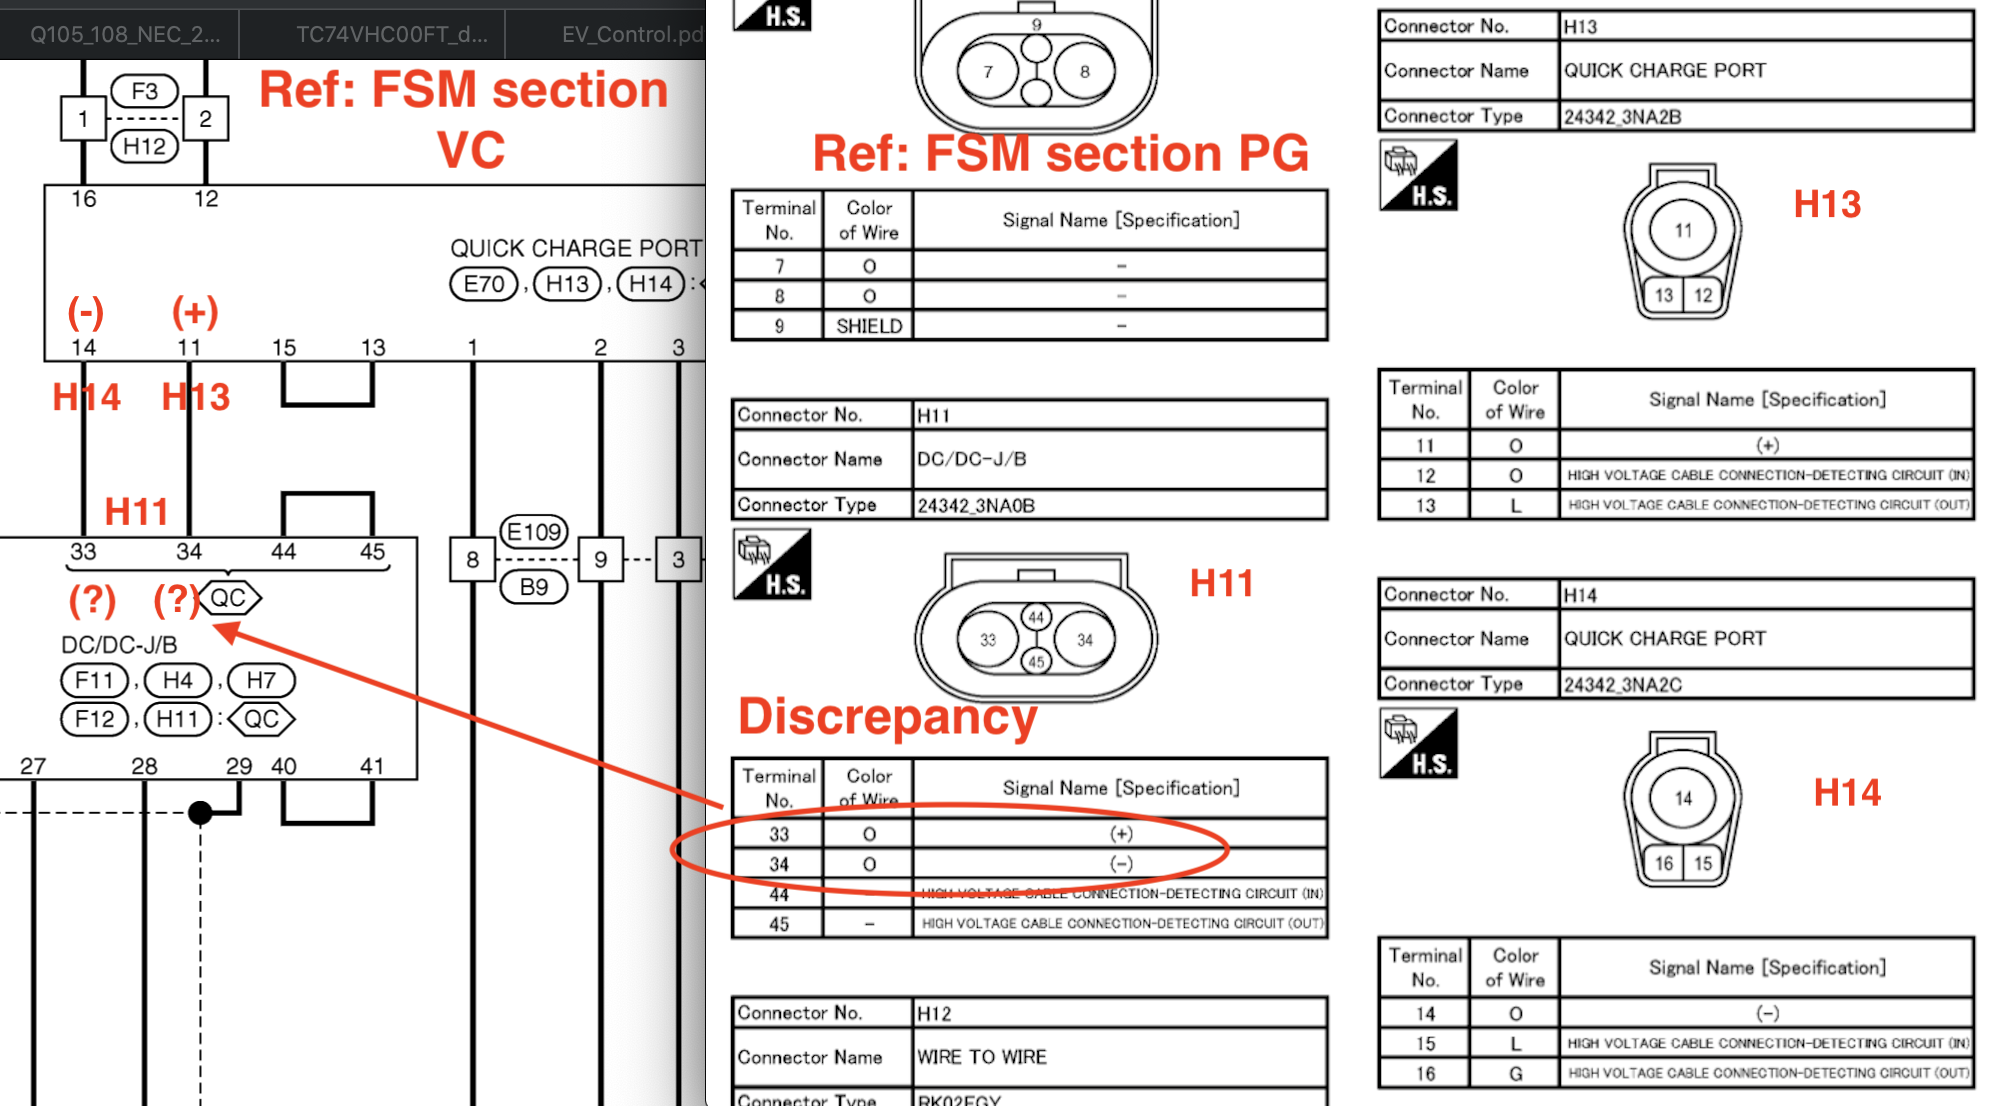
i found an error in the POWER SUPPLY, GROUND & CIRCUIT ELEMENTS, aka PG section of the FSM for the High Voltage connector polarity for the Quick Charge harness into the DCDC Junction Box. This may be why Jim H. burned up his first DCDC when doing bench testing (reversed the polarity) mentioned in his video in post #1.

Comparing with the Vehicle Charging Section, VCS of FSM shows the error:
2Cc6ZIC.png


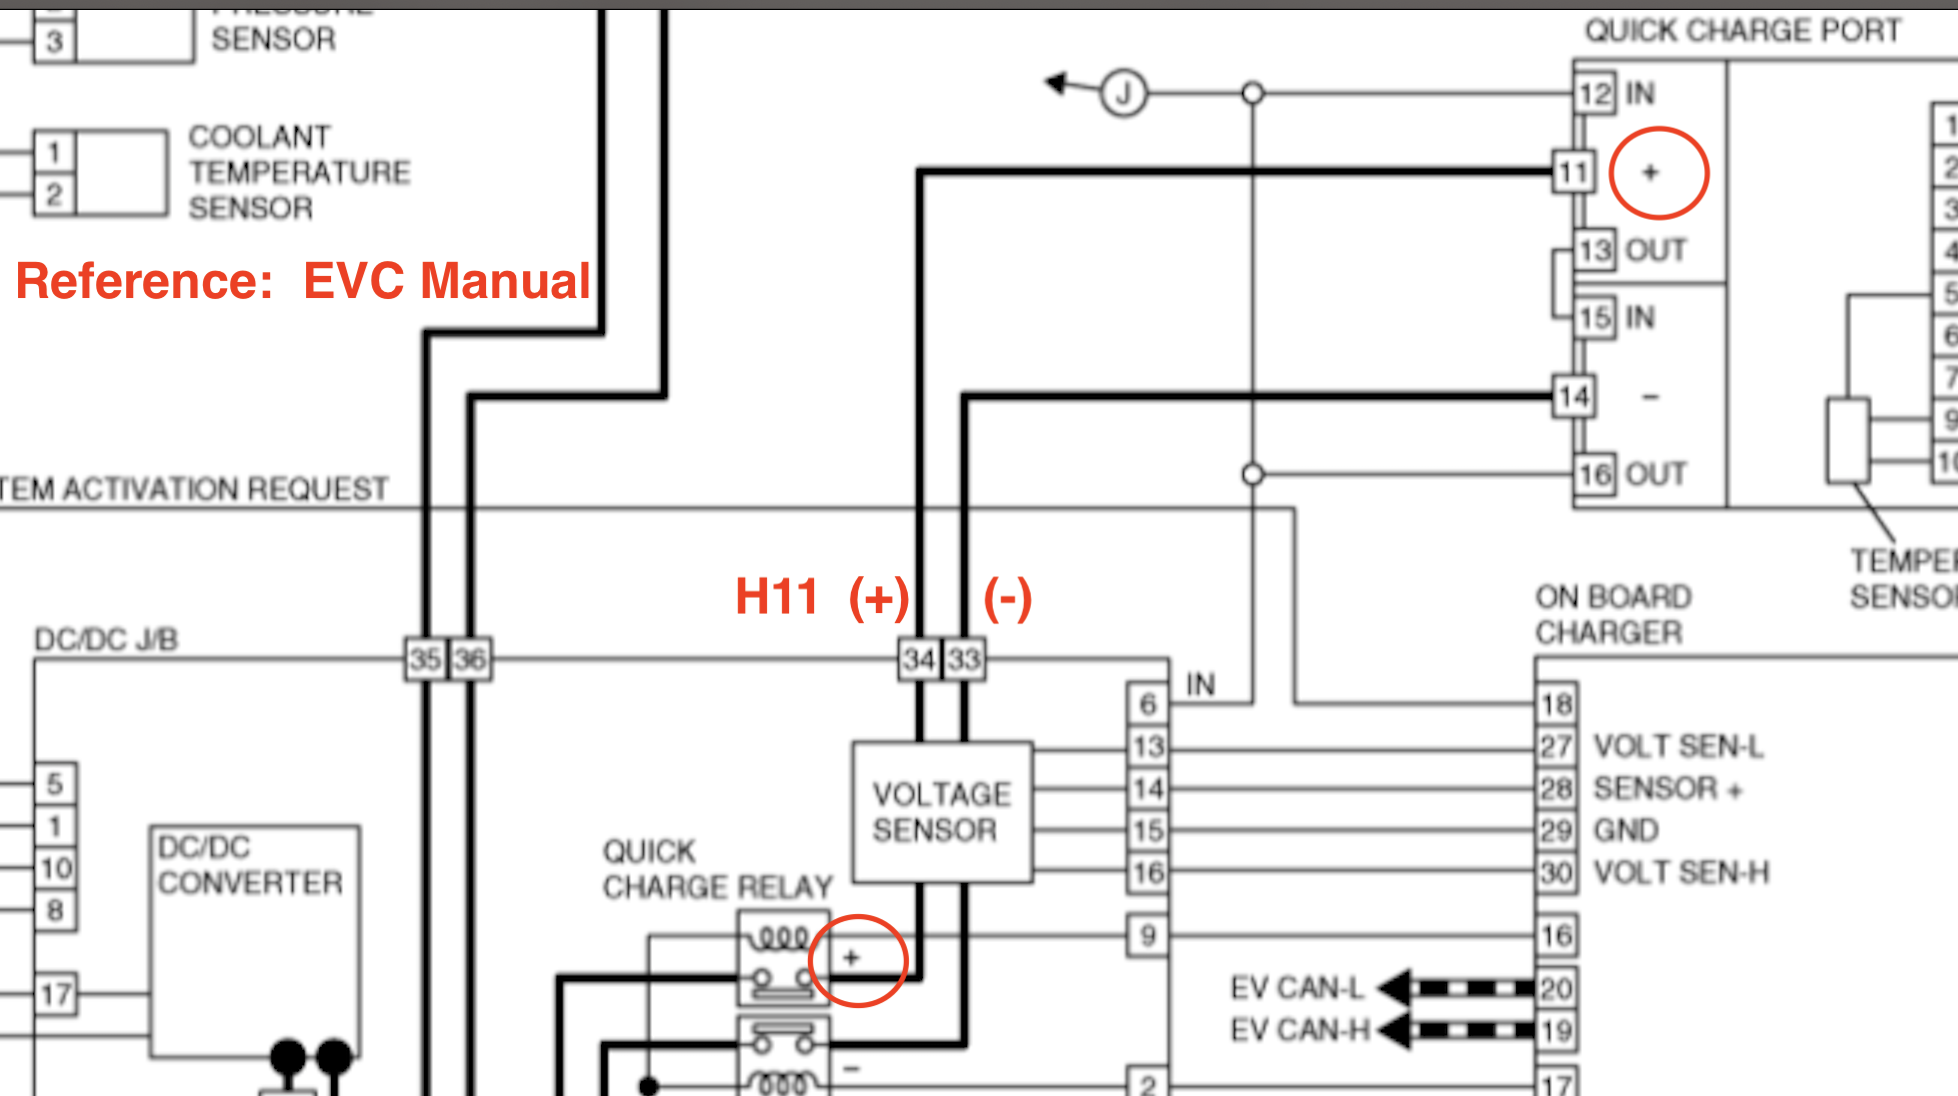
Another wiring diagram in the EVC section but with the correct polarity:
F6qmRMj.png
 
kiev said:
i found an error in the POWER SUPPLY, GROUND & CIRCUIT ELEMENTS, aka PG section of the FSM for the High Voltage connector polarity for the Quick Charge harness into the DCDC Junction Box. This may be why Jim H. burned up his first DCDC when doing bench testing (reversed the polarity) mentioned in his video in post #1.

Comparing with the Vehicle Charging Section, VCS of FSM shows the error:
2Cc6ZIC.png


Another wiring diagram in the EVC section but with the correct polarity:
F6qmRMj.png

I'm sorry to thread hijack but it sounds like you may know the answer to my question. I have installed an auxiliary 12V battery inside the vehicle with a dedicated 12V battery charger to isolated the car's 12v battery from the auxiliary 12v battery. There is an input terminal on the new auxiliary battery charger. I would like to tap into a pin somewhere on the vehicle that represents the on-status for the Leaf's DCDC charger. Basically, I only want the auxiliary battery charger on when the DCDC charger is on. Would you know where the easiest pin/wire to tap into would be that signals the status of the DCDC charger? Thanks and sorry for the bother.
 
Howdy Biscuits and welcome to the forum, you didn't say which model year you are driving but my research is from the 2011-2012 units

Here are some observation, questions, suggestions...

1. In my 2012 i found that the 12V wasn't being charged fully, so i disconnected the current sensor at the Negative terminal of the battery. That seemed to cause the DCDC to operate more often and keep the 12V charged better. i didn't monitor the charge current or the voltage level other than to verify that it went up to 14.1-14.4 at the accessory outlet in the car. i never noticed any negative effects such as overcharging, leaking acid, etc Most trips were about 30 minutes duration but even an hour would likely do no harm.

2. As you may already know, another trick to engage the DCDC is to operate the wipers. This turns it On immediately and the output voltage is about 14.1-14.4

3. Some folks would be worried about a lead acid battery in the passenger compartment, fumes during charging and acid leak in event of accident, etc.

4. There is a DCDC Activation signal from the VCM that would indicate when the car has decided to turn On to charge the 12V system. So that wire would be a good trigger signal. Pin 70 on VCM goes to pin 10 of HV DC junction box.
 
kiev said:
Howdy Biscuits and welcome to the forum, you didn't say which model year you are driving but my research is from the 2011-2012 units

Here are some observation, questions, suggestions...

1. In my 2012 i found that the 12V wasn't being charged fully, so i disconnected the current sensor at the Negative terminal of the battery. That seemed to cause the DCDC to operate more often and keep the 12V charged better. i didn't monitor the charge current or the voltage level other than to verify that it went up to 14.1-14.4 at the accessory outlet in the car. i never noticed any negative effects such as overcharging, leaking acid, etc Most trips were about 30 minutes duration but even an hour would likely do no harm.

2. As you may already know, another trick to engage the DCDC is to operate the wipers. This turns it On immediately and the output voltage is about 14.1-14.4

3. Some folks would be worried about a lead acid battery in the passenger compartment, fumes during charging and acid leak in event of accident, etc.

4. There is a DCDC Activation signal from the VCM that would indicate when the car has decided to turn On to charge the 12V system. So that wire would be a good trigger signal. Pin 70 on VCM goes to pin 10 of HV DC junction box.

Ah, I'm driving a 2017 which I believe is the same model year.

#2 I did not know that the wipers kick on the DCDC. That's a clever trick!

#3 The final install will be sealed AGM batteries that shouldn't leak. I will secure them well enough so that in the event of an accident in which they come loose, I will already be dead.

#4. I think this is just the information I'm looking for! Do you know what document I'm looking for to verify the pin is the same for the 2017?
 
2017 uses a totally different system. No manual found for the 2017, but here is the 2015 which also uses the PDM instead of the DCDC junction box.

See the EVC manual page 58-59 for details, it is controlled by the CAN buss signal from the VCM. You will need to contact Dala the Great for help with this.

2015 EVC
 
Back
Top