DC Quick Charge Road Trip!

Mitsubishi i-MiEV Forum

Help Support Mitsubishi i-MiEV Forum:

This site may earn a commission from merchant affiliate links, including eBay, Amazon, and others.

RobertC

Well-known member
Joined
Jul 27, 2012
Messages
292
Location
Winter Garden, FL
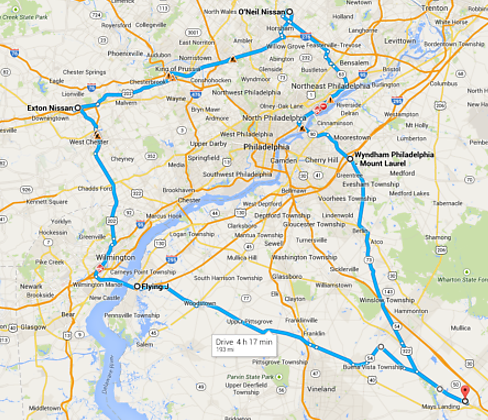
I thought it would be informative to start a new topic to document DC quick charge road trips, so here is my road trip today.

Total Distance: 190.6 miles
Total Time: 6 hours 2 minutes
Total DC Quick Charge Time: 58 minutes 43 seconds
Total kWh Charged: 28.5kWh
Number of Quick Charges: 4
Total Cost: $12

Google Map
6uFXyTt.png


DC Quick Charge Details:
Stop #: Location; City; Charging Network; Time; kWh; Percent Charged; Cost
Stop 1: Flying J Truck Stop; Carney's Point, NJ; Blink; 16m20s; 8.2kWh; 28-80%; $5
Stop 2: Exton Nissan; Exton, PA; ChargePoint; 15m55s; 6.9kWh; 38-81.5%; $0
Stop 3: O'Neil Nissan; Warminster, PA; ChargePoint; 14m0s; 7.1kWh; 35-80%; $0
Stop 4: Wyndham Hotel; Mt. Laurel, NJ; Greenlots; 12m28s; 6.3kWh; 40-80%; $7

Pretty good for a car with a published range of 62 miles.
From where I live in New Jersey, the distance to the following cities is:
Philadelphia: 50 miles
New York City: 120 miles
Baltimore: 127 miles
Washington DC: 163 miles
To make these road trips possible, I would need DC quick chargers every 30 miles or so.
 
Nice ... thanks for documenting these, since I am within driving distance of Exton, and we make that trip in a gas car regularly. Once we did it in the iMiev, but had to wait 2 hours to get a 50% charge on L2. To do that in 15 minutes would hardly be a hardship over the gas car.

Not being a Leaf, did the Nissan dealerships require you to call ahead or grovel ;) in any way to use them? I know in the past for L2 they've just said, "It's open 24/7, just come by and use it".
 
Yesterday I did a road trip, 465.5 km round trip (289.25 miles), from Burnaby, BC to Seattle and back.

The trip included 10 DC quick charge sessions and 1 Level 2 charge.

Two of the quick charge sessions were top-ups from 80% to 95%, in order to make sure I had enough range to handle the longest stretch of the trip, between Burlington, WA and Everett, WA (about 69 km). I used 13 bars on this leg each time. I might have made it with only 80%--I would have been down to one or zero bars if I would have attempted this--but I did not want to risk it on such a long day trip with my son in the car.

Total charging cost: $33 USD.
- $20 monthly charge for unlimited Aerovironment charges (I had 5 sessions on the AV DCQC chargers, which are $7/session without the monthly subscription).
- $9 on the Chargepoint unit at Magic Nissan in Everett, WA (3x$3/session)
- $4 for four hours of charging at a Blink Level 2 charger in Seattle.

Observations:
- I didn't mind the frequency of the stops, it was good to get out of the car, and the 20 minutes at each stop flew by with bathroom breaks, food purchases, and my son's trumpet practice next to the freeway in Burlington. But the time added up and it was a very very long day overall, with heavy traffic between Everett and Seattle each way.
- Since I was stopping so frequently to charge and I had to stop in certain places, I was unwilling to stop anywhere else, even though I would have liked to have done some shopping at places without chargers.
- Cell phone was crucial. The AV charger in Burlington was giving me error messages (and the Miev's "high voltage component" light illuminated each time there was an error). After 4 attempts, I called AV. A rep there remotely reset the charger, and it worked smoothly after that. Next time I won't try 4 times before calling, I'll call right away.
- If one DCQC unit is down or has a major problem, the whole trip would have been impossible. For example, if the AV CSR had not been able to resolve the error in Burlington, we would have been stuck at the Level 2 charger there for several hours and would not have been able to make it to Seattle and back in a day. The possibility that a charger might be down makes the road trips stressful.
- I stopped at DCQC units 8 times, but I only had to wait one time for another car to finish a charge (a 5-minute wait). I felt lucky that there were no lineups at the chargers.
- When I was paying attention, I limited my speed to 100km/hour. During leg 7 (see below, I was not paying attention to speed and went along with the flow of traffic at 115 km/hr for about 10-15 minutes. I noticed my RR decreasing much more rapidly at this higher speed.
- On the charges that stopped at 80%, I noticed when I turned on the car it usually showed 14 bars, but as soon as I started driving it went down to 13 bars.

Data (sorry these are incomplete, I don't have data for AV chargers):
Leg 1: home to Surrey Museum, 36 km, charged for free up to 80%, 4.3 kWh in 13 minutes.
Leg 2: Surrey Museum to Sehome Village in Bellingham, WA, 51.1 km, charged up to 80%.
Leg 3: Sehome Village to Burlington Outlet Mall, 38.7 km, charged up to 80%, then a second session up to 95%.
Leg 4: Burlington to Magic Nissan in Everett, 68.7 km, down to 3 bars by the end. Charged up to 80% for $3, 8.4 kWh in 17 minutes.
Leg 5: Magic Nissan to Safeco Field, Seattle, 39.2 km, went from 13 bars to 8 bars, charged up to 100% for 3+ hours at Level 2, $4.
Leg 6: Safeco Field back to Magic Nissan, stop and go crawling traffic, only down to 12 bars by the time I arrived, but still felt like I needed more than 80% to be sure of making it to Burlington on next leg, two DCQC sessions, $6, first one up to 80%, 2 kWh in 6 minutes; second one up to 96%, 1.7 kWh in 12 minutes.
Leg 7: Magic Nissan to Burlington, down to 3 bars by the time I arrived, charged up to 80%.
Leg 8: Burlington to Sehome Village in Bellingham, charged up to 80%.
Leg 9: Sehome to Surrey Museum, charged up to 80%, 7.6 kWh in 16 minutes.
Leg 10: Surrey Museum to home.

I welcome your feedback.
 
Well we don't yet have a DCQC network here in the montreal area but I thought it might be worth mentioning for those people with canion that sending cold air to the battery via the floor vent while underway may a good idea to help keep those battery temps down with multiple QC.

It seems the with the AC on you can reduce the battery temp about 2 deg c in 15 minutes or so.

Once the temp is down keeping some AC air flow to the battery will keep it from climbing or slow the climb in temp until you get to the next QC.

Maybe a good idea for everyone but with canion you have the temp feedback to see the effect.


Don.....
 
danpatgal said:
Nice ... thanks for documenting these, since I am within driving distance of Exton, and we make that trip in a gas car regularly. Once we did it in the iMiev, but had to wait 2 hours to get a 50% charge on L2. To do that in 15 minutes would hardly be a hardship over the gas car.

Not being a Leaf, did the Nissan dealerships require you to call ahead or grovel ;) in any way to use them? I know in the past for L2 they've just said, "It's open 24/7, just come by and use it".
I had to ask where the DC quick charger was at Exton because I did not see it a first and they were very friendly. Just as I pulled up to the charger a vehicle was being moved that was blocking access. I ended up talking to a customer the whole time I was charging who had lots of questions. I would be wary of planning to charge there after hours. Since the charger cord is so short you won't be able to charge if the parking spaces are blocked. I posted a picture of my i-MiEV charging on PlugShare. The business hours are also listed there.
 
burnabyimiev said:
Yesterday I did a road trip, 465.5 km round trip (289.25 miles), from Burnaby, BC to Seattle and back.
Nice trip! The DC quick chargers definitely increase the range of the i-MiEV.

burnabyimiev said:
- If one DCQC unit is down or has a major problem, the whole trip would have been impossible. For example, if the AV CSR had not been able to resolve the error in Burlington, we would have been stuck at the Level 2 charger there for several hours and would not have been able to make it to Seattle and back in a day. The possibility that a charger might be down makes the road trips stressful.
On my trip, I did check the phone apps for the three networks that I used, Blink, ChargePoint, and Greenlots, and all DC quick chargers were listed as available. I would have had to find a nearby Level 2 charger if one of the quick chargers was down and it would have really slowed down the trip.

burnabyimiev said:
- On the charges that stopped at 80%, I noticed when I turned on the car it usually showed 14 bars, but as soon as I started driving it went down to 13 bars.
On my trip, both the Blink and Greenlots chargers stopped at 80%. The Nissan ChargePoint chargers (that were free) kept charging past 80%.

burnabyimiev said:
- When I was paying attention, I limited my speed to 100km/hour. During leg 7 (see below, I was not paying attention to speed and went along with the flow of traffic at 115 km/hr for about 10-15 minutes. I noticed my RR decreasing much more rapidly at this higher speed.
Since I knew I had more than enough charge to make it to the next DC quick charger, I tried to maintain the speed limit. However, my phone navigation app chirps when I go more than 10mph over the speed limit and it went off several times.
 
Don, today I looked up all the threads about adjusting the vent flow to send air to the battery pack and have to say that I'm nervous about trying to attempt that modification myself--I would have liked to have kept the battery cooler during my 10 QC day (and it was 80+ F outside that day), but I'm not that handy and am scared to make a mistake that would damage my new 20K car.

JB
 
This was first mentioned by siai47 and is described somewhere in the forum but here goes an explanation

If you remove the plastic just to the right of the acc pedal where the USB connector goes in if you have one. You can see an actuator that moves the flap to direct air to the battery. Remove one screw and you and move the lever to take it off the servo. Then you can flip it by hand while driving.

To help you locate this. Turn on the heat and reach down from the drivers seat with your right hand and find the hot pipe. The servo actuator is just right and above that area. But you have to pull the plastic off a little to access it and be a contortionist to get a screw driver on the screw.

It's reversible also just in case. But take care that when you quick charge you should flip the lever manually or re connect it.

Don.....
 
The info can be found here--- http://myimiev.com/forum/viewtopic.php?f=14&t=1515 . There are some pictures of the actuator and what the control lever looks like. Once you remove the wire connector from the actuator and the two screws you are all set. The control lever can be left in the "cool the pack" position all summer if you want. Just set your dash airflow selector 1/2 way between "face" and "floor" and make sure when the blower is running that the lever is set so that no air comes out of the floor vent and then you know that cold air is going into the pack. When you QC, there is no need to re-adjust the lever as the lever would be in this position anyway. In the winter, I just reached down and put the lever in the opposite position if I wanted floor heat. The actuator has been sitting on a shelf for the last year. This mod honestly works really, really well---you will see the temperature drop on the CANION very quickly. Seeing how all new cars come standard with QC everyone can keep their packs happy in the heat.
 
This mod is also nice in the winter for the opposite. On our coldest day last winter (-10F), I needed to do a 60-mile round trip with only level 1 opportunity charging 10 miles into my trip, and 10 miles from the end. I was able to pull my car into the heated shop of our office and plug in. I removed the servo and flipped the lever, forcing air into the sub-zero battery pack. Since the car was charging, I left the key in the ON position with the fan running full speed (not max), just pulling air from the shop and into the battery. I also left the front doors open a little to bring the interior up to temperature. I don't recall the exact temperatures, but the battery came up from around 0 F to 65 F in about an hour and a half. It was nice having my regen back, plus about an additional 8 miles just from a warmer pack. The problem, though, is since I have to continuously bring in fresh air to prevent my windshield from frosting, the car quickly got cold.
 
Thanks to Don, siai47, and PV1--I will give it a try. I don't have USB on my base model but I see where the USB connector would be. I wish I had got around to doing this before attempting 10 quick charges in one day...but the car seems fine and did fine all day long.

Did I get close to the record for most miles in one day with 289? I also saw my highest RR ever, 144 km, after the Level 2 charge to 100% in the middle of the trip (after crawling on the freeway at 35 km/hr for an hour). I should have taken a picture of the dash, but didn't think of it at the time.
 
Robert: Jimminy Cricket! I live less than 1 mile from O'Neill Nissan in Warminster. Too bad that I didn't know you were stopping in there or I could have driven over and seen your I-MiEV. I have the white with EV blue decorative decal package(you have seen it on many different web pages, with the plug decal, etc). Hope that the O'Neill people treated you well. My car has no QC, but I have on a few occasions used their Level II units. I use 120V at home.

Lou
 
OldGeek said:
interesting mod, but I don't understand why it is needed. Can someone explain to the noob? (me)
Since high temperatures harm lithium ion batteries, we want to keep the pack cool during many quick charges like this, or on really hot days. The i-MiEV will actively cool the battery while quick charging, but does nothing during driving and regular charging. This mod allows the pack to continue cooling even while driving.

Also, some of us use the mod to heat the battery in the winter, as I explained a few posts up. Since I was able to park in a heated shop, I was able to just run the fan and force the already warm air into my freezing battery pack to heat it up for slightly better range and stronger regenerative brakes. Others on here have modified their i-MiEV with a combustion heater and pump warm air into the battery for the same reason. Lithium ion batteries like to be kept near room temperature (65-75 degrees F).
 
My post on the previous page has a link. The pictures are near the end of the post---read the entire thread and you will know everything you need to know about this.
 
Back
Top